
Are home-canned peaches good for you? YES! When you can peaches at home, you can control the amount of sugar in the canning syrup.
Canning peaches without sugar can also be done, but the color and consistency of the fruit may change. Keep in mind, sugar is used as a preservative.
When peaches come into season, it is usually not for very long. Our peaches will be “out” in less than 4 weeks from when they start.
For that reason, I get as many as possible to preserve for later. One of our favorite ways is to can peaches for pantry storage.
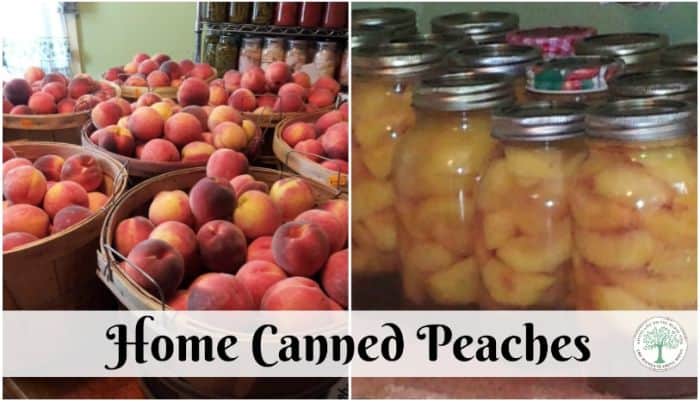
Canned Peaches Recipe
- You will need some fresh peaches. There are 3 main classes of peaches, cling, semi-freestone, and freestone. This refers to how hard the flesh clings to the pit. I try and use the freestone variety for canning since they are easier to pit and peel.
- Get your jars cleaned and into boiling water to sanitize. I use quarts mostly due to my family size, but you can use pints if you would like. This is also the time to get new lids and your bands ready.
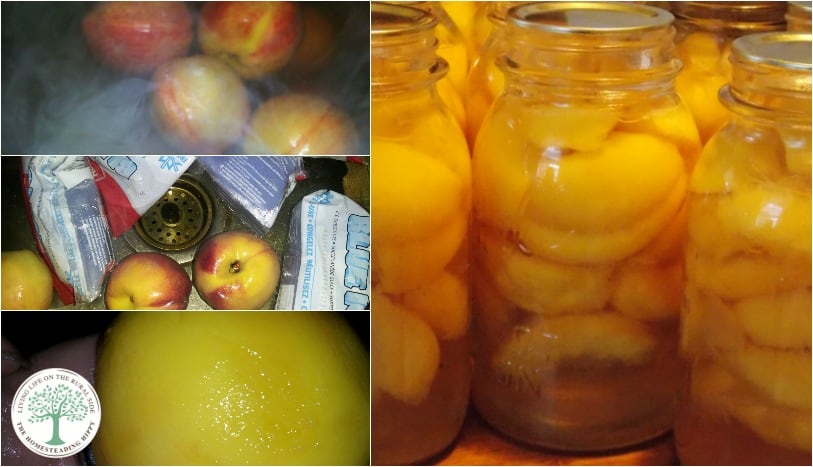
- Fill the sink with ice-cold water. Adding ice or ice packs will keep it cooler for longer. This will help you remove the peels.
- Put an 8-12 quart stock pot, filled with 2/3 of water onto boil. This will be for briefly cooking the peaches. Do not use your canning pot.
Preparing Your Syrup to Can Peaches With
- Light syrup 1:10, or 1 cup sugar to 10 cups water
- Medium syrup 3:10, o 3 cups sugar to 10 cups water
- Heavy or cloying syrup 1:2, or 5 cups sugar to 10 cups water
It is possible to can peaches without sugar, but the color and texture tend to be different when you use them. I use a light syrup for all my fruit canning.
Choose your syrup concentration, and bring the water and sugar to a simmer.
Allow to simmer until all the sugar is dissolved. You will want the syrup to stay at a simmer until you can peaches with it.
Do not allow it to boil over, however. Keep the heat on low once it’s simmering.
Canning the Peaches in a Water Bath Canner
- As the large pot of clear water is boiling, you will want to rinse off your peaches. Putting them in a colander is easiest.
- Place the whole peaches in the boiling water for 1 minute, then remove to the ice water bath.
- Allow to cool in the ice water bath for 1-2 minutes, and the skin should slip right off.
- Cut the peach in half and remove the pit. Save the skin and pits for jelly later.
- Slice the peaches in halves, or cut into quarters.
- In a clean, sanitized jar, place 1/4 cup of your syrup at the bottom of the jar.
- Fill the jar with peaches, then pour syrup over the top of the peaches.
- Use a rubber spatula to remove all air bubbles.
- Wipe the lid with a damp towel and add new lid and screw the band finger tight.
Process in boiling water bath for 25 minutes, beginning when the water returns to a full boil. Remove from the water bath and allow to cool in a nondrafty place for 12-24 hours.
Check the seals and refrigerate any that didn’t seal properly. Wipe the jars down with warm soapy water to remove any residue and use within a year.
Some great ways to enjoy your home-canned peaches are:
- top ice cream
- bake in a cobbler
- stir into homemade yogurt
- add to smoothies
- spoon over homemade granola
- enjoy straight out of the jar
Do you can peaches at home? What is your favorite way to enjoy them? Be sure to pin this for later!

Heather’s homesteading journey started in 2006, with baby steps: first, she got a few raised beds, some chickens, and rabbits. Over the years, she amassed a wealth of homesteading knowledge, knowledge that you can find in the articles of this blog.
Learn more about Heather and the rest of the writers on this page.
Yumm! This looks so good. A few years ago my mom and I canned full cling peaches, and it was horrible trying to remove the pits! I haven’t canned peaches since but I need to because they are delicious.