
Stevia is an herb grown for its sweet, sweet flavor without the calories of sugar. Chewing on a stevia leaf will release a flavor that can be 30 to 40 times the sweetness of white sugar.
Extract of this plant is often used in place of sugar, especially in low calorie or diabetic recipes. Leaves of the stevia plant can be used as an extract, dried, fresh, or even ground to a powder to sweeten everything from desserts to drinks.
Tropically, this herb is grown as a perennial, but in cooler climates, it must be grown as an annual.
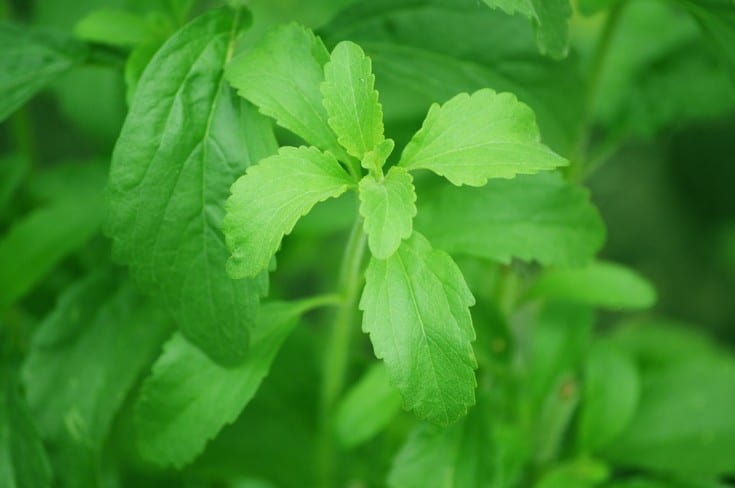
Table of Contents
The Trouble with Stevia Derivatives
There is a derivative of stevia that is often used as sugar substitutes, commercial drink mixes, and other processed foods. On labels it might be listed as Reb A, Rebiana, or Rebaudioside A.
Because this is a highly processed version of stevia, the natural healthy properties have been removed, and it is most often grown in China. However, when teas and syrups are made from whole-leaf stevia, the healthy properties remain.
Stevia in its natural form contain glocysides and plenty of antioxidants. Stevia in its natural form may help to lower blood pressure and reduce the risk of insulin and blood sugar problems.
Stevia can be a little bit finicky to get started, but having your own calorie-free sweetener is worth the effort. It only takes a few plants to provide plenty of sweetener for you and your family. Keep reading to find out how to plant, grow, and harvest stevia.
Stevia Basics
Botanical name: Stevia rebaudiana. Stevia is in the sunflower family, also known as Asteraceae. It is also known as sugarleaf, candyleaf, or sweetleaf because of its sweet flavoring.
Plant type: Stevia is tropically grown as a perennial herb but in cooler climates, it is usually grown as an annual because it does not tolerate frost.
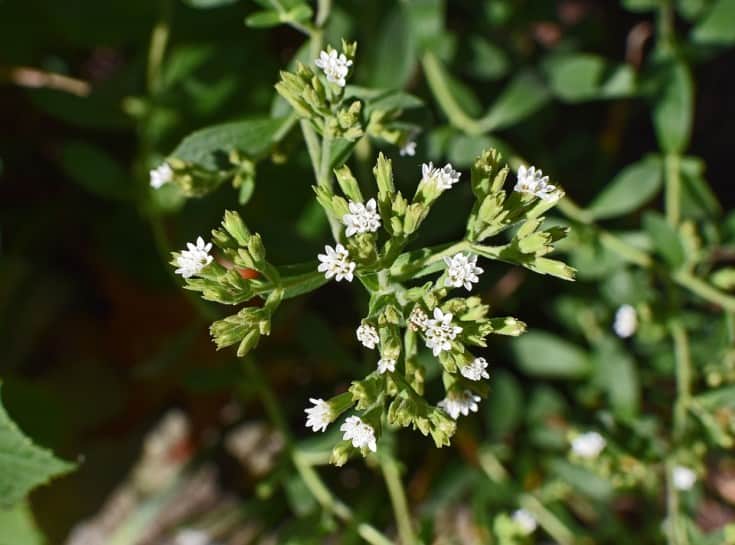
When stevia blooms, it has pretty white flowers. If the temperature isn’t too cold, it will bloom in early autumn, and produce tiny seeds.
Growing season: Stevia will continue to grow throughout the growing season, as long as it doesn’t get too cold.
Hardiness: Stevia does not tolerate cold or frost, but has few diseases or pests.
The Best Location For Growing Stevia
Stevia plants love full sun, except during the hottest parts of the summer. When the temperature gets hot, make sure your plants have a little shade in the afternoon, when the sun is at its strongest.
Stevia is hardy in USDA Plant Hardiness Zones 11 and up, and prefers semi-humid locations. It grows well in raised beds and containers as well as in gardens.
Soil Requirements
Like most herbs, stevia prefers a well-draining soil enriched with fertilizer and compost. Although stevia will grow in a fairly wide range of soil pH, from 5.0 to 8.0, it grows best in a soil pH between 6.7 and 7.2.
You might want to mulch around your stevia plants to keep moisture in, keep the roots cool, and prevent weeds. Don’t allow the soil to remain soggy or the roots will rot.
If you are growing your stevia in pots, you can try alternative growing media such as soilless potting mixes, vermiculite, perlite, or coco peat.
Planting Stevia
When you grow stevia, you’ll want to think about growing at least three to five plants to make sure you have enough sweetener to last throughout the year.
To optimize the growth of your stevia plants, space your seedlings about 18 inches apart. Keep your rows about 24 inches apart. While stevia grows well outdoors, it’s best to start seeds indoors.
Starting Stevia Seeds Indoors
The easiest, most common way to grow stevia is to get it going by starting seeds indoors.
You’ll want to start your seeds at least eight to ten weeks before your last frost date to make sure they have plenty of time to germinate and grow into established plants.
Stevia likes to germinate in a warm environment. Choose the darkest seeds and plant them in a room where the temperature stays between 70 and 75 degrees Fahrenheit (21 to 23 Celsius). It takes approximately 7 to 21 days for stevia seeds to germinate.
Use a seed starting medium that will keep the seeds moist, but not soggy.
You can cover seed trays with clear plastic wrap or a seed germination cover to keep the humidity stable and the temperature warm, but make sure you remove it after they sprout in order to prevent mold or damping off disease.
After the seeds have germinated and are starting to grow, you might want to use a small fan in the room to create air flow. This will help prevent damping off, and will encourage the seedlings to grow strong stems.
Before transplanting your stevia seedlings into the garden, you’ll need to harden them off.
This is an easy process that prevents seedlings from damage that can occur from the shock of being moved from an indoor protected environment to an outside environment.
Just bring your seedlings outside a little bit each day in a more sheltered spot when the weather isn’t harsh. Each day, increase the amount of time you put the seedlings outside.
In a week or two, depending on the weather, your seedlings should be ready to transplant into the garden.
Direct Sowing Stevia Seeds
Technically, you can direct sow your seeds right into the garden. However, most locations have too short of a growing season for stevia to germinate and mature fully since they are so sensitive to frost.
Stevia can be difficult to germinate, and seeds can be expensive and hard to find. For this reason, stevia plants are often purchased form a garden center as established plants or grown from cuttings.
Growing Stevia from Cuttings
Sometimes, stevia has a low germination rate, and can be difficult to get started from seed. If you have trouble, you may want to start your stevia plants from cuttings, instead.
Stevia cuttings root easily, and you can bring a pot inside for the winter to use for cuttings for spring planting.
- First, you need to take stevia cuttings.
- Each cutting you take should be trimmed from just above a set of leaves. Make sure there are two leaves on the actual cutting.
- If you like, you can dip your cutting into root hormone, then put the cut end into moist potting soil, sand or mix of peat moss and vermiculite.
- Keep the soil evenly moist.
- After 3 to 4 weeks, the root system should be developed enough for you to repot them.
- A grow light and heat mat set at about 70 degrees F (21 Celsius) will help the cutting to flourish.
- Plant outdoors only after the danger of frost has passed.
Transplanting Stevia
Stevia transplants easily, especially if the plants are sturdy and growing well. For more compact, bushier plants, you can prune your seedlings. Wait until they are just about five inches high.
When they are tall enough, you can trim the top two inches off of the main stem, then transplant the seedlings into larger pots.
Once the seedlings have become established, and all danger of frost is passed, you can transplant your seedlings into the garden.
First, you’ll need to harden them off by leaving them outside for a little while each day, gradually increasing the time spent outdoors over the course of a week to two weeks.
Once they are hardened off, and the danger of frost is over, they can go right into your garden, container garden, or flower bed.
Companion Planting
Stevia makes a great companion plant. It works well with marjoram, thyme, oregano, and marigolds. Marigolds will help ward off unwanted pests. Stevia also has properties that naturally repel pests, as well.
Watering
Stevia plants don’t like soggy soil or dry soil, so you want to aim for a happy medium. If you are growing stevia in containers, put a couple inches of gravel in the bottom of your pot or container to increase the drainage.
Stevia has a lot of surface roots, so you’ll need to water often, especially in the heat of the summer. Keep the soil moist so that the plant isn’t sitting in water yet doesn’t dry out, either.
Fertilizing Stevia
You can top dress your stevia plants with a layer of compost or mulch. That may be all the fertilizing your plant needs, and it will also help control moisture loss.
However, if your plant does need a boost, choose a fertilize that has less nitrogen then potassium and phosphorus. Follow the directions accordingly.
Harvesting
Be sure to harvest your plant before frost arrives, because this will kill tender plants. The end of September and the beginner of October is usually a good time frame for this.
Look for flower buds to appear, and harvest the plant before the buds open. The more flowers that open, the more bitter the aftertaste of the stevia will be.
If possible, harvest your plants in the morning because the sugar content will be at its highest, making the leaves their sweetest. Also, cooler weather and short days will enhance the sweetness of the leaves.
If you desire, you can harvest just a few leaves at a time, as needed. However, if you are going to create extracts or dried powder, you will want to harvest larger portions of the plant.
If you want the plant to continue growing throughout the season, do not harvest more than 1/3 of the plant at any time. This will make sure there is enough plant to regrow for the next harvest.
LongTimeMother, from DenGarden.com, shares a few special tips on harvesting stevia. She says instead of washing your stevia in your kitchen sink where it could be contaminated, rinse it off in a clean glass bowl.
She also shares a great idea for drying stevia leaves. Rather than drying your stevia plants outside, tie them with a rubber band and hang them upside down in the house until the water has dripped off.
Put the leaves into a paper bag, and shake it every time you pass by. The leaves should be dry in about 24 hours, and will sound crunchy when you shake them.
Lastly, she explains that if you don’t have a coffee grinder to grind your dried leaves into a powder, just roll a rolling pin or bottle over top of the paper bag (after the leaves are good and dry) and they will get crushed into a powder form.
Saving Stevia Seeds
Stevia plants produce small white flowers. Seeds begin to appear about 10 days after the flowers open. The seeds are tiny and have small hairs attached to them, similar to dandelion seeds.
Collect the seeds and allow them to dry on a window sill or some other warm spot until they turn completely brown. Once they have fully dried, you can store them in an envelope or glass jar.
Growing Stevia in Containers
You can grow stevia plants in containers even if you don’t have room for a full-size garden or a raised bed. Try a 10 to 12 inch container or pot.
Fill the bottom of the container with gravel to increase drainage, and use a light potting mix. Top dress with a little mulch or compost to keep the shallow roots moist but not soggy.
Growing It Indoors
If you don’t have a balcony or patio to grow stevia on, consider growing it indoors. You can purchase stevia plants from a nursery, big box store and, sometimes, even in the fruit and vegetable section of your local grocery store.
Use a good size pot, around twelve inches, and fill it with a little gravel in the bottom, and some lightweight potting soil.
Place you potted stevia in a sunny window so it can receive as much direct light as possible. If the plants don’t get enough light, they may be smaller than plants grown outdoors.
If necessary, you can supplement sunlight with growlights to give your plants a boost. You may find that it helps to prune your stevia plants by trimming them back before they flower to encourage branching.
After a few years, the stevia plants may begin to lose their potency. Take a few cuttings from your plants, and then start new ones for a fresh batch of homegrown sweetener.
Stevia Growing Problems
The biggest problem you will face when growing stevia is watering your plants correctly.
As we discussed earlier, you want to make sure to keep the soil evenly moist without making the soil to wet or allowing it to become too dry. This will ensure your plants are healthy and able to ward off pests and disease.
Pests
You won’t find too many pests or diseases that bother your stevia plants because of its insect repelling attributes. Some animals and bugs, such as cutworms, enjoy the sweet taste, however.
To get rid of cutworms, you can pick them off by hand at night with a flashlight. You could sprinkle diatomaceous earth around your plants or apply a pesticide.
If your garden is small, you can make small collars out of cardboard to place around each plant. This will prevent the cutworms from getting to the stem of the plant.
Diseases
Stevia does not suffer from too many diseases, but small seedlings can be easily affected by damping off. Damping off is typically caused by a fungus that causes a healthy seedling to suddenly fall over, wither, and die.
You can usually prevent this problem by not overwatering seedlings, and by providing good air circulation. Make sure there is plenty of space in between individual seedlings.
Septoria Leaf Spots
This disease appears as gray lesions on the plant that spread. This typically occurs in gardens where plants are planted closely together, or during rainy periods.
The best way to mitigate Septoria leaf spot is to eradicate the plants that are infected, making sure not to infect other areas of your garden.
How to Preserve Stevia
There are a number of methods that you can use to preserve stevia for future use. You can dry stevia like any other herb. You can also create stevia syrup and extract for use in drinks and recipes.
How to Dry Stevia
If you know how to dry other types of herbs, you can simply dry stevia the same way. For example, wrap a rubberband around several branches of stevia and turn them upsidedown.
Hang them where this is enough air circulation to allow them to dry. The stems are bitter, so be sure to remove the dried leaves from the stems before you use them. Store them in an airtight container.
You can separate fresh leaves from the stem, and then dry the leaves in a dehydrator, if you prefer. Spread the leaves out onto your dehydrator screens, and follow the manufacturer’s directions.
Then store your stevia leaves whole in plastic bags or other air-tight containers. They should be good for about 12 months. Avoid humidity to extend the life of your stored stevia.
You can also crush dried stevia leaves into a fine powder with a mortar and pestle, food processor, or even a coffee grinder. Store the powdered stevia in an air-tight container. You can stir it into drinks or use it to sweeten desserts.
Stevia Syrup
You can make a very simple liquid sweetener from stevia powder that is easy to use in recipes. Place a tablespoon of stevia powder or dried leaves in a bowl, and pour one quart of boiling water over top.
Allow the dried leaves to soak in the water. After the liquid has cooled, you can refrigerate it to be used within a few days, or freeze it for later. You can use this mixture to sweeten everything from coffee to oatmeal and dessert.
Liquid Stevia Extract
If you want a potent sweetener, mix one cup of dried stevia (powder or leaves) with 1.5 cups of rum or vodka. Allow to steep for up to 36 hours. Steeping the mixture for longer than 36 hours will cause your extract to become bitter instead of sweet.
After the extract has finished steeping, strain the mixture and pour it into a bottle. This mixture will keep indefinitely due to its alcohol content.
If you want to remove the alcohol content, simmer the mixture over low heat for 30 minutes, stirring often. Do not allow it to boil. You can keep this mixture in the refrigerator for up to 6 months.
If you want to make stevia syrup without alcohol, the process is similar. Pour 2 cups of warm water over a half cup of dried stevia leaves. Allow this mixture to steep in a glass jar for 24 hours and then strain the leaves out.
Cook on low heat in order to reduce the liquid to a more concentrated syrup. This will keep in your refrigerator for up to a year.
Stevia Tea
You can make use of some of the health benefits of stevia by making fresh stevia tea.
As previously mentioned, stevia can have health benefits relating to blood sugar and blood pressure.
It may also have antioxidant, anti-septic, anti-microbial, and antibacterial properties as well, making it good for healthy skin, healthy teeth, and good digestion.
To make stevia tea, simply pour boiling water over a few fresh stevia and mint leaves and allow it to steep for several minutes. This makes for a healthy, refreshing tea.
Even fresh stevia is much sweeter than sugar, so you may need to experiment to find the level of sweetness that tastes good to you.
Stevia is much sweeter than sugar, so you will need very little stevia in comparison to the amount of sugar you would place in a recipe.
Generally, a cup of sugar is equal to the sweetness in a teaspoon of powder or stevia extract.
You can use stevia extracts and powder to sweeten drinks, oatmeal, and many desserts. Be careful when baking with stevia extracts and powders, because the amount of stevia required is so small.
The texture of your desert may end up being somewhat different due to the difference between sugar and stevia.
Amanda is a homesteader and a Jesus-loving, mother of 6 toddlers. She’s raising lots of fancy chickens and goats on her small homestead (among other things). Find out more about the team here.