Go Back
jar of pressure canned chicken

Canned Chicken Recipe (Hot and Raw Pack)

Servings 20 pints

Equipment

  • Pressure canner
  • Crockpot (for the hot pack method only)
  • Clean, sterilized jars
  • Lids and rings
  • Jar lifter
  • Paper towels
  • Canning funnel
  • Colander
  • Cutting board
  • A few sharp knives
  • Rubber spatula to remove air bubbles

Ingredients
  

  • 2 chickens whole
  • salt to taste
  • water

Instructions
 

Raw Pack Method

  • Start with a clean bird. By that, I mean fully rinsed, all feathers removed, and all the insides taken out. I always, always, always have to double check this as my kids are known for forgetting to remove the lungs…but I digress.
  • Simply cut your bird into pieces, along the fat lines and joints.
  • Remove all the skin, even from the dark meat. The skin tends to make it greasy and can lead to sealing failures.
  • I leave the bones in the legs and thighs, and remove all the bones from the breast meat.
  • Make sure to save the carcass for making bone broth, and you can even store that to store for later use.
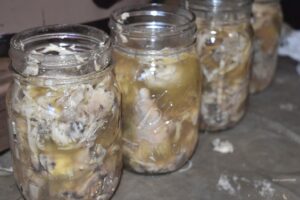
  • Fill clean jars with the meat. I use the canning raw chicken, or raw pack method, from my canner’s instructions, but you can also cook the chicken to medium done first, if you prefer. For how to cook chicken, you will want to simmer the pieces in broth for 15-20 minutes until medium done. Proceed with the rest of the steps.
  • For canning chicken leg quarters, I have found it’s best to cut them into separate thigh and leg pieces. For legs, I do 4 pointed down and 3 pointed up, every other one. For canning raw chicken thighs, I simply stack them on each other. Usually, I can get 6-7 thigh pieces in a wide mouth quart jar. For breasts, I stack them on top of each other.
  • Then, fill the jars with hot water or broth, leaving one inch headspace.
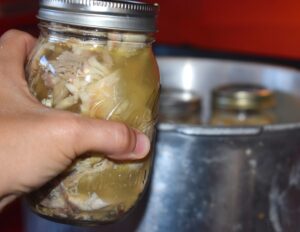
  • Use a rubber spatula to remove air bubbles by running it alongside the inner edge of the jar.
  • Wipe off the tops of jars to remove residue.
  • Add a new lid and clean band, screwed down finger tight.
  • Pressure can be at 10 pounds pressure for 75 minutes, adjusting for your altitude.
  • Allow the canner to cool on its own accord, remove the jars and set in a cool, non drafty place for 24 hours.
  • Check seals, wipe the jars and store in your pantry.

Hot Pack Method

  • Begin with fresh, thawed chicken. Place it in the crockpot whole, then cover with water. Cook on low for 12 hours.
  • Remove the chicken from the slow cooker. Strain the broth through a colander into a new stockpot. Let it remain warm on the stovetop. Remove the bones from the chicken pieces and discard. While you’re doing this, sanitize your jars.
  • Load chicken into jars. Add a teaspoon of salt to the jar if desired.
  • Fill with hot broth, leaving 1 ¼” headspace. Wipe the rims of the jars with a paper towel and make sure there’s no food particles on the screw bands.
    put broth over chicken pieces
  • Fill the pressure canner with water according to the manufacturer’s instructions.
  • Load your canning jars, then lock the lid.
    loading jars into pressure canner
  • Vent the canner, allowing it to release steam from the vent pipe for 10 minutes. Then, put your weight on and allow the canner to build pressure to 10 lbs. Start your timer.
  • Process pints for 75 minutes (without bones) in the pressure canner. When the time has elapsed, turn the heat off, then allow the cancer to come back down to zero pressure before opening the lid.
  • Check the seals, allow the jars to cool for 24 hours, then store in a cool, dry place.