
Growing fodder is a cheap way to feed your chickens, ducks, and rabbits throughout the year.
If you’re raising animals of any kind, you probably already know how the costs can add up in a hurry.
Growing fodder is an easy, inexpensive technique that will let you cut costs and feed your chickens, rabbits, and ducks the healthiest diet possible.
It’s a simple concept, really. Basically, it’s allowing grains to sprout and grow into their respective grasses for feed supplementation for poultry. The animals then get greens with chlorophyll, as well as the proteins from the grains and the sprouts.
Fodder is a type of animal feed that is composed of plants.
It can be made from a variety of different plants, including grasses, legumes, and grains. In addition to being a source of nutrition for livestock, fodder can also help to keep animals warm in winter and cool in summer.

Some fodder can also be used as bedding, it can absorb moisture and help to keep stalls clean.
Fodder is an important part of many livestock operations, and it plays a vital role in the health and well-being of animals.
Table of Contents
Why Grow Fodder?
Fodder can stretch your animal feed dollar and reduce your overall expenses. In fact, just fifty pounds of grain can be transformed into more than 300 pounds of fodder – all you have to do is sprout it!
Fodder offers a variety of benefits to your chickens. Not only will it provide them with access to year-round grains and greens, regardless of the weather, but it also provides novelty that can help relieve boredom in a flock.
The vitamins, proteins, and minerals in fodder tend to be more bioavailable to the chickens, and fodder is more digestible, too. I’ve even noticed that the egg yolks are darker and arguably more nutritious from my hens that were fed fodder, too.
Not only that but sprouted grains are more nutritious for animals than plain old grain. All you need is a bit of moisture in order to sprout your own feed.
Are Sprouts the Same Thing as Fodder?
Well… yes and no. The terms “sprouts” and “fodder” are often used interchangeably, but the two are not one and the same – the two words refer to various stages in the germinated grains.
While sprouts are germinated seeds that are under four inches tall, fodder is taller than four inches. So at the beginning of your growing experiment, you would have sprouts, but when you’re finished, they would be fodder.
Growing sprouts is not the same thing as growing fodder because fodder, of course, takes longer to grow. Therefore, you will have mold and various sanitation procedures to worry about.
That said, sprouts do give you more options because you can grow a wide variety of plants, like:
- lentils
- mung beans
- broccoli
- alfalfa
- lentils
- radish
- amaranth
- millet
- corn
- sorghum
- quinoa, and more.
How to Build a DIY Fodder System
A fodder system is a great way to provide your chickens, ducks, and rabbits with fresh, nutrient-rich greens year-round. And best of all, it’s easy and inexpensive to build yourself. Here’s what you’ll need.
If you choose to make a fodder system with flat trays, you’ll just need some shallow trays to start.
Pay a visit to your local thrift store for options – you can use things like Styrofoam meat trays, seed starting trays, or baking trays.
You can also choose to build a fodder wall to save space, which is fairly easy to do.
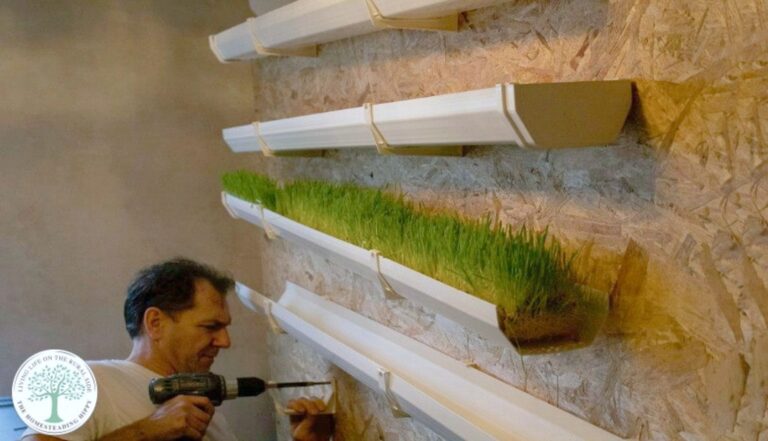
This wall required:
- 6 8-foot plastic gutters
- 6 gutter ends
- a bucket
- drywall screws
- a wall you aren’t using with studs-this can be in a garage, a greenhouse, or in your kitchen if you want
To make the wall, measure where the studs in the wall are.
- Make markings on the gutters to position into the studs.
- Attach one end of the first gutter into the stud, and angle the gutter so the opposite end is 1 1/2 inches lower than the top.
- Place the gutter end on the higher spot.
- Attach the second gutter approximately 3 inches lower than the one above and cap the opposite end
- Angle the OPPOSITE end higher than the first gutter to create a “waterfall” effect.
- Continue layering the gutters on the wall, positioning the opposite end to allow water to flow.
Where to Put Your Fodder Growing Trays
One important decision is where to place your fodder growing trays. The location of your trays will affect the amount of sunlight and airflow they receive, which can impact the rate of growth and quality of the fodder.
In general, it is best to place the trays in a sunny location with good air circulation. If possible, try to find a spot that is protected from strong winds, as this can damage the delicate roots.
Prepare the Grains
You can get barley fairly cheap at a farm store, bulk foods store, or online. Any kind of grain can be used, including oats, barley, wheat, and millet.
The fodder process can help increase the digestibility of grains, making it easier for your chickens to absorb the nutrients they need.
In addition, these methods can also help reduce the amount of feed your chickens need to consume.
As a result, you can save money on chicken feed while also ensuring that your chickens are getting the nutrition they need.
You will want to soak the grains overnight in a bowl, covered with water and a tablespoon of bleach to retard mold.
Cover your grains with water. Try not to fill them more than half-inch depth for each tray, as the grains have a tendency to mold otherwise.
The next day, rinse the grains and place them about an inch deep, in the top gutter. Start soaking another batch of grains and repeat daily until all the gutters are filled. (6 days)
Watering is simple. Just water the top gutter well enough that the excess water will flow into each gutter, watering all of them.
The bucket at the end will catch any remaining water. (BUT, be sure to drain the bucket daily. It does get rather smelly if it sits more than that.)
You should water both morning and night. If you keep your fodder system outside and it dries out quickly, you may need to water even more frequently, as evaporation will occur more rapidly.
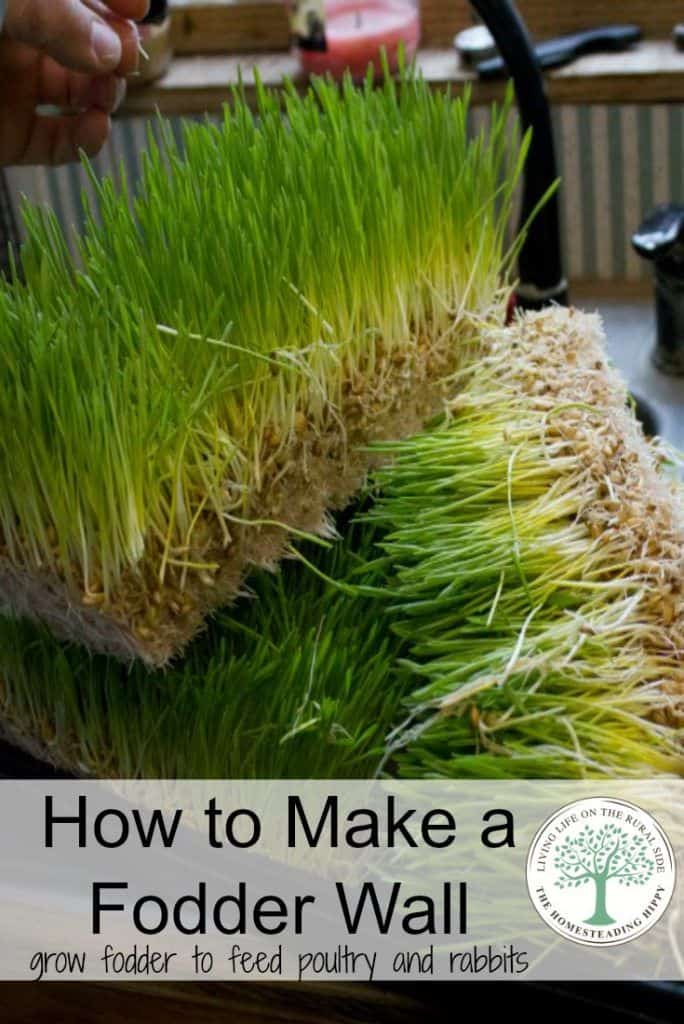
Here they are around day 7:
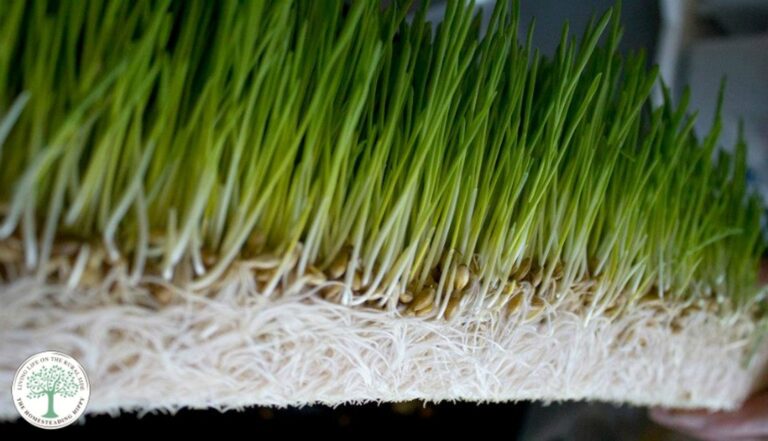
Roots usually start to appear during the first few days, and they’ll be followed shortly after by greens.
You can feed the fodder at any stage but it usually takes a week or two to get a nice block of fodder going.
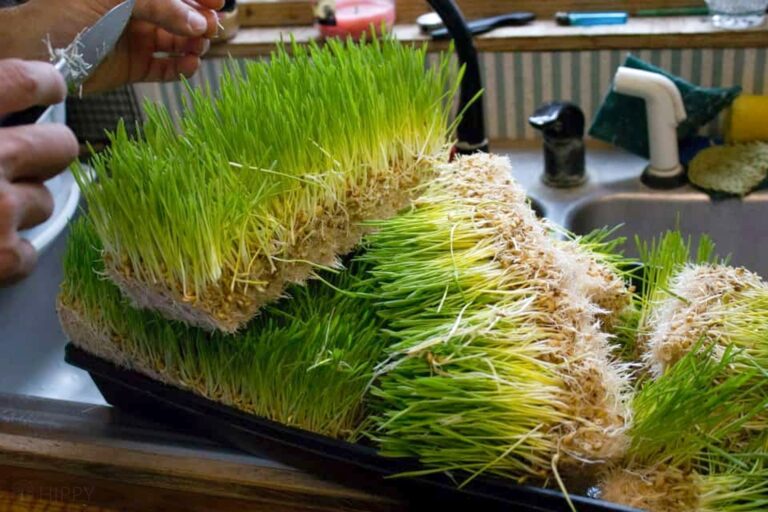
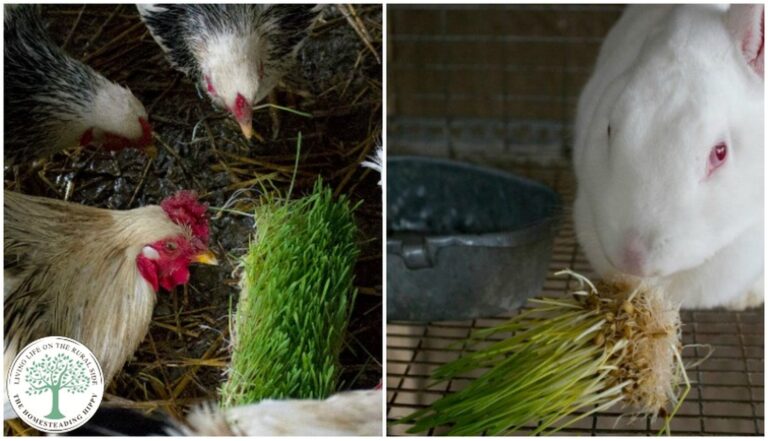
The fodder is peeled from the gutter and cut into squares with a sharp knife to be given to the poultry or rabbits. It’s like a carpet or mat that is all woven together.

Each animal gets a chunk of the fodder daily and it’s split pretty evenly. The rabbits like the greens, but they don’t eat as much of the roots.
The chickens and ducks love all the greens AND roots and enjoy their daily treat.
A Few Things to Keep in Mind
When you are growing fodder, you will want to source your grains from a reputable source. Make sure the feed has not been treated and is fresh.
You should always use clean containers and fresh water, and make sure you keep the room temperature between 45 and 69 degrees.
You can sprout fodder outside, too, but these temperatures will be best for the greatest level of success.
You may be able to sprout successfully in colder or warmer conditions, just watch out for mold.
Get Your Grains from a Reputable Place
When you are growing your own fodder, it is important to get your grains from a reputable place.
The last thing you want is to end up with grain that is full of toxins or has been treated with chemicals.
Ideally, you should find a local farmer who can supply you with organic grain. If you can’t find a local source, make sure to purchase from a reputable online supplier. Once you have your grain, it is important to store it properly to prevent spoilage.
Always Use Clean Containers and Clean Water
It is important to always use clean containers and clean water. This will help prevent the growth of mold and bacteria, which can be harmful to your plants.
Make sure to wash your containers thoroughly with soap and water before using them, and be sure to change the water regularly.
If you notice any mold or bacteria growth, throw out the affected materials and start again with new seedlings.
Keep the Room Cool
When you are growing your own fodder, it is important to keep the room cool. The ideal temperature range is between 45 and 70 degrees F (7 to 21 C).
If the room is too hot, the fodder will not grow properly. If the room is too cold, the fodder will not be as nutritious.
Adopt a Growing Rotation Schedule
By rotating how the gutters are filled, you should only need to only soak and grow one gutter at a time, allowing for one day off a week.
The fodder wall will grow very well as long as it doesn’t get too hot in the summer. If you use A/C, it should be fine. Otherwise, try a fan on it to keep it from getting too hot and molding fast.
Alternative Methods of Growing Fodder
I should mention that the method I told you about above is not the only tried-and-true technique for growing fodder. You can also sprout grains in shallow trays as long as you have a shelf to place them on.
Again, you’ll drill a few drainage holes in each tray and follow the same steps to soak your grains.
How Much Fodder Should Your Chickens Eat?
A typical chicken will consume between 2 and 4 pounds of feed per day. The type of feed will vary depending on the age and breed of chicken, but a good general-purpose feed will suffice.
If you are feeding your chickens kitchen scraps, make sure that they are getting a variety of different foods so that they are getting all the nutrients they need.
Avoid feeding them too much meat or fatty foods as this can lead to obesity and health problems.
In general, it is best to let your chickens free-range so that they can forage for their own food. This way, they will get the exercise they need and you won’t have to worry about their diet being too one-sided.
Adding fodder is a good way to supplement the free ranging or offer your chickens the same benefits of free ranging in the wintertime.
When feeding your chickens fodder, make sure to offer it in small amounts throughout the day so they don’t overeat. You should also supplement their diet with plenty of calcium-rich foods such as crushed oyster shells.
How to Deal With Mold and Flies in Fodder
Anyone who has grown their own fodder knows that mold and flies can be a problem. The warm, moist environment that is ideal for growing sprouts is also perfect for mold and fly larvae to thrive.
However, there are a few simple steps you can take to discourage mold and flies from setting up shop in your sprouts.
First, be sure to rinse the grains thoroughly before you begin sprouting them.
Second, keep the humidity low by ventilating the room where you are growing the sprouts.
Third, wash the trays thoroughly between uses.
Finally, place a small bowl of apple cider vinegar near the sprouts. The flies will be attracted to the vinegar instead of your sprouts.
By taking these simple precautions, you can enjoy a mold and fly-free crop of healthy sprouts.
DIY Chick Fodder Cakes
Chickens are notoriously messy eaters, and it can be difficult to keep their feeding area clean.
One way to cut down on the mess is to make your own chick fodder cakes. These cakes are made from a mixture of seeds, grains, and greens, and they can be easily customized to suit your flock’s needs.
To make a fodder cake, simply combine all of the ingredients in a bowl and mix well. Then, wet your hands and press the mixture into a small cake mold or cup.
Be sure to pack the mixture firmly so that it holds together when you remove it from the mold. Once the cake is formed, place it in the refrigerator to set.
When you’re ready to serve it, simply put the cake in the chicken coop and let your chicks enjoy it!
Not only will they love pecking at the green bits and rooting around in the roots, but they’ll also be getting a nutritious treat. Plus, you won’t have to worry about them making a mess of their feed area!
Final Thoughts
One way to provide your chickens with fresh fodder is to grow it yourself. This not only provides them with a healthy and nutritious diet but also helps reduce feed costs.
Growing fodder can be done in either an indoor or outdoor setting, depending on the climate and weather conditions in your area. In addition, there are many different types of plants that you can grow as fodder for your flock.
By following these simple tips, you can start growing fodder for your chickens today!
Have you grown fodder? What are your experiences with it? Be sure to pin this for later!

Heather’s homesteading journey started in 2006, with baby steps: first, she got a few raised beds, some chickens, and rabbits. Over the years, she amassed a wealth of homesteading knowledge, knowledge that you can find in the articles of this blog.
Learn more about Heather and the rest of the writers on this page.
We started sprouting lentils this winter. I am hoping to expand into more fodder systems this year.
My neighbor set up extensive fodder growing trays but his horses didn’t go for it. So he brought it all here for my chickens. Welp, they didn’t really go for it too much, either. But boy, did I love seeing the green in the midst of winter snow! So it was good for my spirits! He decided he wouldn’t go to the trouble again. Good luck with your fodder and your chickens. You are a good farmer!
We are planning on doing this later this year. I just picked up some peas to start sprouting after we get our birds in a few weeks.
That was a great post and something I did not now so thank you for sharing them with us.
Very innovative idea and great for saving costs.
Chlorophyll
That looks like a great system! I it makes a huge difference in egg quality during the winter when greens are in short supply. We’ve actually been doing something similar with our pigs – fermenting/sprouting grains in whey. they love it!
We Soak Our grains In water, We Mix oats, barley, Buckwheat sHello And minerals, Our Piggies And Chickens Go nuts
An interesting article. So far we haven’t felt the need for this step, as our birds free-range during most days and get their greens that way, along with the grains we give them. But you bring up a good point about winter time. Certainly worth further consideration. I do hope you see and quickly fix one thing: “They then get greens with chloroform…” I assume you meant to type “chlorophyll.” Thanks again for the useful info. 🙂
thanks for catching that! changing it right now! 😉
Hi Heather,
Nice post! I’m not a farmer and don’t raise chickens or other livestock, but I love eating sprouts. Never thought to call them fodder, but hey, why not? Sometimes my eating habits resemble grazing.
Anyway, I often sprout grains here in the kitchen, but in smaller quantities than you describe. Perhaps it’s time to step it up a notch. 🙂
Thanks for explaining this all out, and giving so many tips! I pinned it 🙂
I am learning all of this because I want to start raising chickens. My questions is this. If there are holes in the pan tso the water drains what about the seeds? Don’t they fall through the holes as well|. I started 2 cups of Red hard wheat in a bowl and soaled it for 24 hours and then drained it and rinsed it well. repeating for another 24 hours. At the end of 48 hours I had a very few tiny sprouts and the batch was starting to smell so I threw it all out. What did I do wrong?
you want to make the holes pretty tiny so the seeds won’t fall through 🙂 after they sprout, they grow pretty fast and their roots will intertwine, making falling through the hole pretty uncommon.
I’ve tried both White and Red wheat and have much better luck with the white. I only soak mine overnight, drain in the morning and leave in cup for day. Put in the first tray that evening. I rinse my trays twice a day to avoid mold. Rabbits get the top haircut and the chickens get the root mat. They all love it.
What a great idea! I can’t wait to give this a try!
I just started Laco- fermenting wheat berries for the girls. They eat it but not with the gusto I thought they would after seeing my friends girls go after hers. I may try this sprouting idea with plain water and see if they like it better.
Thanks for the ideas.
We live in town, so there is not a lot of access to the idea of free ranging outside the large pen, unless we are at constant attention. We love sprouting a mix of wheat/oats/milo. We also sprout barley. The chickens love it. Since we have access to free 5 gallon buckets, we just cut them off with a saw so we have a circle pan. This idea has so far been the best in terms of cost and durability. We started out with seed sprouting trays and quickly realized they won’t hold up. For our 12 chickens, we give them one circle tray every afternoon and their normal feed every morning with snacks as we come by them. It just makes sense. It increases the amount of feed, and quality of feed, in exchange for time spent soaking and watering which doesn’t take that long, so it’s a win. The cost of retail feed dropped dramatically. We still buy the 50 pound bags of all these various grains, but cost wise it has saved us a lot. We keep ours in the same little greenhouse as your picture. Nothing big and fancy but it works great.
Hi – and thanks for the informative post. Question – I hesitate using bleach to retard mold…wondering if the use of vinegar wouldn’t be just as effective. I’m thinking especially apple cider vinegar, which has health benefits of its own.
I think that ACV would work as well!
To the soaking water, I would add some Food Grade Hydrogen Peroxide for controlling mold. It is totally healthy and will actually help with germination. Not sure what percentage or amount as I have only seen it mentioned but haven’t used it myself. But I would steer clear of bleach as it is extremely toxic to all life forms.
I’ve never heard of using peroxide! I’ll try that and see if it works as well!
I soak my seeds/grains overnight in a mason jar, then after the soak I empty the water and have 3% food grade hydrogen peroxide that I spray them with, then rinse that night and drain. I have the hydrogen peroxide in a spray bottle and keep in the fridge. I do this with all of my sprouts.
Great idea!
Use 3 per cent.
Really? Bleach and Aluminum pans? If this is to make healthier eggs than I think I’ll pass. I’ve been doing a fodder system for years and did not use bleach or aluminum. We did plastic (which has it’s own problems) and kept a fan on it to keep the mold off. I am interested in trying ACV for mold. Thanks for the post and getting the word out about fodder.
Actually, she only uses 1/2 capful of bleach and that goes on the grain before it goes into the pans…I am sorry that wasnt’ clear 😉 But you are right, putting it into aluminum pans isn’t the healthiest idea. I think that using plastic along with ACV is what I plan on trying next. Please let me know how yours goes!
Where do you buy grain suitable for sprouting? Can I just buy a bag of barley from the local supermarket?
That’s where my friends gets her barley
You say this fodder system saves on feed cost. How much does the grain cost (for sprouting), vs. the usual feed? When I bought a bag of wheat berries, it was roughly a buck a pound. Chicken feed is significantly less than that. Granted, the greens in winter are a nutrition plus, but does it really “save”?
Just curious how the total economics play out.
it saves on feed cost (for me anyway) because in my area, a 50 lb. bag of soy free feed is $25, plus the time and gas it takes to drive and get it. I can stretch that with grains that I buy in bulk for $26 for a 50 lb. bucket.
I buy mine in bulk from our local co-op, so it winds up being $.50 a pound. That does save us, not just in feed costs, but in time and gas running to the store, which is over 50 miles one way for us.
Oh my goodness. I just bought a 50 lb. bag of wheat for $10 at Tractor Supply. That’s going to lower our layer pellet expense greatly.
What a great idea! We are planning for chickens next year and my 3-tier greenhouse won’t be used in the winter! I’ll grow some fresh greens. Where do you get the barley from? Is there a way to make sure it’s organic?
I have a place locally that buys it in super bulk 2x a year (like the tune of 10 tons) as a co-op. I get it from her for about $.50 a pound for a 50lb. bucket. I would check with Wheat Montana or Honeyville, which are both online…
Wow, that’s an amazing option for keeping chickens going when you don’t have enough regular grass.
I am a bit jealous, your chickens eat better food than we do! At Growing Futures Kenya we make our own food from waste sweet potatoes, coconut, cassava, and msimbi (probiotic sludge that forms as palm wine ferments).
I tried to grow my barley in a greenhouse in May but it gets too hot and all I grew were mold and flies! I gave pans growing well in my living room and will try the greenhouse again in the cooler weather this fall.
We soak and ferment but I don’t have the patience for sprouting. I forget to water them and they end up molding. I need to get better at it because it is fabulous!
Wow! That gutter waterfall system looks awesome. I’ve tried doing fodder in the past, but that looks super easy. Now I’m inspired. 🙂
Thanks Kathryn! Let me know if you try it!
I have been growing fodder and sprouts for a couple of years now. I ran into a problem this summer. My whole setup got infested with fruit flies. I tried to fight them with traps but no good.
I quit growing for the summer. I’ll try again when it gets cooler. Any thoughts or ideas.
Thanks.
We have the same problem! I tried putting a lid over my sprouts but it just caused them to mold very quickly. I don’t know how to get rid of the fruit flies!
Try diatomaceous earth! I have hogs and without it my place was swarming with flies. Now i have NONE!
Look it up in the internet because it really works!
well i am sure glad i read your comment about the fruit flies before i tried it …. we already fight those darned things…. its been a bit better here lately havnt been seeing them but i envisioned the swarm again after reading this
I’d like do to this in my garage but there aren’t many windows so there’s not much natural light, especially in Winter. I’m putting in some electric lights for my rabbits and will probably add a heating source as well. Any tips on lighting for growing fodder? Do any grains work better than others under electric lights?
Mine takes 12 days to grow,some batches get moldy and some times I get a great mat and then sometimes it just stays seeds with green stalks and gets moldy don’t any ideas what I’m doing wrong?
I have an aquaponics system. Can i run the water throughout the day? I want to go large for a wildlife centre. All creatures great and small can eat sprouts. ?????????
I have grown fodder for quite a few years. I have experimented with timing, light, etc, and have kept detailed records (yes, I am a bonificad Nerd). Those little, moving black things in the wheat seeds are not typically fruit flies, they are wheat grain mites. When they eat the germ of the wheat, the seed will not sprout, it just gets mushy. If your wheat smells like honey, it is infested. The wheat can still be sprouted, but not as much will sprout. The mites don’t attack barley. The soaking process, with bleach, typically kills the mites and the eggs, but vinegar does not seem to do as well. One of my concerns was natural light. However, through study and experimentation, I discovered that fodder does not really need light. The sprout (fodder) is the growth of the seed, before it turns to grass, which is when photosynthesis (requiring natural light) starts. Also, the light encourages mold growth, which is reduced noticeably in darker conditions. I have an 8 tray, graduated height, watering system tower. It is watered every 6 hours, by a small submersible pump, attached to an electric timer. In the perfect world, and fir optimum growth, I soak the seeks no less than 10, but no longer than 12 hours (less than 10 hours- less water penetration, fewer sprouts; more than 12 hours- oversaturation/drowning many seeds, fewer sprouts).
I currently use bleach in the soaking water, because the seeds get rinsed well before being put in the trays. (I got way more mold with vinegar. I am considering trying Hydrogen Peroxide 3%.) Day 0 doesn’t count, as it is just wet seeds (covered- the high humidity, at this stage, causes better sprouting). Day 1 is when little white tips appear. By day 7, I have a solid mat of 6”-8” tall sprouts (optimum growth and nutritional value). Day 7 is optimum because at day 9-10, the sprouts turn to grass, and the high nutrition value begins to diminish (and the mold battle get far worse). My chickens fight over the unsprouted seeds first, while tearing the mat apart, and throwing it everywhere. Then they graze on the green sprouts (pun intended) throughout the day. The next day, a new mat is ready, etc., and on, an on it goes. Sorry, I got carried away there. For us Nerds, experimenting, keeping detailed records to minimize variables, then analyzing the results for optimum production, is exhilarating!