
We had a ton of onions to pull this year, and although they were small, there were a lot of them. I was hesitant to simply cure and store them since they would take up so much room and offer very little usefulness on their own. Then the thought came to me – pickled onions!
I’ve had pickled onions before in restaurants and absolutely loved them. They are a staple for burgers, salads, and other kinds of meals, and I wanted to replicate that deliciousness at home.
I decided to set out making my own pickled onions this year, and I’m going to talk you through the process. It’s shockingly easy and you’ll likely wonder why you haven’t yet tried this yourself!
Can You Can Un-Pickled Onions?
You can easily make canned onions without pickling them, too – useful to know if you really don’t like pickled foods or if you want more of an all-purpose onion to use in soups, stews, or other dishes where pickling would ruin the flavors.
However, what you need to know is that canning a low-acid food like an onion requires the use of a pressure canner. This will kill harmful microorganisms that cannot be destroyed via water bath canning alone.
Pressure canners get up to 240 degrees F (115 Celsius) – an absolute must when canning most vegetables.
Pickled onions, on the other hand, can be water bathed because of the increased acidity!
Canned onions that are preserved without pickling, since they are cooked for so long and at some hot temperatures, become somewhat soft.
This does not ruin the flavor at all, but something to note so that you aren’t disappointed when you aren’t met with that signature crunch upon biting into your first canned onion.
What Kinds of Onions Are Best for Pickling?
You can use any kind of onion for canning and pickling. Make sure you choose mature bulbs and be sure to clean them thoroughly.
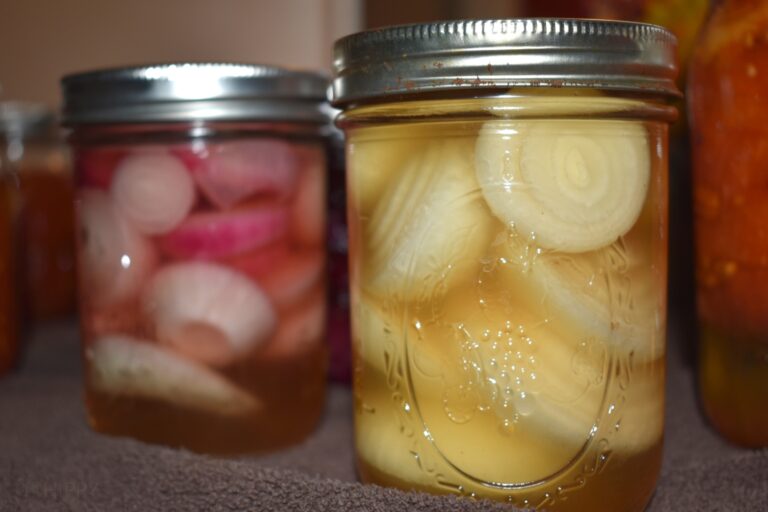
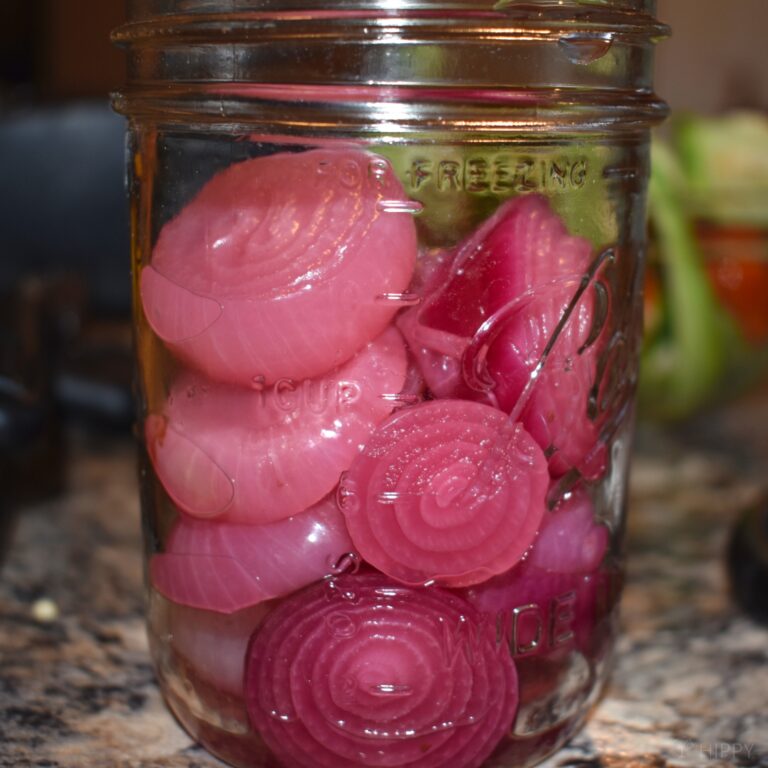
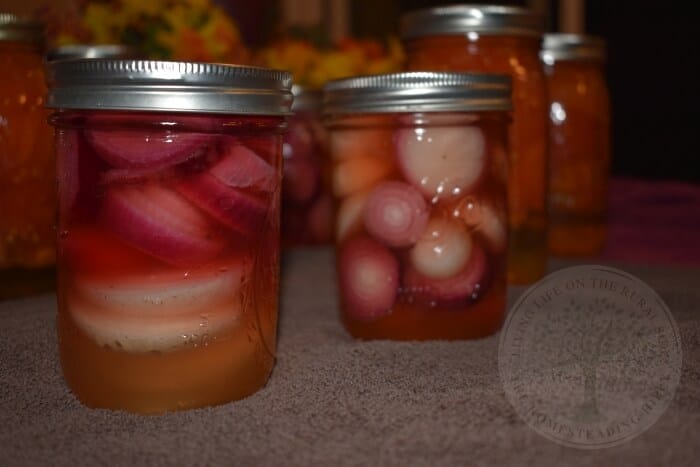
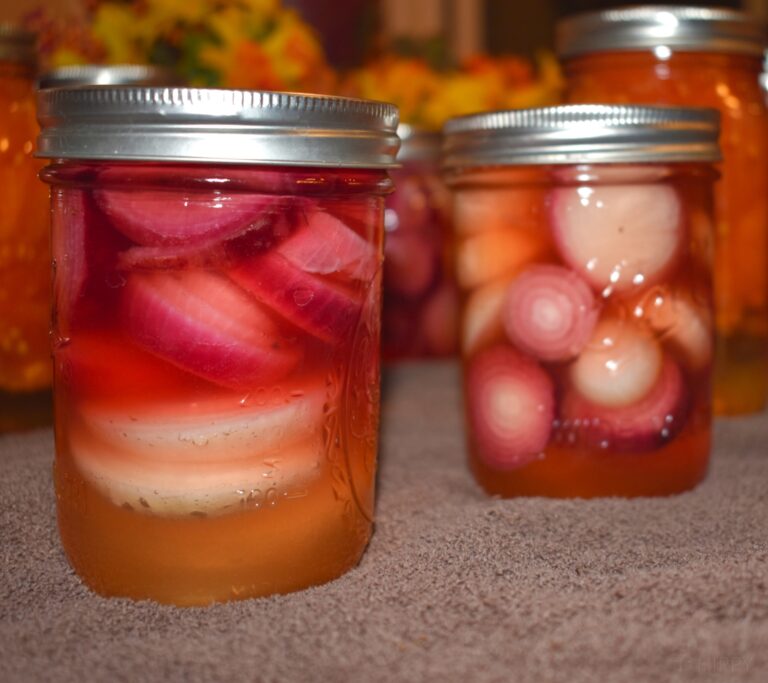
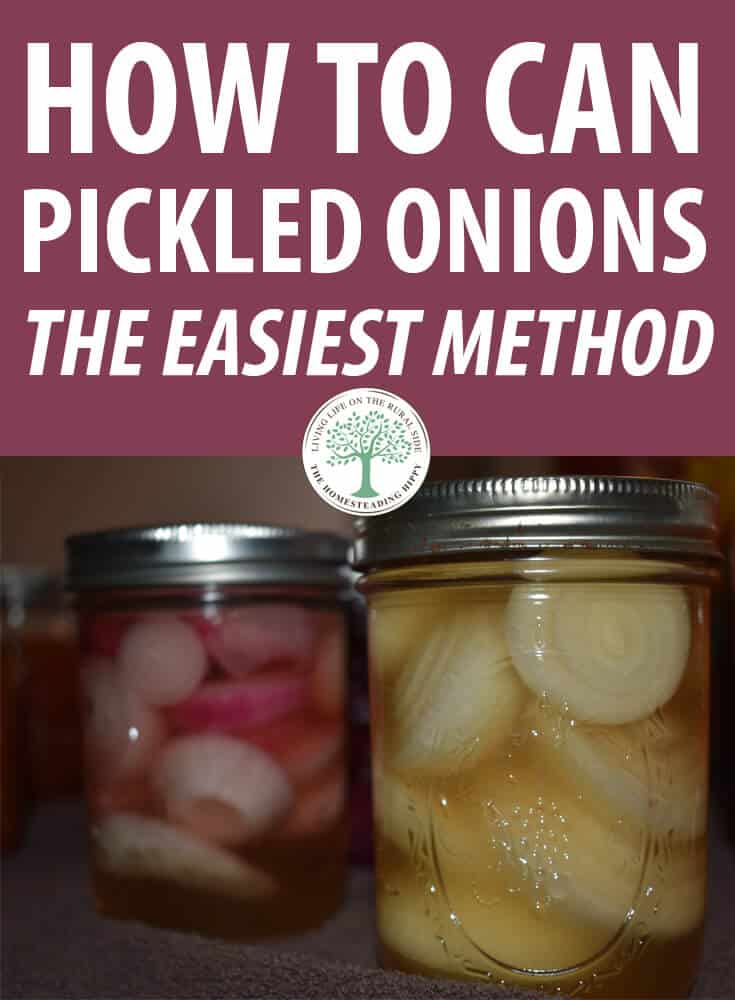
Otherwise, it’s safe to just about any type of pickled onions. I find that the flavor doesn’t really change much between red, white, and yellow onions, but I personally prefer using red onions since they give such a gorgeous purple-pink color to the finished product!
Ingredients
- 3 lbs onions (any type)
- 2 cups of apple cider vinegar
- 2 cups white vinegar
- 1 clove of garlic (peeled, pureed, or crushed)
Equipment Used
- Pint jars (only use canning-approved jars made by companies like Ball or Kerr)
- Water bath canner or large stock pot with a rack inside
- Jar lifter (or a set of tongs)
- Ladle
- Lids (do not reuse these)
- Rings (these may be reused)
- Bowls for cleaning and peeling onions
- Stockpot for preparing brine
- Estimated Prep Time: 2 hrs
- Estimated Cook Time: 10 minutes
Nutrition Facts
- Servings Per Jar: 2
- Calories: 14 kcal
- Carbohydrates: 3 g
- Protein: 1.1. grams
- Fiber: 1.7 grams
Instructions
Step 1. Wash Your Onions Thoroughly – Before and After Peeling.
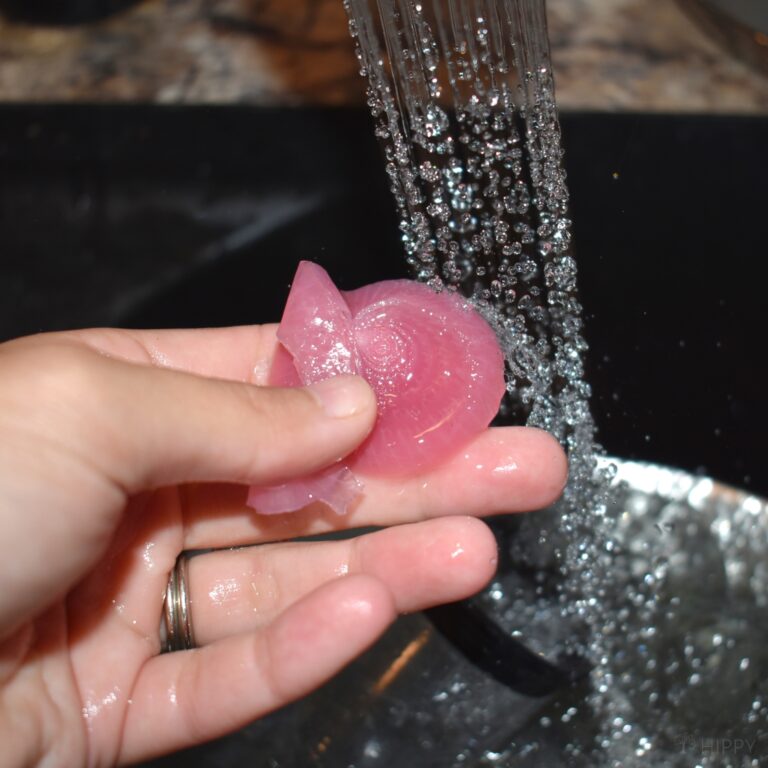
The first and most important step when canning onions is to wash them. I like to do this both before and after peeling. Onions are covered in dirt – after all, they are root vegetables! – and it’s important that you remove any soilborne pathogens before putting your onions in a jar.
You’ll notice in the picture above that my onion appears a bit red! That’s because my first go-around I soaked my onions in warm water to help get some of that dirt off.
It didn’t hurt them any, but did cause some of the color from the red onions to bleach the white flesh of the yellow ones!
I would advise against soaking your onions in that manner as it really didn’t seem to help much. Instead, rinse once with the skin on and then again after you have peeled your onion.
The second time I cleaned a batch of onions, that seemed to work much better. Make sure you have removed all the peels before proceeding to the next step.
Another option for washing and peeling your onions is to boil your onions and then quickly submerge them in cold water (similar to the blanching method).
You really only want them to be in each container of water for about 30 seconds each – don’t let them soak like I did. This should be a much more effective way of cleaning and peeling your onions if you don’t want to stand around peeling them all day!
Step 2. Cut Your Onions
Now you need to slice your onions up. I recommend slicing them into rings, although depending on your intended uses, you could also dice them.
Try to keep them at a moderate size – you don’t want your onions to be so large that they won’t fit into your jars but you don’t want them too small, either, as they will become mushy.
I recommend slicing them ¼ inch thick and then separating the slices into rings. Make sure you cut out any bad or soft spots in the onions, too.
Step 3. Prepare Your Brine
There are a ton of different recipes out there for brine for pickled onions. Make sure you pick one that is approved as safe for canning – you don’t want to make yourself sick because remember, onions are low-acid foods that need the acidity of pickling in order to be safe for storage.
The recipe I’ve given you calls for a 50-50 ratio of apple cider vinegar and white vinegar. You can use any kind of vinegar for pickled onions.
I’ve also heard of people using plain white vinegar (which prevents the discoloration you see in my jars) or red wine vinegar. I like apple cider vinegar because it gives the onions a nice, semi-sweet flavor.
Using any kind of vinegar is safe as long as you don’t change the vinegar proportions listed in the recipe. Don’t dilute it, as vinegar prevents botulism.
You might find older recipes that have less vinegar or add some water but don’t try to use these today. In older times, most pickling vinegar had 10% acetic acid – today it has only about 5%. Therefore, you need to make sure you stick to modern recipes for ultimate safety.
Distilled white vinegar is often used in pickled onions because it doesn’t affect the color of the vegetables. It has a mellow flavor.
Apple cider vinegar has a fruitier flavor but will darken your onions, as I mentioned. Red wine vinegar is also safe, but be sure to check the label – it often has lower levels of acetic acid.
Combine your vinegar of choice with your garlic in a large stock pot. Bring it to a boil and simmer it for about five minutes.
You can do this while you are cleaning and cutting your onions if so desired. You can either add your onions to the boiling mixture or you can wait and just use this as a brine.
Step 4. Ready Your Canning Equipment
Once your onions are peeled and ready to go, you can start getting your canner ready, too. I recommend heating your jars, bands, and lids while your onions are being prepped to save some time.
I simply put the jars through the sanitizing cycle in the dishwasher to heat them up. You don’t want to do this for your lids, though (nor do you want to reuse lids between canning cycles).
However, always sanitize your bands and jars, even if they’re brand-new. It will remove any contaminants and get them nice and hot for the canner. Don’t make the mistake of putting cold jars in the canner!
Even though your brine will be hot, you don’t want to put cold jars into a hot water bath canner as you increase the likelihood of them cracking as they heat up too quickly.
I also preheat my lids in a pan of water on the stovetop. This is not a mandatory step. I do it just to sanitize them. It will not impact the safety of your canning one way or the other.
You should also wipe down your canner to make sure it is nice and clean. Then, you can fill it about halfway full with water and begin heating it on the stovetop.
Step 5. Fill Up Your Jars
Once your onions are clean and cut into rings, you can start packing them in your jars. Pack them densely – but don’t overpack – and make sure you leave about an inch of headspace.
Cover the onions with the hot brine, again leaving headspace. Remove any air bubbles with a plastic or wooden bubble remover – don’t use metal, because this can etch the glass.
Once your jars are loaded, wipe off the rims and get rid of any food particles. Onions are easy to can in this regard, because they pack in nicely and don’t usually leave a lot of mess behind!
Place your lids on the jars and then screw on your bands until they are fingertip tight.
Step 6. Load and Can Your Jars
Load your jars into the canner. You should be able to fit 7 to 9 pints or 7 quarts in your canner, depending on the size and style you have. Don’t let them touch, as this can cause breakage of your jars when they move during canning.
After you’ve filled your canner, add more water until it covers the jars.
Process your jars in a water bath canner for ten minutes. You will need to adjust the canning time if you live at a higher altitude.
Don’t start your timer until the water in the water bath canner has come back up to a boil – even if your water was boiling when you added your jars, it’s important that you wait until it comes back up to a boil before you start the timer.
Even though your jars are hot, they aren’t quite as hot as the canner and they will cause the temperature to dip.
Step 7. Cool Your Jars
Once you have canned your onions for ten minutes, you can go ahead and shut the heat off. You are safe to pull the jars immediately if you want to start canning another batch of onions, or you can let them cool in the water bath.
Either way, once you finish canning your jars, you will want to let them cool. I recommend placing them on a towel in a draft-free location.
Don’t put them on your countertop without anything underneath them – the cold temperature of the counter can be a sharp contrast the jars, which can cause breakage. You can also damage the finish on wooden surfaces with your hot jars.
As your jars cool, be sure to leave plenty of room between them so they don’t bump into each other and break. You can remove the rings to use on another batch of jars if you’d like, but make sure you let the lids remain on the jars.
Press down with your fingertip to see if the lid has sealed – if it hasn’t sealed, it will move up and down.
Some popping noises are to be expected regardless, but if the lid moves, you don’t have an effective seal. You should store your onions in the refrigerator or start the canning process all over again.
Step 7. Store Your Jars
Once your jars have cooled for 12 to 24 hours, you can go ahead and store them. A cool, dry location is best.
You should use them within a year for optimal freshness, but ideally, you should wait for at least three to five days before consuming to allow the flavors to really set in.
Other Recommendations
- All of the pickled onion recipes I have found call for canning in pints. In many cases, you are also safe to convert that to quarts but I would be hesitant since I haven’t found any safe recipes for that yet.
- If you live at an altitude of 1,000 feet or less, you can follow this recipe directly. If you are between 1,001 and 6,000 feet, you should process for fifteen minutes, and at altitudes above 6,000 feet, can for 20 minutes.
- Slice your onions thinly to allow them to pickle more quickly. If your onions are about ⅛ inch thick, they will soften and absorb the vinegar rapidly. If you slice the onions thicker (¼ inch or more) they will have more of a crunch, but you’ll want to wait the full five days after canning to let them truly absorb all of the vinegar.
- Some people add sweeteners, like sugar, honey, or maple syrup. These will make your onions sweeter, removing some of that signature onion tang. I like vinegary, pungent onions, so I don’t use sweeteners. However, some sweet stuff will definitely give them more of a balance. Just make sure you use an approved recipe if you decide to add any sugar.
FAQ
Yes! You can use any kind of vinegar and it will be safe for canning. The difference in the type of vinegar you choose will have to do less with safety and more with flavor.
Just make sure you select vinegar with at least 5% acetic acid and if you’re cleaning very low-acid vegetables (like onions or artichokes), don’t dilute the vinegar with any water. If your vinegar flavor seems a little too vinegary, add some sugar instead of water.
Either is fine and it’s really a matter of preference. I like wide-mouth jars for onions, as it’s easier to pull the onions out with a fork.
You sure can. There are quite a few canner-safe recipes out there that call for ingredients like bay leaves, kosher or pickling salt, peppercorns, or even sugar.
These are all perfectly safe for the canner. This recipe has no added sugar but the apple cider vinegar adds just the perfect touch of sweetness.
No. This recipe can also be converted to a “quick-pickling” method, through which you put the onions in the refrigerator and allow them to develop their flavors in the jars there.
Simply follow these steps but skip all the canning procedures. Remember, though, they need to be used in just a few weeks.
Yeast and mold are the most common types of spoilage in pickled onions. However, as long as you follow water bath recipes that are tried and tested, you should be able to avoid these along with acid-tolerant bacteria.
Keep in mind that most pickled vegetable recipes are for pint jars only, and the water bath processing time is determined by the acidity of the vegetable.
You can usually store your pickles for quite some time, but if you notice signs of spoilage like bulging tops, a lost seal, a bubbly product, or scum on the top of the brine, it might be safer to toss the jars than eat the contents.
How to Use Pickled Onions
There are so many ways to use up your pickled onions – I honestly wish we had canned more! They are delicious atop a sandwich or burger, and they’re also great with grilled meat.
You can even cook them with slow-cooked pot roast or toss them into a salad! I served them instead of using fresh onions in a pasta salad the other day and, boy, were they delicious!
These homemade pickled onions are not only delicious, but they’re good for you. Sure, you can buy pickled onions in the store, but they’re going to be loaded with sugar and preservatives.
This is such an easy recipe, it’s well worth the little bit of extra effort to make them yourself.
Have you ever made pickled onions before? What recipes do you know of that you’d like to share? Be sure to let us know!

Rebekah is a full-time homesteader. On her 22 acres, she raises chickens, sheep, and bees, not to mention she grows a wide variety of veggies. She has a huge greenhouse and does lots of DIY projects with her husband in her ever-growing homesteading endeavor. Learn more about Rebekah here.
Actually you should edit the article where you state any vinegar can be used. Vinegars here in the USA and most all countries is not standardized to a specific acetic acid %. You must use a minimum of 5% acid of liquid hot bath canning. There are some vinegars with Arctic acid. of 4%. There are also many sources that are 10‰ and need to be diluted with distilled water down to 5% unless people like the taste of the much higher acidic level. The old distilled white vinegar recipes typically state 1:1 ratio vinegar:water as the distilled vinegar of the day was 10% acetic acid. Many countries in Europe still have vinegars sold @ 10% acetic acid concentration.
So I recommend editing to state any vinegar of at least 5‰ acetic acid level. If using a vinegar lower it can be adjusted to 5% by adding the proper amount of a higher acid vinegar or reducing via stove top the vinegar volume to achieve 5%. Its only some very basic math to calculate needed volume change either way. Balsamic makes awesome pickled products but can be a point or two high and distilled water needs to be added.
You start out the article saying that onions MUST be pressure canned. Then you go on to say how to water bath them, which is it??
Hey Curtis,
Thanks for pointing that out. I updated the article to say that, while onions need to be pressure canned, picked onions are more acidic and can be canned in a water bath.
Can the jars be put in the oven at 225 degrees instead of the water bath?
Angel, canning must be done in either a water bath canner or a pressure canner.
Are you able to mix the onions (red, white, yellow) in the jars?
I made this for red onions and added pickling spices. I can’t wait to taste them. The brine made enough for 4 pints.