
A clay pot heater is a simple, effective way to heat a small room or space using nothing more than a few candles and some clay or terracotta pots. No moving parts. No electricity. Just ambient heat.
But capturing that heat is the key. A candle on its own generates a set level of heat through a single flame. More flames, more heat. And the heat from the flame must be captured to be useful, otherwise it will disperse upward and the heat production will be negligible.
How Do Clay Pot Heaters Work?
Clay pot heaters capture and transfer heat through conduction, convection, and radiation. These heaters work to radiate heat outward by a combination of the three.
If properly configured, a clay pot heater will capture and radiate the heat from a single flame without letting a single thermal unit go to waste.
Stage 1 – Convection
Convection is the first stage of heating up your clay pots. By putting a direct flame beneath the inverted pot, heat can be captured for better use. Cooler air is forced downward until the space is heated evenly, or heat escapes.
This is where the clay pot heater can capture and disperse the heat in a form you can feel. This stage lasts about 15-20 minutes depending on how much heat is applied from below, and on how much heat escapes.
An unobstructed heat source will funnel heat upward until it dissipates. Note how a candle will burn in seconds if you hover your hand over the top, but you can hold steady for long periods on the sides without injury.
The clay pot heater prevents the heat from escaping out the top, and allows it to move to the second stage.
Stage 2 – Conduction
The next stage is conduction. This is where heat moves through an object. In our case, the heat is moving through the clay pot.
As air inside the pot gets hotter, it fights to escape. It naturally wants to move up and out. Since it cannot, the space fills with heat until it finds a way out.
This is where the pot becomes a conductor. Clay expands very slightly when heated up.
This allows just enough of the hot air to escape through tiny pores that open as a result of the heat. In this case, when the pot heats up evenly it will disperse heat evenly in the next stage.
Stage 3 – Radiation
Finally, heat is dispersed outward through radiation as the air around the clay begins to put out small amounts of heat.
This is like having a large clay pizza oven versus a large fire pit. But instead of keeping heat regular inside the pizza oven, we want our clay pot heaters to radiate heat outward.
Radiant heat is generally slow. But when captured and released slowly, it can be very effective.
Homes like adobe clay structures in the Southwest United States use this principle to absorb heat during the day, and to disperse it slowly at night to retain a relatively constant temperature.
The clay pot heater acts in the same way. By capturing heat, it allows radiant warmth to escape outward while candles are lit, and continues to radiate heat for a short while after the candles go out.
Option #1: Building a Standard, Tabletop Clay Pot Heater
Gather Your Gear
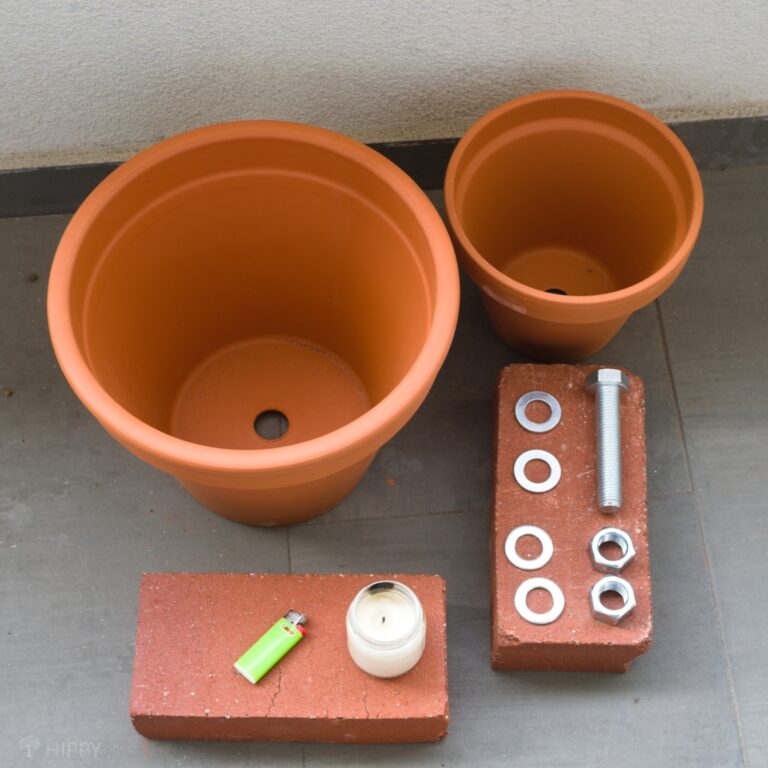
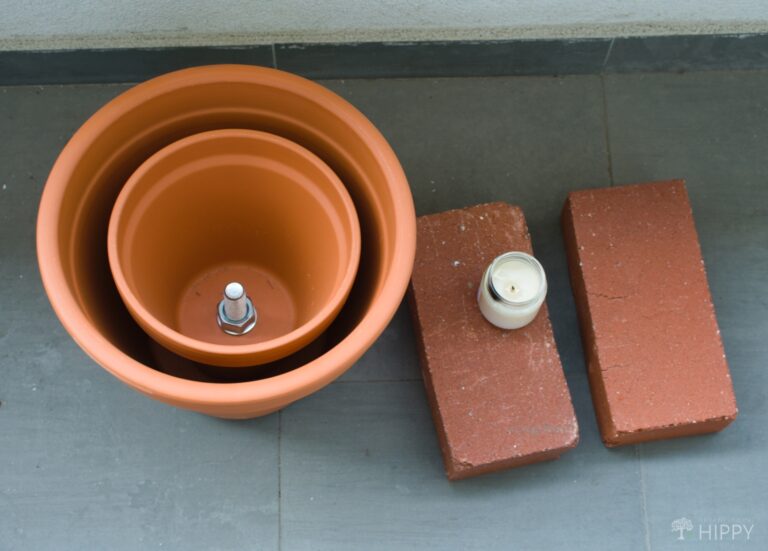
To build your own clay pot heater, you’ll need a few basic components:
- Clay pots (Typically 5”, 7”, 10”, or 12” in size)
- All-thread
- Bolts (Must be same thread pattern as All-thread)
- Washers large enough to cover drain holes in the base of the pot
- Clay pot fireproof base (I used two bricks)
- Candles, flammable gel, or another heat source
Building Your Clay Pot Heater
For our heater, we used two clay pots of slightly different sizes. The difference in diameter should be of around 2 inches. So you can use, for example, a pair that’s 8″ and 10″, one that’s 10″ or 12″ depending on how big youw ant it, and on how many candles you intend to use.
A single match and we were up and running. We allowed heat to escape through the hole in the top to demonstrate how heat funnels outward if unobstructed.
A typical clay pot heater uses a different configuration to trap heat and increase stability.
The basic step-by-step procedure goes something like this:
Step 1: Find a set of clay pots.
For our heater, we used two clay pots of slightly different sizes. The difference in diameter should be of around 2 inches. So you can use, for example, a pair that’s 8″ and 10″, one that’s 10″ or 12″ depending on how big you want your DIY heater, and on how many candles you intend to use.
You can stack pots of larger sizes on top of each other to provide an air gap between pots. This may be useful if you have a heat source with a wider base, or multiple candles.
Step 2: Connect the two pots
You may have to to try on nuts and washers of different sizes to get ones that fit and cover both wholes of the pots… I know I did!
Insert the threated bar or bolt through the first (larger) pot:
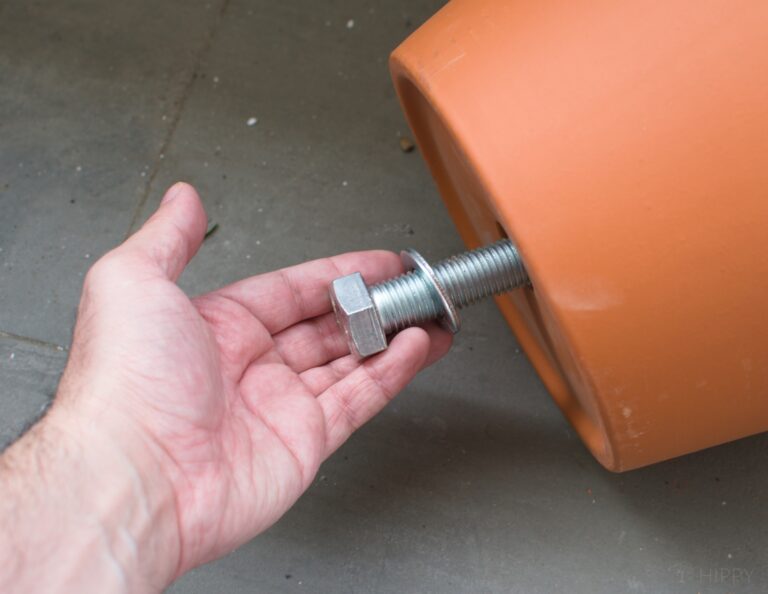
Then add a washer and a nut on the inside of the first pot:
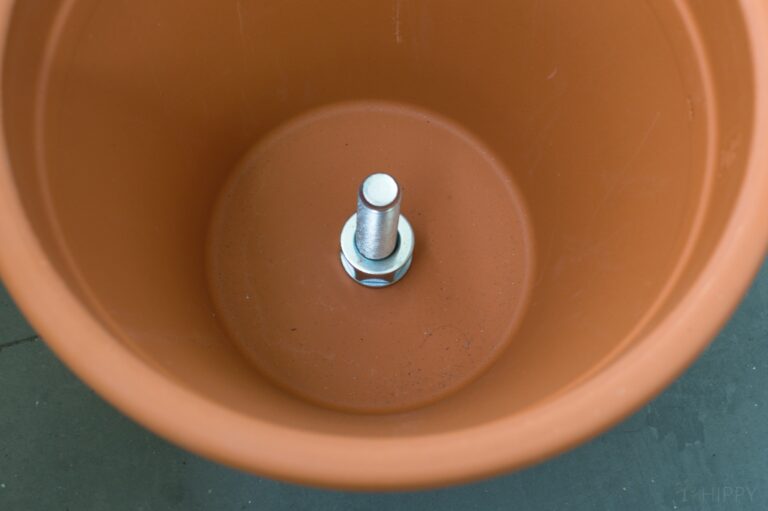
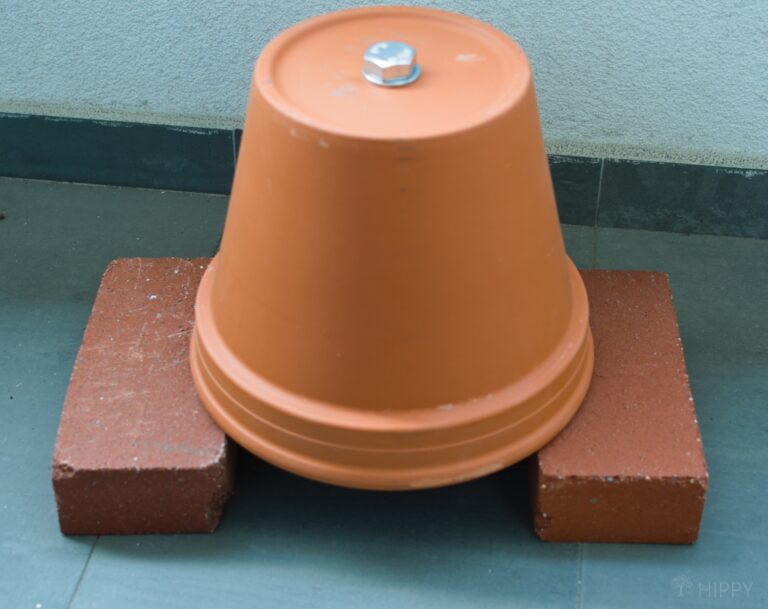
Then add the second pot, and another washer and nut inside it:
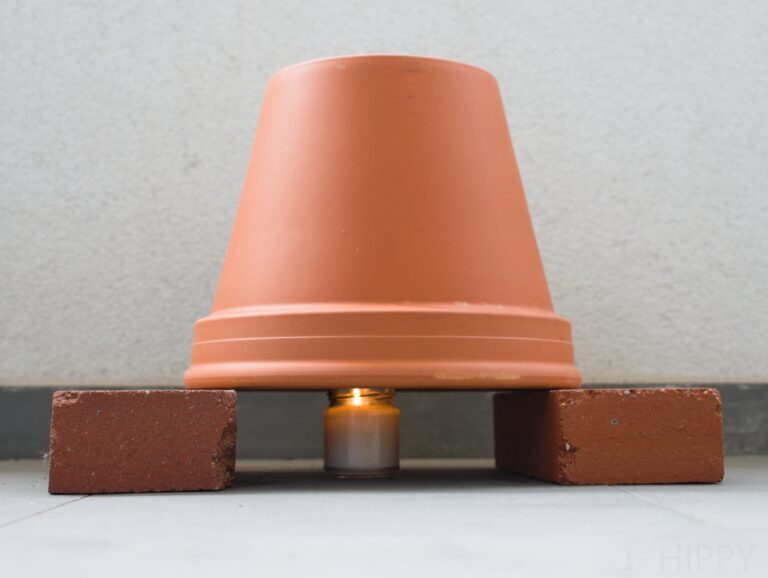
And that’s it! you can now place the two clay pots upside-down on the two bricks:
Step 3: Place your heat source.
Tealight candles are enough to supply a fair amount of heat for a short period of time. You can extend the duration with longer-burning candles if desired.
Make sure the heat source you intend to use will fit inside the clay pot heater, and not get smothered:
Provide an air gap between the candle and the base of the clay pot to allow air to flow in. This will prevent the flame from suffocating.
Step 4: Start your heater.
Light your candles and arrange the pot above the heat but upside down so it captures the heat.
Make sure you have a source for air to enter from below or the flame will smother out. Different configurations may help to improve the heat output or general feel.
Option #2: Make a Hanging Terracotta Pot Heater
Making your own hanging terracotta pot heater is easy and cost-effective, but you may be wondering how you’ll heat a room if you don’t have a tabletop to put it on. This hanging heater is a great choice, since it’s meant to be suspended and doesn’t require a flat surface.
The steps are similar to those listed above, but with a few variations.
Gather Your Materials
Before you begin, make sure you have all of your materials. You will need two large terracotta pots (the bigger the better), one smaller pot, a few candles, some metal tubing that fits snugly into the top of the larger pots, a few feet of wire, and some strong glue. You can find these materials at any home improvement store and online retailers.
Steps
Step 1: Assemble Your Pot Heater
Once you have all of your materials, it’s time to start assembling your terracotta pot heater! Start by attaching the metal tubing to the bottom of each large terracotta pot with glue. Make sure it fits snugly so that no air or smoke can escape through the connection.
Next, place the smaller pot upside down in one of the larger pots and attach them together with additional glue. Once they are firmly connected together, fill both pots with sand or lava rocks until they are completely full. The sand will help absorb heat from the candle fire while also keeping it contained within the pots.
Step 2: Attach Wire and Hang
The final step is to attach a few feet of wire around both of the large pots in order to hang them up securely. Be sure to leave enough slack so that you can adjust them depending on how much heat you want in your space. When everything is properly secured and hung up, light the candles and enjoy!
Option #3: Make a Heater With 3 Pots Instead of 2
Most clay pot heater tutorials call for two pots, but this is assuming that the walls of those pots are relatively thick (which provides more insulation).
If your pots are on the thinner side (you’ll know this is the case if you find your heater just isn’t putting out enough heat for your liking), you can try to make a heater with three pots instead of one.
Gather Your Materials
For this tutorial, you’ll need the same materials as in the first tutorial, plus:
- A third 8-inch clay pot (with a drainage hole on the bottom)
- Two nuts (instead of one)
- Six washers (instead of three)
- Five nuts (instead of three)
- Ovenproof ceramic bowl
- Drill
- Glass-cutting drill bit (3/8”)
- 18” threaded rod (3/8”)
- Terra-cotta pot
Drill Holes in Pots and Bowl
Using a 3/8″ glass-cutting drill bit, carefully drill a hole in the bottom of each clay pot, as well as the ovenproof ceramic bowl. Make sure to keep your drill speed slow and steady to avoid breaking the pots.
Step 1: Assemble the Heater
Start by placing the ceramic bowl upside down on a flat surface. Insert the 18″ threaded rod into the hole you drilled in the bowl, and secure it with a nut and washer.
Step 2: Add the First Clay Pot
Slide the first (largest) clay pot onto the threaded rod, with the drainage hole facing downwards. The pot should rest on the ceramic bowl. Add another washer and nut to hold the pot in place.
Step 3: Adding the Second Clay Pot
Repeat the process with the second (medium-sized) clay pot, placing it inside the first pot. Add another washer and nut to secure the pot in place.
Step 4: Adding the Third Clay Pot
Add yet another washer and nut before sliding the third (smallest) clay pot onto the threaded rod, placing it inside the second pot. Finally, add another washer and the last bolt to hold everything together.
Option #4: How to Make a Solar Clay Pot Heater
If you’re looking for an easy and affordable DIY project, why not try making a solar clay pot heater? It’s an easy project that requires minimal tools and supplies, and can be used to warm any room in your house.
Gather Supplies
The first step is gathering all the supplies you’ll need. You will need two large clay pots (4-5 inches larger than the one that fits inside of it), 1/2 inch copper tubing, flexible tubing, duct tape, silicone sealant, water heater coils, pipe insulation foam, and clamps.
You may also need some other tools, such as a drill with a 1/2-inch bit, scissors, or wire cutters. Once you have all your supplies gathered up, you’re ready to begin building your solar clay pot heater!
Steps
Step 1: Build the Frame
The frame of your solar clay pot heater is made from two large clay pots – one slightly larger than the other so it can fit inside. Drill three holes in one side of the outer pot at equal distances apart with a 1/2 inch drill bit. These are where your water heater coils will be inserted and secured with clamps.
Then use silicone sealant to glue the inner pot into place inside of the outer pot. This creates a double-walled chamber that will trap heat as well as provide insulation against freezing temperatures outside.
Step 2: Attach Copper Tubing
Once your frame is built, it’s time to attach the copper tubing. Start by running a length of 1/2 inch copper tubing along each side of the frame from top to bottom.
Secure them in place using duct tape or clamps if desired. Then connect each end of this tubing together using flexible tubing so that it forms a continuous loop around both sides of the frame.
You may also want to add an additional piece of copper tubing across the top for extra heat transfer if desired. Make sure all connections are secure before moving on!
Step 3: Add Insulation & Water Heater Coils
Once all your copper piping is attached and secure, add insulation around each side of the frame using pipe insulation foam or another material that won’t absorb moisture or break down over time due to UV exposure from sunlight during warmer months.
Finally, add your water heater coils on either side of the frame and secure them with clamps – this is what will actually heat up when exposed to sunlight during winter months!
Option #5: The Inverted Clay Pot Heater – the Simplest Type
This is the simplest type of clay pot heater you can make. It’s basically just an upside-down pot beneath which burning candles are placed. It’s easy to set up and the most inexpensive, too.
However, it’s not super safe and doesn’t distribute or store heat as well as the other types – some homesteaders have likened it to having a hot stone in the room.
Nevertheless, it’s a fun project that is also quite useful. To get started, you’ll need:
- An inverted clay pot (ceramic or terracotta work best)
- Candles
- A metal plate or tray to place below the pot
- Masonry screws and nuts (optional)
- A drill with a masonry bit (optional)
Step 1: Assembly
Place your metal plate or tray on the floor beneath where you will be placing your inverted clay pot. This will help catch any wax that might drip from the candles during use.
Place your chosen number of candles in a circle around the lip of your inverted clay pot. Make sure that they are spaced evenly apart from one another and all facing inward toward the center of the pot.
Step 2: Secure the Candles
If desired, secure your candles in place by screwing them into the lip of your pot using masonry screws and nuts, making sure that they are firmly secured before lighting them up.
Step 3: Lighting the Candles and Using the Heater
Once everything is set up and ready to go, light each candle carefully, one at a time, until all of them are lit and burning steadily within their holders around the lip of your inverted clay pot heater.
Leave your heater running for as long as necessary to warm up whatever area you wish to heat up with it – usually, just 10 minutes or so should do it. Just make sure that you keep an eye on it while it is running so that nothing catches fire accidentally!
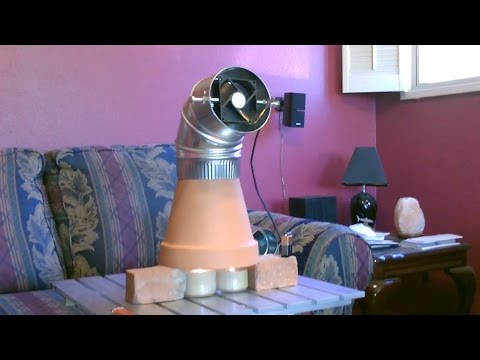
Option #6: The “Engineered” Clay Pot Heater
This type of clay pot heater is incredibly involved. It has a lot of technical design elements, and while it’s super effective, offering a larger heat output and more safety, it is more challenging to construct.
Here’s a YouTube video to walk you through it:
Getting the Most Out of Your Heater
There are a few key elements to keep in mind. The environment, situation, and need will play a significant role on whether or not you need to re-purpose your clay pots.
Assembling the heater is simple and easy if you have the parts on hand.
The Smaller the Space, the Better the Result
A key component to a clay pot heater’s success is the size of the room. I’ve tested these heaters and confirmed radiant temperatures in excess of 140 degrees Fahrenheit (60 degrees Celsius) using only three tealight candles.
So as a concept for a small space heater, they’re more than capable. But the key phrase there is “small.”
In order to heat a space effectively, you’ll need to reduce the size of the room you’re attempting to heat. If the expectation is to heat a 400-square foot living room with a single heater, you may find these pots falling short.
However, if you reduce the size of the room – say to a small bathroom or bedroom – you’ll start to see the room temperatures rise.
Even a small chicken coop could be served with a well-positioned and safely-secured clay pot heater. Just make sure to keep fire safety in mind at all times!
The Ideal Number of Pots to Use
The success of your clay pot heater largely depends on the number of pots you decide to use. Generally, it’s recommended to nest two or three terracotta pots inside each other, with two being the sweet spot for most situations.
Using three pots can be helpful if they’re too thin, but this might trap too much heat, making the entire setup less efficient. To achieve the perfect balance, go for one 12-inch diameter pot and one 10-inch pot for a larger heater, or a 10-inch and an 8-inch pot for a smaller setup.
As you select your pots, it’s essential to avoid glazed ones. The glaze can prevent the pots from properly absorbing and circulating heat.
Additionally, make sure your terracotta pots are completely dry before using them. Wet pots may heat unevenly, causing them to crack or even blow up, sending shards of pottery everywhere. So, ensure your pots are in good condition, unglazed, and bone-dry before each use.
Before you assemble your clay pot heater, closely examine the pots to ensure they’re free from any existing cracks. These cracks can cause instability and pose a risk of the pots breaking during use.
To properly inspect your pots, light them up from within and observe the exterior for any visible light escaping through cracked areas.
When stacking your pots for the heater, it’s important to leave around an inch of air space between them. This space allows for proper circulation and distribution of heat throughout your heater.
As you’re putting together your pots, make sure they fit snugly inside one another while still maintaining the necessary air gap.
Check your pots thoroughly for any paint, residue, or other foreign substances that might be present. If you find any, it’s crucial to remove these substances before using the pots in your heater, as they can emit noxious fumes when heated or cause issues with heat distribution.
Use sandpaper or a wire brush to gently scrub away any coatings or buildup from the surface of your pots.
Set it up for Success
To get more radiant heat, cover the top to prevent heat from escaping so easily.
With regard to safety, you must be able to position the heater where it won’t be disturbed by little hands, pet paws, or a clumsy visitor. Exposed flame and hot wax can cause serious injury if toppled as a result of movement or instability.
So it’s best to set up your clay pot heater in an area that is at a safe distance from disturbance, and away from flammable surfaces.
Because of the inherent stability of an inverted clay pot, you can focus more on the pot’s location. Keep it away from open drafts, vents, or fans that could cause excessive airflow.
As mentioned earlier, avoid placement on or near flammable materials. You can increase the stability by bracing the pot or anchoring it down.
Dial in Your Duration
Time is also a factor. I was able to use a few tealight candles rated at four hours and they burned for nearly six hours.
Some candles may burn for a shorter time and others for a longer duration. This is something to keep in mind if you intend to heat a space for an extended period of time.
In an emergency, the best candle is going to be the one you have on hand. And the longer it lasts, the better. Even after the candles go out, the clay pots tend to radiate heat for a short while. But it tapers off pretty quickly.
The clay pot heater is also efficient and cost-effective. Since there are no moving parts or electrical components, all you need is a steady flame.
Candles are ideal and inexpensive. For example, a 100-count set of tealights can be had for less than $6 – or about 3 cents each. In our example, three tealights held a constant temperature for a minimum of four hours:
In other words, a constant radiant heat source like this can operate for just over 2 cents per hour. This cost can be even less if you make your own candles or re-purpose old ones.
Best Types of Candles to Use
One of the best and safest options of candles for your clay pot heater is those that come in a tin. These candles are stable, burn consistently, and there is no risk of breakage or melted wax.
Tin candles can last for around 50 hours, depending on the quality, making them a great option for long-lasting heat in your home. Plus, candles in a tin are relatively inexpensive and can be found in many stores or purchased online.
Tealight candles are the most commonly used candle type for clay pot heaters, as they’re small enough to fit under the pots. Choose high-quality tealight candles (preferably in tin or glass jars) that last around 5 to 6 hours, ensuring that your heater isn’t too costly.
Since clay pot heaters are meant to be used only when the power fails, investing in better-quality tea lights is a manageable expense for the convenience and heat they provide for your DIY heater.
Another essential aspect of using candles in your clay pot heater is efficiency. Using four candles can provide more heat than a single candle, making the heating process more effective. By placing multiple candles beneath your clay pot heater, you are maximizing the output and can quickly warm up your space in cold weather situations.
Although using standard long household candles might seem like a cost-effective solution, they aren’t recommended for your heater. The main issue is that these candles tend to be unstable, meaning they can fall over, leading to a potential fire.
Plus, standard household candles might reach too high and tip or lean, causing the clay pot heater to become unbalanced (and, thus, unsafe).
Be Mindful of Fire and Carbon Monoxide Safety!
When using your clay pot heater, or any other source of heat or fire in your home, it’s so important to think about safety – both in terms of fire and carbon monoxide exposure.
Always place your heater on a stable, non-flammable surface and keep it away from flammable materials such as curtains, clothes, or furniture. Ensure that the heater is in a well-ventilated area, as burning candles consume oxygen and produce carbon dioxide.
Be mindful of kids and pets and never leave the heater unattended. Regularly check the candles to ensure they are burning correctly, and remember to extinguish them before going to bed or leaving the house.
With that said, a clay pot heater offers an affordable and easy way to keep your home warm during power outages or chilly days.
At first, these heaters seemed like a farce. But once I put them to the test, I was pretty impressed. While they don’t put out the instant intense heat of an open fire, they do work to radiate a comforting glow, and they do help to stave off the chill.
As long as you take the time to consider a few safety precautions and aerodynamics, this simple configuration can provide hours of low-level heat whether it’s for survival, ambiance, or comfort.
D. Ryan Buford is a professionally trained writer and journalist from the Pacific Northwest region of the United States. He currently hosts “The Next Generation,” a live, weekly internet radio show on Prepper Broadcasting Network that focuses on parenting and preparedness. Learn more about our team here.
As an advocate of the preparedness and homesteading world, Ryan left behind a successful, fast-paced urban job for a more sustainable life among farm fields, wildlife and family. In addition to leading a self-sufficient life, he writes as a freelancer and maintains a blog and magazine at www.dryanbuford.com.
I would like to see more pics of stacked pot construction and what are your thoughts of sterno versus tea lights? great work!