
The first year on my homestead I struggled to keep up with yard work. Heavy winds often caused loose limbs and deadfall to litter my property.
I’d spend hours cleaning up the brush every spring, piling it up and hauling it away to the brush pile at the landfill several miles away.
Such a waste. It costs money, time and extra energy. Plus, I’d spend money on landscaping bark for the garden. But there’s a better way. You can repurpose your deadfall by turning out wood chips for use around your property.
This simple but effective form of permaculture will save fuel, time and energy all around. It will also help to benefit your garden, your trees, and the general appearance of your home.
Landscaping bark is often used to spruce up homes and commercial properties. It is relatively inexpensive compared to other forms of landscaping materials. It adds to curb appeal, aids in weed prevention, and it also helps to keep roots and plant life cool during hot summer months.
However, it tends to fade each year and disappears as it compacts or breaks down naturally, so it generally needs to be replaced to remain effective. Commercial bark sometimes spurs wasteful foresting methods, contains chemical additives, and has colors or dyes added in.
But there’s hope. You can take advantage of the waste from trees on your property to create your own wood chips. This task can be repetitive and dangerous, so keep safety in mind when breaking out the equipment.
Table of Contents
What Exactly Are Wood Chips – and What Are Their Benefits in a Garden?
Unless you’ve been living under a rock, you’re probably already aware of what wood chips are and how they can be used. However, here’s a short synopsis in case you need to jog your memory.
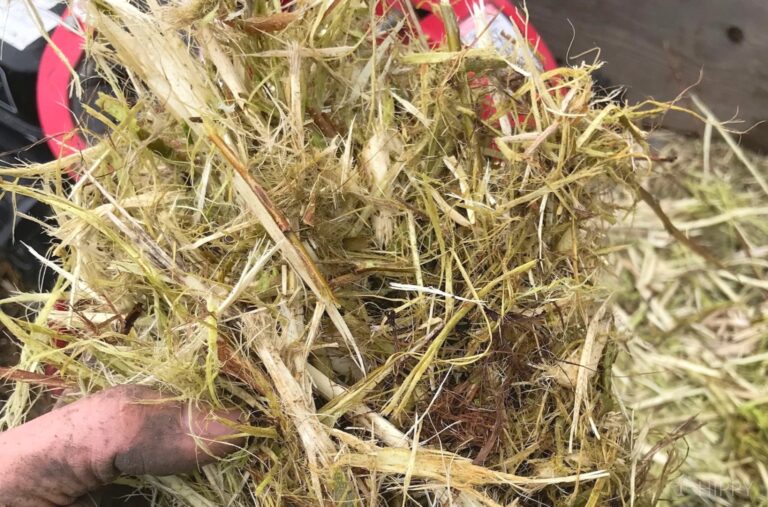
Wood chips are tiny pieces of wood, usually made out of whole trees, branches, and limbs.
While they can be used to make paper, textiles, and wood products like chipboard (and more recently, as fuel), they’re also an excellent fertilizer for gardens. They are renewable and easy to use as a mulch.
Not only are wood chips economical – you can easily create your own or obtain them for free from local recycling centers and arborists – but they also help keep unnecessary matter out of the landfills.
You’ll contribute less to fuel wastage and since they break down so slowly, you won’t need to replace them often in your garden.
Wood chips are usually comprised of material of various sizes, so they’re more resistant to becoming compacted than other materials, like bark or sawdust.
Plus, this diversity supports a wide range of soil microorganisms, making for a healthier plant environment and more resistance to environmental stress.
The Equipment
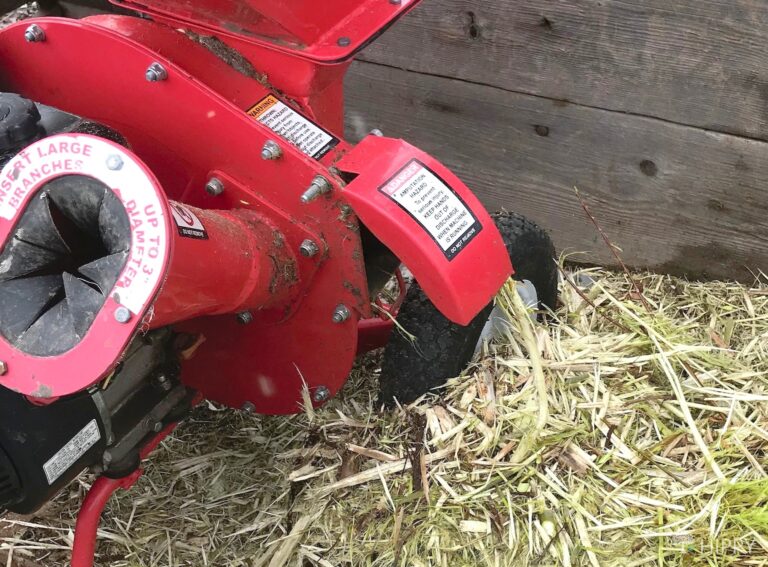
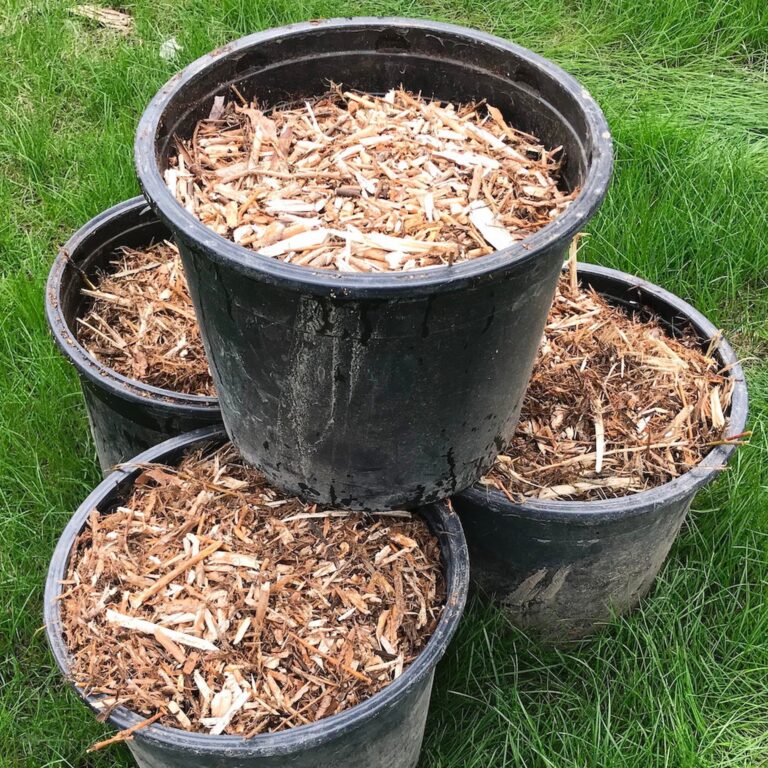
Wood chippers use a high-speed rotary cutting motion to reduce branches into small chips. These gas-powered small engine cutters are a big help around the homestead. Piles of branches can be reduced to fit in a few five-gallon buckets in a matter of minutes.
Residential wood chippers are moderately expensive, but if you consider the cost of landscaping materials year over year the cost of the equipment isn’t as daunting over time. The price varies depending on the size and ability of the machine.
To gauge the best equipment for your homestead, keep an eye on the diameter of branches that tend to fall and choose the best for that size. If you are unsure, cut a small section and take it with you when you go in to make a purchase.
If you’re looking to go in cheap and have some skill with small engine repair, you may be able to find deals locally by checking ads, flea markets, thrift stores or yard sales.
In some cases, people will buy the equipment and never use it, or have problems starting it up and sell it for pennies on the dollar. Basic maintenance and minor repair could save you hundreds of dollars if you’re not in the market for a brand-new machine.
Understand how the machine works and the inherent dangers: fast moving parts, flying debris, loud equipment. There are warnings on all equipment to help keep operators safe so pay attention.
Always wear your protective gear, including impact-resistant gloves, eye protection, and hearing protection.
The chips are often thrust from the machine at extreme velocity, so make sure you have appropriate clothing on, like work boots, good pants, and long sleeves. Save the shorts and flip-flops for another day.
What Kind of Wood to Chip – And What to Avoid
In most cases, you can put the branch trimmings and deadfall from your property into the chipper. The majority of native trees are acceptable for wood chips, but there are some species and forms of wood that should be avoided.
Naturally occurring toxins are present in a few trees used as landscape decoration. These toxins can be harmful to you or to your plants. In some cases, toxins can be absorbed through the chips and into your plants.
The EPA suggests avoiding black walnut for any composting or wood chipping work. Some additional species to avoid are:
- Oleander
- Sassafras
- Yew
- Black Walnut
- Eucalyptus
- Poison Oak
If you obtain wood chips from a vendor or landscape supply, make sure to get an idea of what type of wood is used and if that form of wood is safe for a garden.
Avoid sawdust and chips from any of the woods listed above, and any kind of processed or pressure-treated wood.
Pressure-treated woods contain arsenic chemical compounds that can be lethal if mishandled or ingested. Adhesives and coatings on other forms of treated or processed woods can be harmful to you or your garden as well.
Processing Your Own
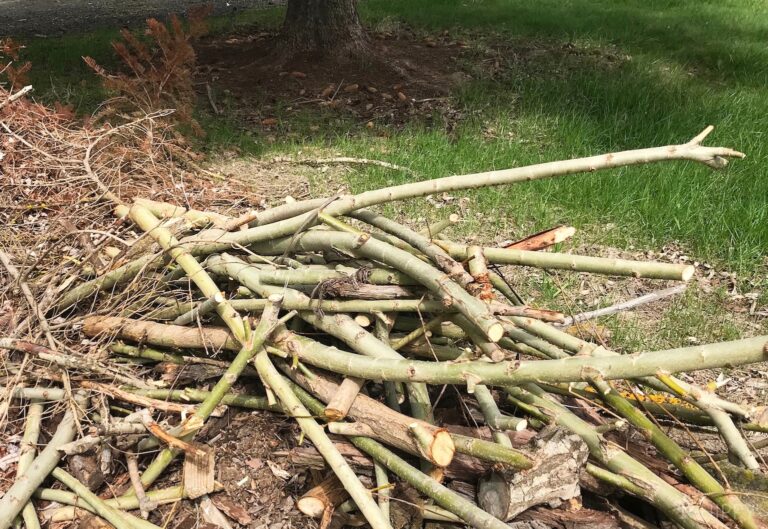
Each year – often after the last snow has melted – you may find branches that didn’t make it through winter are strewn across your yard. In some cases, you’ll pare back some of your trees before spring buds emerge or as the season carries on.
Collect all the branches and set them aside in a pile. When doing so, orient branches in one direction if you can. This will help when you reach into the pile so you don’t have to fight to get the branches out when you are ready to process them.
It helps to split branches down to reasonable sizes within the tolerances of your machine. For example, if you have a branch with a 1” diameter that forms a “Y” with two similarly sized offshoots, cut it back near the base so you have two separate branches.
This will help when you are feeding the branches into the machine. Use loppers or a pole saw to process your branches if they are too large to fit.
If you are trimming green branches, allow them to season in the open before chipping if you can afford to wait. This will help to reduce the stress on the equipment and take less time during processing.
Be sure to keep your pile in a location away from buildings or other trees if you intend to wait before chipping to prevent potential fire damage and rodent activity.
When you are ready to start chipping, lay out a tarp at the discharge point and set up a backdrop if you can. You can use a pallet or a piece of plywood as a backstop. Remember to use your protective gear as you proceed.
Fire up your chipper and feed branches slowly until you get the hang of it. The machine is designed to pull branches into it. Get the base of each branch started and keep your hands away as it works.
The chips will collect in a pile as you process them and the drop sheet will make final cleanup and collection much easier. It usually helps to orient the discharge so chips and dust blow away from you – otherwise, you’ll be covered in sawdust by the end.
Casting Your Chips Early
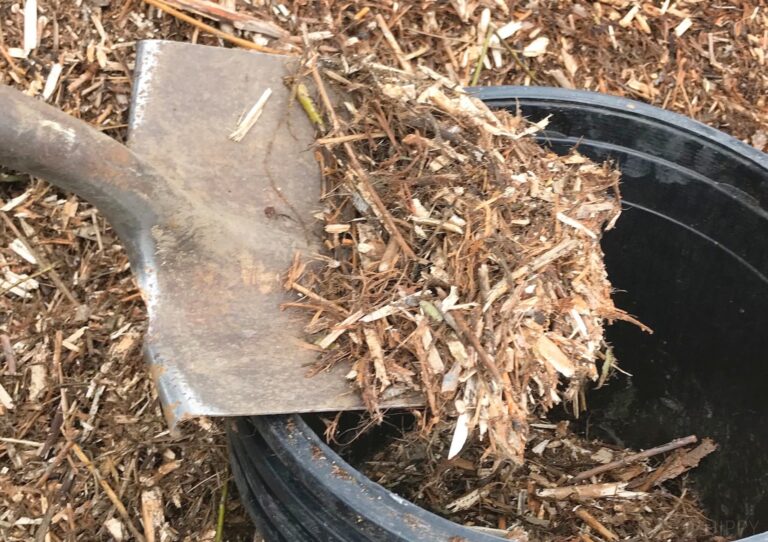
Whether you chipped your own or had a load delivered, you can start spreading your stockpile of wood chips around the homestead. It helps to have a wheelbarrow, buckets, or a small work trailer on hand to move the chips around to your various plants and landscaping areas.
If you’ve had chips on the ground before, pull them back to expose the earth beneath. You’ll likely see various forms of weeds or grasses underneath.
Take a few moments to pull anything that you don’t want to grow up and through your cover. If you’ve laid out weed blocking fabric, this is a good opportunity to check for rips or tears and replace or re-cover them before spreading your wood chips.
Using a shovel, buckets, or even your bare hands, reach into your pile and place the chips about 2-3 fingers deep on any areas you intend to use the chips for weed control. If you do this early in the season it should help to prevent weeds and limit the need for chemical sprays.
Garden Planting Methods
When using bark on a new garden, you can apply a thick layer before you plant. When you are ready to set your seeds or starts, pull back just enough bark to drop your plants in. This will prevent most nuisance plants from coming up around the base of your good ones.
Using bark in a garden can be more than just weed control. There are a few gardening methods that use bark to generate food when soil is inadequate or unavailable.
For example, wood chips are an excellent method for growing potatoes. Dig a small trench about a foot deep and set your potato cuts inside.
If you are homesteading on a small plot, you can set up a series of pillars made of chicken wire and fill the pillars with wood chips, adding layers slowly and placing your potato cuts near the outer rim as you go.
Over time, the leaves will emerge from the outside and you can access the potatoes inside as needed.
Wood chips also help in winter gardening. If you live in a region with the regular threat of cold extremes, save up your wood chips and use them as insulation on the sides and bottom of your cold frame.
Even after the ground freezes, the wood chips will help protect the roots of your winter harvest vegetables and prolong your growing season.
If you have a significant pile branches or limbs that couldn’t fit in your wood chipper, consider adding them along with your wood chips and other garden waste to a hügelkultur bed.
These beds are designed to use the natural decaying process of wood to drive nutrients into the soil cover. They also provide a natural windbreak and additional planting surface because of the mounded structure. To build a bed, dig a small trench and pile your wood waste inside.
Then cover the pile with inverted turf and top it off with good soil. You can then plant directly on the bed and enjoy the benefits of a windbreak, vertical gardening and permaculture all in one.
Use Wood Chips in Raised Beds
Yes, you can even use wood chips in raised bed plantings. Use them directly in the beds or, as a better alternative, you can use it as a walkway between the beds.
You can even pile the chips up to serve as a killing mulch in overgrown raised beds that you’d eventually like to plant in.
Create Your Own Walkways
A side benefit of bark is that it allows for a clear footpath around your plants. Because of the natural weed prevention properties, it’s easy to recognize how pathways of bark can help with access to your fruits and vegetables.
Composting Wood Chips
Composting wood chips is a great way to harness all of their benefits without tying up your garden’s nutrients as they decompose. You will want to compost your wood chips for at least three months to see any benefits.

Woodchip Garden Trail
To create walkways, mound the wood chips in the areas leading through and around your garden. The more you use, the better. Again, 2-3 fingers are adequate in most cases.
Building garden paths help with the aesthetics of your garden and they help to prevent dirt or foreign seeds from finding their way into your garden – and your home.
Since most gardens are tilled in patches, the bark walkways prevent mud from collecting at your feet when it rains and helps to make a clean space for setting down tools during pruning and baskets during harvest.
At the end of the season, use a rock rake to spread the bark in your paths over your garden and the bark will help to enrich the soil whether you till or not.
Casting Your Chips Late
One of the benefits of wood chips is that you can set them aside and let them season all summer without taking up all the space of a giant pile of sticks and brush.
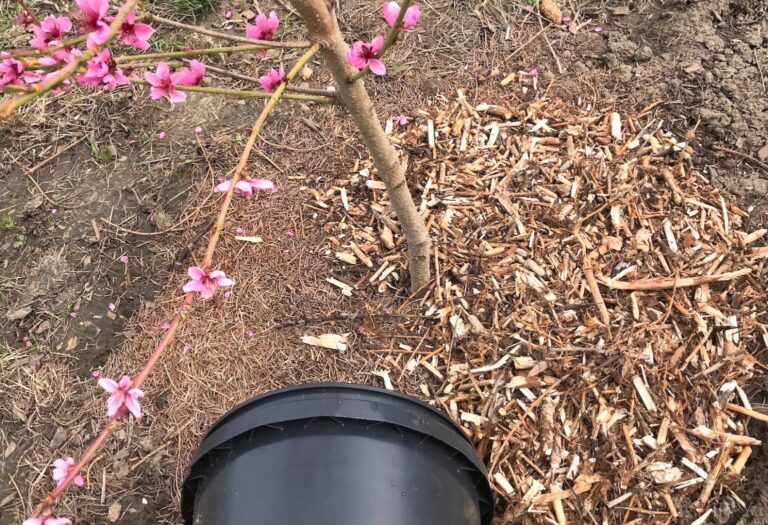
At the end of the season, you can return to your chip pile and use what’s left over to apply mulch to delicate plants that need help through winter.
Rose bushes, berry bushes, and young trees can benefit from a little extra care before winter hits. By covering your younger plants or bushes, you will give them a greater chance for survival through freezing temperatures and snow while they are dormant.
In general, you can place the same amount – about 2-3 fingers – around the base of your plants. Properly pruned rose bushes may require a little more in a hump at the base.
The bark provides an insulating layer for root systems and helps to retain moisture for longer periods.
Do Nothing
That’s right – do nothing. Save up those wood chips after all your garden planting, winter mulching, or pathway creations and set them aside. Any leftovers can be used as brown matter that is essential for good compost.
Add in some grass clippings and fallen leaves and let the magic happen. Eventually, the mixture will turn to soft, nutrient-dense soil that you can use next year.
This process can take some time, but it’s better than letting valuable wood chips go to waste. There are many ways to build a compost bin to suit your needs. Just make sure you have the proper ratio of brown matter and green matter in the mix.
Problems With Using Wood Chips in a Garden
As with any kind of landscaping tool or mulch, there are some considerations you need to make before deciding to go with wood chips. While they are effective and a great option 99.99% of the time, keep in mind that most of the issues in using wood chips are related to improper use.
If you use too many wood chips, for example, in your soil, you may have issues with nitrogen or other nutrient deficiencies (or conversely, overload).
Some people argue that using wood chips can tie up nitrogen and result in plants that are hungry and deficient. However, it depends what kind of plants – and where – you are using these wood chips.
Usually, when you use wood chips to mulch around shrubs and trees, you won’t have any issues. Otherwise, just keep in mind that there is a shallow zone near the surface beneath a layer of wood chips that is typically deficient in nitrogen.
This can be beneficial, though. This “nitrogen-deficient zone” can prevent the formation of weeds and conversely allows for more nutrients to be cycled back to your plants as a result.
You will want to be careful about using too many wood chips (too thick a layer) on first-year perennials, annuals, and some vegetables unless you have put down a nutrient-dense layer of compost first.
This will create a sandwiching effect that allows your plants to access as much nitrogen as possible.
Some people also worry that wood chips will invite disease to the garden. This is typically not a concern if you are making your own wood chips at home.
However, if you’re worried that you may be introducing pathogens, let the chips age for one or two years before you apply them to the garden. While they will lose some nutritional value, they will nonetheless be effective in your garden.
When you’re gardening close to the house, you might want to avoid using wood chips. This is because wood chips can contain small spores that breed fungus and can stain the siding on your home.
You will also want to avoid using wood chip mulch around plants that are sensitive to disease, like tomatoes, lilacs, and roses.
There are some naysayers out there who argue that allelopathic chemicals in wood chips can cause the death or stunting of the growth of nearby plants.
Alllelopathy refers to the release of chemicals produced by a plant that suppresses the growth of nearby plants. However, this is not the case with most types of wood chips. While there are some with these properties, like walnut, that’s not true of most.
You also need to avoid mulching too deeply with wood chips. While mulching deeply with other types of mulch, like hay, shouldn’t be a problem (you can easily push aside the hay to plant or make room for other things), that is not the case with wood chips.
A deep pack of wood chips, especially when wet, can be very difficult to move. Stick to a layer that’s n more than three inches deep.
Finally, remember that wood chips and bark mulch are not the same thing. They have drastically different properties and it’s important that you use natural wood chips from organic sources.
Wrap-Up
Wood chips in a garden are an essential and often underrated tool. They are a natural, effective form of weed control. They provide insulation to valuable plants through winter. They create quality soil amendments over time.
By taking the time to clear up your deadfall and save up those pruned branches, you can provide for yourself and your plants on the homestead.
The next time you’re about to head off to the landfill with that load of brush, or set fire to that slash pile, take a moment to reconsider the hidden benefits of those little wooden chunks. Give them the opportunity to bring new life into your garden.
D. Ryan Buford is a professionally trained writer and journalist from the Pacific Northwest region of the United States. He currently hosts “The Next Generation,” a live, weekly internet radio show on Prepper Broadcasting Network that focuses on parenting and preparedness. Learn more about our team here.
As an advocate of the preparedness and homesteading world, Ryan left behind a successful, fast-paced urban job for a more sustainable life among farm fields, wildlife and family. In addition to leading a self-sufficient life, he writes as a freelancer and maintains a blog and magazine at www.dryanbuford.com.
I was wondering if it is appropriate to plant perennials and shrubs in a mixture heavy on wood chips and light on soil. We have poor soil in our garden. Our master gardener was supervising planting. When I walked around the property and went to add a compost and then mulch I was surprised to see the plants were actually planted in mostly wood ships and a slight bit of soil. Was very surprised. Shocked actually. I added lost of compost and put some wood chips back, but then covered in mulch. I live in zone 6 in CT. Soil is either compacted and terribly dry, or weed-filled with wild rose bushes (rosaria with the berries) and invasive vines like English ivy and poison ivy, OR the soil is a heavy clay material.
Karen,
Your master gardener was on the right track. With densely compacted soil, your best bet is to provide a loose-fill and soil mixture capable of allowing the plant to root while still small. Once strong enough, the compacted soil will be no match for the drive of the plant – especially if it is a hardy plant with a good taproot. Over time, the wood mulch and soil mix will decay and provide a loose soil that will do well to retain some water at the base of the plant so it doesn’t run off along the surface of the surrounding clay. It will act somewhat like a sponge and help to keep your plants alive during hot, dry months. Plus, weeds and invasive plants can be plucked much easier from the area surrounding the base of each plant.
This method would not be as effective with annuals or delicate plants unless you intend to use this as a decorative annual plot and have an abundance of time on your hands.
This type of plant setting is similar to hugelkultur – a German form of gardening that allows plants to grow on a limited space nearly anywhere. Proper rotation can provide decades of high quality soil and compost over time, or a healthy root bed for just about any type of garden.
can I use palm wood chips on my lawn that is showing brown spots
Can green woodchips be spread across the pasture with good effect, or what is the best thing to do with a hugh pile of fresh green chipped wood&leaves?