
Growing anything, whether it be flowers or vegetables, requires a near-perfect environment. If plants are not watered correctly or protected from harsh weather conditions, they will not grow to their full potential. They might even die!
The most important factor that dictates how plants grow is the soil (or other medium) that they are growing in. Even more important is the balance of nutrients that are contained within this medium.
Vital nutrients and trace elements can be added to the growing medium simply by using a cocktail of chemicals found in synthetic fertilizers; however, a far better method is to use quality compost.
Compost is easy to make. We all have those vegetable peelings and plant trimmings that we want to dispose of. Rather than tossing them in the trash, you can throw them in an old plastic bin and after a short while, it will turn into compost.
It sounds simple, doesn’t it? It is.
However, to produce a quality compost that is supercharged with all the goodness that our plants need does requires a little science and know-
Here are some tips that will ensure that the compost that we produce is as high-quality as can be – and the perfect food source our growing plants.
Find the Best Location
The most important tip when starting a compost pile is to start by locating the area in which we are going to produce this quality compost. There are several factors that we need to consider when deciding on which position is best.
The first consideration to make is that it should be close to the kitchen. If we position it too far away, we are less likely to put our food scraps into it.
The problem is that composting will produce smells and attract insects and rodents – probably not something we want under our kitchen window.
Being close to our garden area is important, too, since we will perhaps be adding other materials from the garden. However, it should not be in an area that water collects either naturally or from watering the garden.
While a compost pile needs some moisture in order to break down, you don’t want it to become too waterlogged.
So how do you get the best of both worlds? Some people will choose to compost by keeping a bin in their kitchen for food scraps and then put the compost pile close to the garden.
That way, you don’t have to walk out to the compost every time you have scraps to dump and can just go out every now and then, when your basket is full.
You should also select a location that is more or less level and will allow for good air movement – circulation is key when you’re trying to keep a compost pile healthy!
Get the Best Type of Container
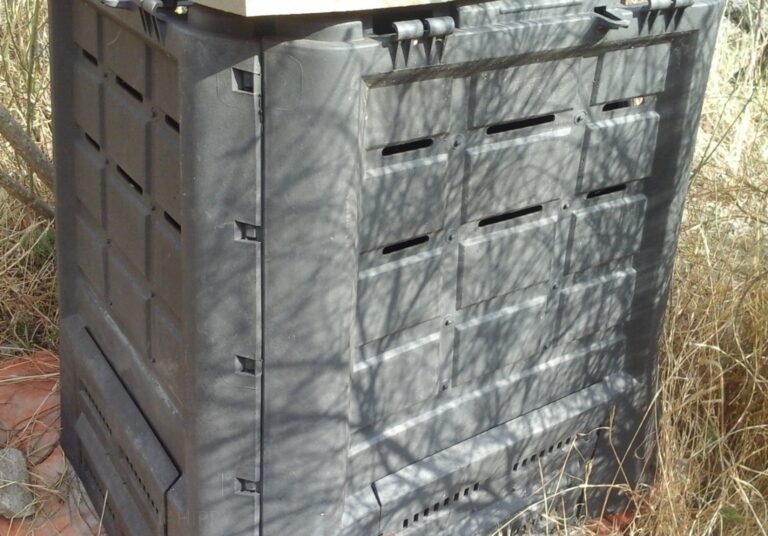
We have a plethora of choices when looking for a container to prepare compost in. Many sophisticated and expensive containers are available in today’s marketplace.
No doubt they all are very good at producing quality compost – however, a container can be made from spare wood or even leftover wooden pallets.
Yet another good use for pallets, there is no limit to what they can be used for! You can buy a prefab compost bin or build your own -the choice is up to you.
Whatever it is, make sure it is constructed of materials that will make it easy for you to get into the pile to add ingredients and to work it – yet will also keep pests out.
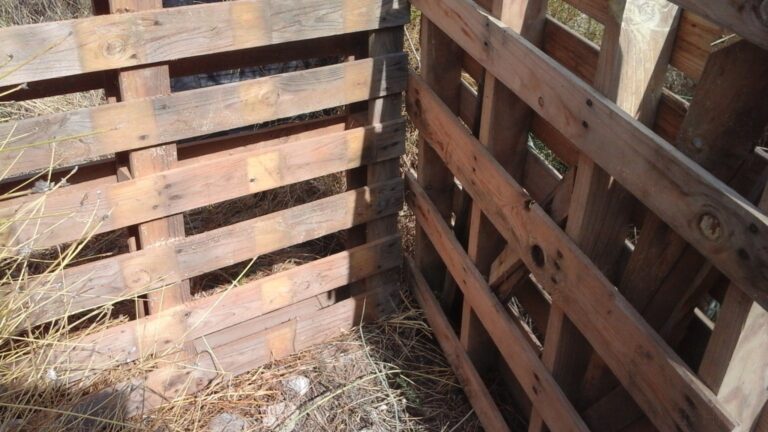
Choose the correct container to suit your requirements (and your wallet) is a good tip to remember.
Choose the Right Size
The size of your compost will depend on several factors:
- The quantity of compost that you need to make with your leftover ingredients (how much “stuff” you need to get rid of)
- The quantity of compost that you can produce
A compost does require some work. At least when you’re first starting out, you’ll have a much easier time maintaining your compost if it isn’t massive.
A three-foot-wide by three-foot-high compost is a good basic size to start out with; anything over four feet could prove to be problematic.
Add the Right Ingredients
Now that you have the perfect size compost in the right location, it’s time to start adding ingredients!
What should we be putting in the compost bin? Here are a few things…
- ☑ Vegetable peelings
- ☑ Fruit waste
- ☑ Teabags and used coffee filters
- ☑ Plant trimmings
- ☑ Grass cuttings
This type of material is a valuable source of nitrogen and moisture and also breaks down rapidly. This is normally called green ingredients.
- ☑ Cardboard egg boxes
- ☑ Scrunched up paper
- ☑ Fallen leaves
These materials break down at a slower rate, and are important sources of fiber and carbon. We commonly to refer to these as brown ingredients.
- ☑ Egg Shells
Adding eggshells, which can be considered neither green nor brown, also helps to introduce a variety of minerals to the compost.
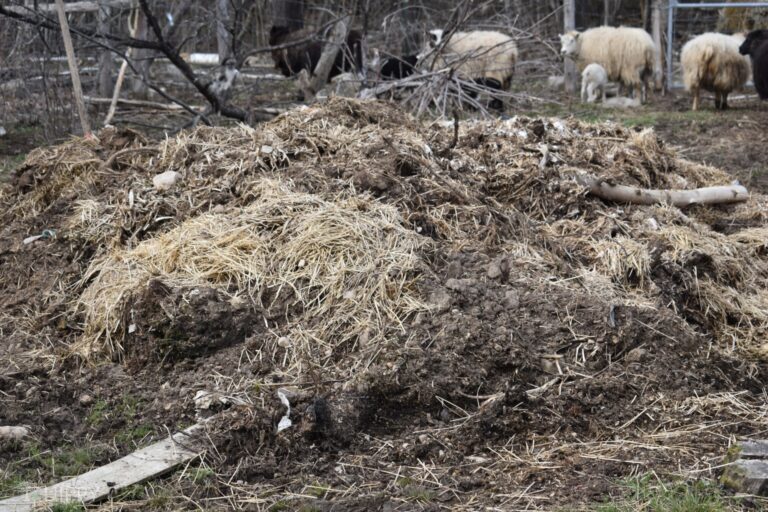
- ☑ Chicken, rabbit, sheep, horse, or cow manure
Anyone that is fortunate to have these animals will have the benefit of adding this nitrogen-rich material to their compost.
Virtually any plant or animal waste is suitable for composting, although it is a good tip to think a little about where the ingredients came from before you add them in.
Don’t add any ingredients that were diseased or treated with any kinds of chemicals, when possible.
Know What Not to Compost
There are quite a few items that should not be added to a compost bin.
- ❌ Plastic
- ❌ Glass
- ❌ Metals
It should be quite obvious that this type of item does not belong in a compost bin since they are inorganic and will not break down. Yes, it is important to recycle these, but the compost bin is not the place to do so.
- ❌ Meat
- ❌ Dairy products
- ❌ Dog, cat, or human feces
- ❌ Baby diapers
Although these do break down, they will lead to bad smells, and make the compost attractive to a variety of pests. They can also harbor diseases.
❌ Pig manure is another ingredient that is controversial when it comes to the compost – some people say it’s fine to add, while others recommend steering clear since pig manure can harbor many diseases to which we, as humans, are also susceptible.
- ❌ Perennial weeds
- ❌ Weeds with seed heads
Adding these to a compost bin will successfully broadcast these weeds to all of your garden. It is hard enough to keep weeds at bay without adding to the problem.
The exception to this is if you have a very well-established compost pile. If your bin has been going strong for several years and is sufficiently “hot,” you may be able to kill weed seeds in the pile.
Get The Ingredients Ratios Right
The mix or ratio of the different products that are added to a compost is an important factor.
Earlier in the article, we classified certain ingredients as being green or brown. This classification can help us establish what ratio is best to create the perfect compost.
We do not need to weigh these items, however, as a general guide, the ratio should be 1 part green material to every 2 parts of brown.
The ratio of materials is important to create the correct levels of carbon and nitrogen. With some experience, it is possible to adjust this to create the perfect product for what is being grown.
This tip will help to ensure that a high quality compost is produced.
Shred Ingredients for the Best Results
Small particles will decompose much quicker than larger pieces. Anyone with a garden shredder will benefit from shredding any material they add to the compost.
If using shrub or branch cuttings, it is good practice to ensure that these are shredded as small as possible. This material will decompose at a slower rate than other materials and will still be intact when the remainder of the compost is ready for use.
Although it does not necessarily take a long time to create compost, normally about 10 to 12 weeks, anything that can be done to speed it up will be a huge benefit. It is a good feeling to have the compost ready to go exactly when it is needed!
Create Layers of Material
Layering the green and brown material when added does help the decomposing process.
Mixing the dry and wet materials allows more moisture to be added to the dry materials which is especially important as there will be a difference in the weight between the brown and the green additives.
This helps to create a more even decomposition rate through the entire compost rather than creating some sections that are done and others that are barely broken down.
Layering is important when it comes to your compost’s quality and overall efficiency in the decomposition process.
“Activate” to Get the Material Decomposing
It may seem odd, but a compost bin will sometimes require a little nudge to help it start the composting process.
In an ideal world, we have a plentiful supply of nutrient-rich compost available precisely when it is needed. This is especially important during planting season. There’s nothing like a good boost of quality compost to help the plants grow strong and healthy!
Time is always against us as any gardener will know. There is never enough time in the day.
One way to speed the composting process up is to activate a new compost pile. It is active organisms and bacteria that create the process of decomposition.
A compost pile will, left to its own devices, start decomposing and create beautiful compost. However, anything that can speed the process up has to be good.
The easiest way to start the decomposition is to introduce active organisms and bacteria to the pile during its initial stages. A bucket of compost from an established pile is the perfect solution and will activate the pile immediately.

This is another tip that will help to ensure the efficiency of the pile and will ensure that quality compost is ready when it is required.
Mix the Ingredients by Regular Turning
The natural process of decomposition requires oxygen to fuel the process. Left to its own devices, a compost pile will become dense and compacted.
When this happens oxygen cannot penetrate very deep into the compost. This will result in a pile that is not very active.
Turning and breaking the compost material with a fork will prevent it from becoming compacted.
At least once a week (or preferably every two or three days), go out and turn your compost with a fork. It should only take a few minutes to complete.
Turning the compost is an important tip since an oxygenated compost pile is a happy compost pile.
Water Regularly
In addition to oxygen, water is an important requirement for the composting process to work efficiently.
A dry compost will soon stop working, however, do not be tempted to just randomly throw a bucket of water on top of the pile. A soggy compost will stop working more quickly than a dry one.
It is hard to quantify how much water to add since this will depend on the mix that is composting and the climate in your area.
A hot, arid climate will require more than in a more temperate area. However, regular watering so that your compost has the consistency of a sponge will be ideal.
Consider using a spray bottle or your hose with the spray nozzle turned on to irrigate your compost. This will allow for a more even, consistent watering.
This is an important tip since a moist compost is good, a soaking wet compost is no good. Add some water whenever you turn your pile.
Monitor the Temperature
Don’t panic if you see some steam rising from the compost, or if it feels hot when it is being turned. This is perfectly normal.
A compost pile that is working well will reach 120 degrees Fahrenheit (48 Celsius)in the first few days. After three or four days, it should be in the region of 130 to 150 degrees Fahrenheit (54 to 65 Celsius). The decomposition process causes this heat or energy release.
The heat is essential as it will destroy many pathogens and can even destroy some weed seeds that have found their way into the pile. The heat will benefit the friendly bacteria and organisms that we wish to encourage.
Don’t be tempted to throw a bucket of water into it to cool it down. This is not helpful, and not necessary.
When the active processes have been completed, the compost pile will start to cool down to approximately 110 degrees F (43 Celsius).
Monitoring the temperature is a good tip to use as a guide for ascertaining when the compost is ready to use.
When it has naturally started to cool, it is normally ready to use. It might seem a bit obsessive, but for those of us who require quality compost, using a thermometer is an essential tool.
For anyone who is not seeing the temperatures rise or sensing that their compost is not as active as it should be, do not worry.
This sometimes happens. Try adding some more active compost or feed the pile with a booster to reactivate the process.
Don’t use active compost on the garden. Wait until it is finished. Using active compost before it is done can be too “hot” and will burn your plants with excess nitrogen and other nutrients, along with too much heat.
Monitoring the compost temperature is an important tip since the heat generated is a good indicator to show how the decomposition process is working.
Consider Using a Booster
To reinvigorate a struggling compost, consider using a booster. Adding a booster to a good compost pile certainly will not harm it and will help to create that extra high-quality product by encouraging the correct enzymes to grow.
A good homemade booster can be made from a few simple items that may already be in your store cupboard.
To a clean bucket add:
- 2 gallons of warm water
- ½ cup of ammonia
- 6oz of beer
- 12oz of regular soda (not diet or sugar-free)
The yeast from the beer, the sugar from the soda, and the nitrogen from the ammonia will create a supercharged tonic to give your compost plenty of energy.
Add this brew a couple of times per year when turning the compost or add it to the spray bottle when watering. Using a booster is a good tip to remember to create that quality compost.
Avoid Chemicals
Most hardware stores will sell a range of chemicals to activate or boost a compost pile. However, I believe it is best to avoid as many commercial chemicals as possible. This is especially important if we are going to be using this quality compost to grow food.
There is an old saying worth remembering: We are what we eat. Do we really want to be introducing chemicals into our food source?
Why would we want to buy something that is easily made from products that we already have?
Worms, an Eager and Free Workforce
A perfect natural and efficient worker that can be added to a compost pile is worms.
A compost pile is worm heaven.
This little creature just loves the dark, moist environment of decaying vegetation. They will happily spend all day and night munching through the vegetation and creating quality compost.
Certain types of worms, like red wigglers, can be purchased to be put into a compost. However, I do like to keep things simple and fully utilize anything that I have to hand. If you have worms in the garden, it is a simple task to move a few handfuls to the compost – it’s also a fun task if you have kids!
This is an easy tip to take on board. These little creatures will thank you and offer a reward of a super compost.
More is Often Better
Your own unique circumstances will dictate how much compost is required and how much compost can be produced.
I have found that sometimes my compost pile is ready to use but I still need more compost and have plenty more ingredients to add to the old compost, too.
I find that a simple solution to this common dilemma is to have several compost bins positioned right next to each other.
Three is a perfect number for me. One bin has compost that is ready, the second is full and working, whilst the third is being built.
With this system, I am able to use the compost in the first bin which then becomes vacant and ready for a new material to be added for the next production cycle of compost.
Consequently, I have a quality compost production line that is easy to maintain and produces all the compost that I need.
The tip of using multiple compost bins works for me, however, it may not be relevant for everyone’s circumstances.
Ready To Get Started?
Hopefully, the tips we’ve covered in this article will be helpful to you as you create your own quality compost pile.
Over a period of time, you can experiment with various techniques and methods to find which of these pieces of advice works best for you – and you’ll make your compost the highest-quality pile it can be!

Three years ago, I bought an off-grid Cortijo in a small valley in the Andalucian mountains. Although, perhaps the lifestyle is in my genes as my grandfather and his four brothers were Homesteaders in Alberta Canada in the 1900s.
The mountains of Spain are a difficult place to grow many of the flowers that I was used to in the UK. However, veggies grow well year-round. Peppers, tomatoes, potatoes, lettuce, cucumber, melons, and chard all fare well in the Mediterranean climate. Almond trees provide me with a cash crop of around 1 ton while still retaining some to make almond milk and flour.
Meet the rest of the Homesteading Hippy team here.
Great tips. My experience of making compost is a bit hit and miss but a couple of things I’ve learnt:
Manure is the magic ingredient. If you’re struggling to get it going then add manure.
Cover your compost to avoid it getting to wet or if it’s already to wet covering it allows for the heat to better dry it.
If you’re a bit lazy and fortunate enough to have access to a front end loader the. Use this to turn it. So much easier.
All great advice. Thank you.