
Have you ever seen an herb spiral, or thought of building one for yourself? If so, then this is the article for you. An herb spiral is a garden fixture shaped into a spiral. It is similar to a garden bed, but winds around itself.
The soil is typically sloped evenly from lowest at the entrance of the spiral to highest at the core of the spiral.
Most often, the soil isn’t stepped into levels, but has a smooth gradient from top to bottom. The soil is typically held in place through rocks, tiles, bricks, or wooden support.
There are two kinds of spirals that are shaped a little differently. A small ‘cluster’ herb spiral doesn’t need an access path and takes up much less space than a ‘labyrinth’ spiral design.
The limit in size of a cluster herb spiral is about four feet in diameter, because most gardeners won’t be able to reach into the spiral from all angles if it is wider than this. It is faster, easier, and cheaper to build than a labyrinth spiral.
Meanwhile, a labyrinth spiral can grow many more herbs than a cluster one, and it requires an access path all the way to the center of the spiral. This means that it takes up much more space, and is more visually impressive.
Patterns in Nature
The flow of energy and distribution of resources in nature lends itself to some repeating patterns that can be seen across the world.
For example, a tree spreads out in many directions, facing its leaves toward the sun to absorb the maximum amount of sunlight, while maintaining a thick trunk for stability.
Its roots, meanwhile, anchor it into the ground in an inverse pattern from the branches and twigs. This allows the tree to absorb water and nutrients from the ground.
The spiral is a well-represented pattern that can be generated by the movement of a fluid on a rotating sphere.
This is shown visually through the Coriolis effect, where winds and ocean currents travel in a spiral shape as they move away from the equator and towards the poles. Snail shells and ammonite fossils also show a spiral shape.
In the garden, an herb spiral bed has many advantages. One is that the spiral allows for high sunlight capture and efficient use of space, because all three dimensions of space are used.
Another advantage is that edges are maximized, allowing for a diversity of herbs to be grown. Taller herbs can be strategically placed to shade herbs that grow better in partial shade.
Depending on the angle of placement and the prevailing winds of the location, many of the herbs can be sheltered from wind.
Finally, the amount of moisture received is also controllable, as the plants grown in the lowest part of the spiral also get the wettest soil due to the water flowing down the incline. Owing to receiving more shade, the lowest plants also lose the least water to solar evaporation.
Uses of Herbs
So, now that you’re thinking of building an herb spiral, it is time to start planning for which herbs you want.
Herbs have several culinary and medicinal uses, and the list of herbs that are useful to humans in some way is so long that this article can’t hope to describe more than a tiny fraction of them.
Even if you don’t consider yourself particularly knowledgeable about herbs, you almost certainly come into contact with them on a daily basis.
Do you buy toothpaste with breath-freshening ingredients? Perhaps you like to burn incense in your house when visitors come over? Or maybe you use after-sun gel after spending a long day outdoors to prevent sun damage?
All of these uses, and thousands more, come from herbs.
Below, you can read a short list of common herbs organized by category of usefulness. Culinary herbs are primarily used in flavoring foods, insectary herbs are good at pest control, medicinal herbs treat injury or pain, and groundcover herbs are great for preventing weed growth.
Furthermore, most of herbs on this list could reasonably fit into at least two categories, which stand testament to their versatility.
| Culinary | Cilantro, Basil, Parsley, Dill, Oregano |
| Insectary | Sage, Peppermint, Lavender, Marigold, Chives |
| Medicinal | Aloe Vera, Bergamot, St. John’s Wort, Catnip, Chamomile |
| Groundcover | Creeping thyme, Yarrow, Gallium, Wintergreen, Candytuft |
How to Build an Herb Spiral
At this point, hopefully you’re ready to make an herb spiral in your own garden! In this section, you can read a step-by-step guide on how to build one.
As stated in the introduction, you have two choices – to build a cluster spiral or a labyrinth spiral. This guide will focus on the labyrinth spiral, as it is the more complex of the two, and more appropriate for self-sufficient living.
You can use similar principles to build the cluster spiral, as long as you remember the principle that the maximum diameter is four feet, and that you ignore any instructions that mention paths or path spacing.
Tools Required
- Spade
- Wheelbarrow
Materials Required
- Cardboard
- Stakes or flags
- Soil
- Stones, bricks, tiles, or wood to keep the soil in place
- If using stones or bricks, then gabions, concrete, or another material that will keep stones in place
Design Considerations
In Permaculture design, it is always considered a good idea to know your sectors and zones, and then to draw a simple map of your site. The most relevant sector to consider for an herb spiral, and indeed for most permaculture designs, is length and angle of sunlight exposure.
Unless you want to plant only shade-tolerant herbs, it will be best to place the herb spiral in a place where it will receive at least partial sunlight (for those who live in hot zones below 35 degrees North latitude) or full sunlight (for those who live in cooler climates above the 35th meridian.) It is also sensible to place the spiral where the winds will not be overly intense.
Meanwhile, Permaculture zoning is its own category of the design science. An herb spiral fits best as a Zone 1 construction, unless it is particularly large or being used for commercial purposes, in which case it is a Zone 2 structure.
What this means is that the entrance to the herb spiral should be relatively close to where you live, preferably 30 seconds’ or less walk from its closest door. You do not want to travel long distances to harvest herbs – ideally, they are right outside your kitchen door.
One way to tell if your herb spiral is close enough is if you imagine yourself regularly dashing outside to harvest that fragrant flavor while the pot is still boiling and someone is calling for you from another room.
If it feels even slightly inconvenient to fetch the herbs, you may reason to yourself, “no, I’ll get it next time”. Ideally, you want to be able to go and get the herb and add it to your food, or at least the cutting board, in under a minute. This will ensure regular use.
Don’t forget that your herb spiral must also be within range of a hose pipe for irrigation purposes, as most of your herbs will require regular watering.
Recall that watering is easier with an herb spiral because all of the herbs are together, and the water flows from the top to the bottom. These factors reduce the time spent and water used.
At this point, it is time to consider the size of your herb spiral, and how many layers it will have. This article will focus on a medium level of complexity, addressing someone with intermediate skill, and either a considerable budget or a substantial outlay of time to build it.
It is a labor-intensive job to build one, so knowing this as you begin is a design consideration of some importance.
Design Steps
In the design I propose, the spiral can occupy a rectangular area of 15 by 12 feet, which makes its square footprint 180 square feet.
This is not small, but note that the spiral itself takes up less area because it fits inside the rectangle. To design it, you will most likely need a pencil, paper, and a ruler. I suggest using the following method:
Make a scale model on paper, such as with a 1:36 ratio. This will make the suggested spiral model 5 inches wide and 4 inches long on paper. Make a rectangle with these dimensions. Now, you may want to choose where the spiral core is.
One way to do this is to draw a vertical dashed line down from the point that is two-fifths across the long side, and a horizontal dashed line across from the point that is one-third down the short side. Where these dashed lines intersect can form the inner end of your spiral.
Make an x at the intersection point, then draw a solid line 2/3rds of an inch up your vertical dashed line. Make another x. This solid line forms the core boundary of your spiral.
You can now draw a spiral from each x. The lower x spiral forms the inner boundary and the higher x spiral forms the outer boundary. All of this should be drawn in pen, and now you can switch to your pencil.
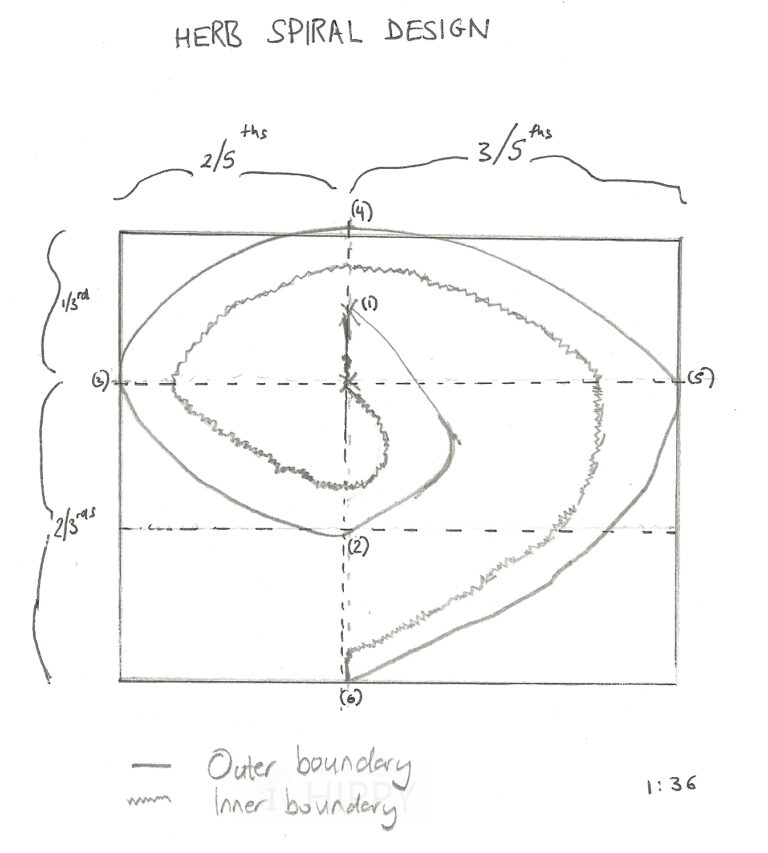
You may want to start with your outer boundary ‘wall’, which begins at the upper x (point 1 on the diagram). Attempt to curve all the way around to the same vertical 2/5ths line, but now you should be at the horizontal line two thirds of the way down (point 2).
Curve back to the first third at the leftmost edge of the rectangle (3). Curve up to the topmost edge on the vertical 2/5ths line (4).
Now curve right until you reach the first horizontal third at the edge of the rectangle (5). Finally, curve down and left to the bottom edge and return to the 2/5ths line (6).
You can now design your inner boundary wall. Starting from your lower x, make another spiral that is at all points 2/3rds of an inch closer to the core than the outer spiral.
This may seem a time-consuming diversion, but its purpose is to help you envision the kind of spiral you want and to prevent expensive mistakes in the building process. As a hopeful side effect, perhaps you will find inspiration for any other designs you may want to make.
Cost
It is not impossible to build an herb spiral for free if you have the correct materials at your site, and the time to build it. The final budget is up to you.
This build is not especially technical in nature, requires no special qualifications or licenses, and has minimal risk to the environment, so it does not strictly require professional help to build. It can definitely qualify as a ‘do-it-yourself’ job.
However, it is undoubtedly labor-intensive, so if you want to keep your budget low, try recruiting the help of eager and willing friends, family, neighbors, and any students that are learning from or being mentored by you.
A build of the complexity described above will take several days, possibly even longer than a week, without the help of a professional landscaper.
Even small cluster herb spirals may take a day or two of hard work. Heavy stones, soil, and equipment will need to be moved, whichever design you choose.
Since many people who build herb spirals for themselves use recycled materials, it is hard to give a cost estimate of the materials themselves.
If you have some money budgeted for an herb spiral but don’t know where to begin, you might try prioritizing that top foot of soil is nursery-bought compost, and that only the soil below the top foot is site soil.
This maximizes the fertility of the herb spiral while keeping costs low, and saving the rest of your budget for stakes, stones, wood, or plants.
The Building Process
Now is the time to transfer your design to reality. First, use four markers, such as stakes, poles, rods, or flags to mark the rectangular area that the spiral bed will take up, one for each corner.
Inside this rectangle, mow down any grass or weeds until the area is flat. Now, lay cardboard across the area, and soak the cardboard by spraying it with water.
Any cardboard that is exposed to the sun should be wet, and made wet again in two hours if it is not yet covered. The presence of the cardboard is intended to suppress weed growth.
Once the cardboard is laid, you can remove the markers, but don’t forget to weigh down the cardboard so it doesn’t blow away in the wind.
It is now recommended that you use at least two different kinds of marker – one to signify the outer spiral and one for the inner spiral. For example, you can use red flags for the inner spiral and blue flags for the outer spiral. You can use as many markers as you like.
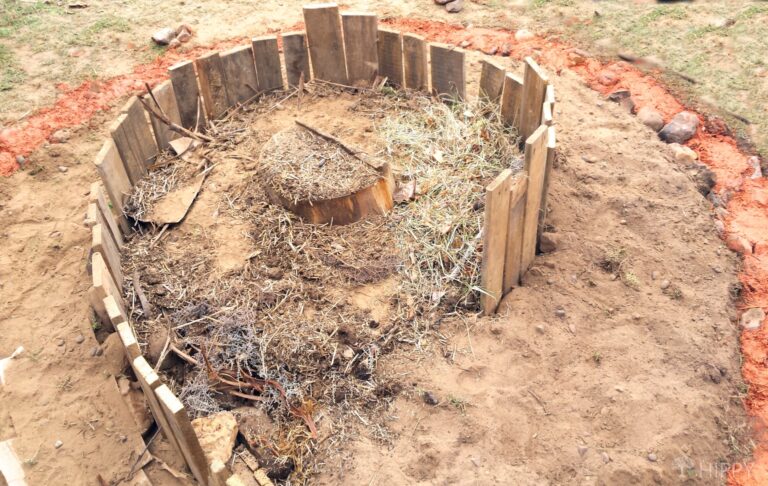
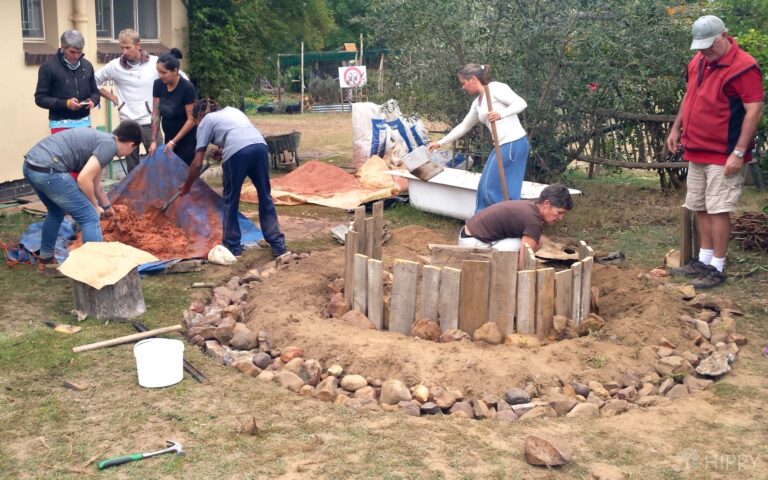
You must now dig two small ditches, one for each spiral. Enclose the ditches at the entrance and at the core.
The ditches will now form your foundation for the bed boundaries. The foundation will later be filled in with rocks to stabilize what you’ll be using for your boundaries.
Plywood is probably the quickest to set up. If you’re using plywood boundaries, a ditch of around six inches wide and eight inches deep is sensible. Once all the ditches have been dug, you can remove the markers.
Place each plywood boundary wall in the center of the ditch, and then fill the ditch in both sides of the wood with stones to keep the wood stable. When the soil is pressing on the wood walls, the structure will be more stable than it currently is.
The core of the spiral needs the highest walls, and the exit, the lowest. It is up to you how high and how low, but there must be a slope of the walls for your structure to be considered an herb spiral.
Once the walls are set up and stable, you can fill the bed with soil. As mentioned above, make the top foot of soil be your best-quality soil, which might be aerobic compost that you know is free of any weed seeds.
Below this can be a mixture of gravel, your lower-quality compost, and site soil.
Soils
Most herbs have evolved to prefer a sandy soil, and so bought compost can be mixed with some sand to reduce costs.
If you already have a sand-type soil on your site, this is better than a clay-type for herb spirals and will ultimately cost less to build than if you have to buy in sand. In any case, you may prefer to have well-drained, well-aerated soil in which to grow your herbs.
Conclusion
In this article, you learned the why’s and how’s of herb spiral construction. An herb spiral can be a beautiful, useful, fun addition to a garden or homestead plot, and having all your herbs in one place will make for easy harvesting.
Overall, construction of herb spirals can rank from lower intermediate to upper intermediate difficulty of construction compared to other permaculture techniques.
The difficulty depends mostly on the size of spiral that you want to install, and the construction materials you choose to use. Do you have any experiences to share about herb spiral construction?
Maybe you’d like to tell us which herbs you have grown and what you’ve used them for? We’d love to hear from you!

David Dornbrack is a permaculture designer and author from the Austin area of Texas, USA. He first achieved his PDC in South Africa in 2013, and has since traveled to the world’s prototypical intentional community and ecovillage, Findhorn Foundation in Scotland. He has gardened in three different climate types – Mediterranean, Cold Temperate, and Humid Subtropical. His favorite plants are tomatoes, chilies, and potatoes. He believes that humans function best when interdependent – able to take good care of themselves so that they can be generous and giving to others. He would like to gain experience in house-building, carpentry, and solar electricity installation. Meet the rest of the team here.