
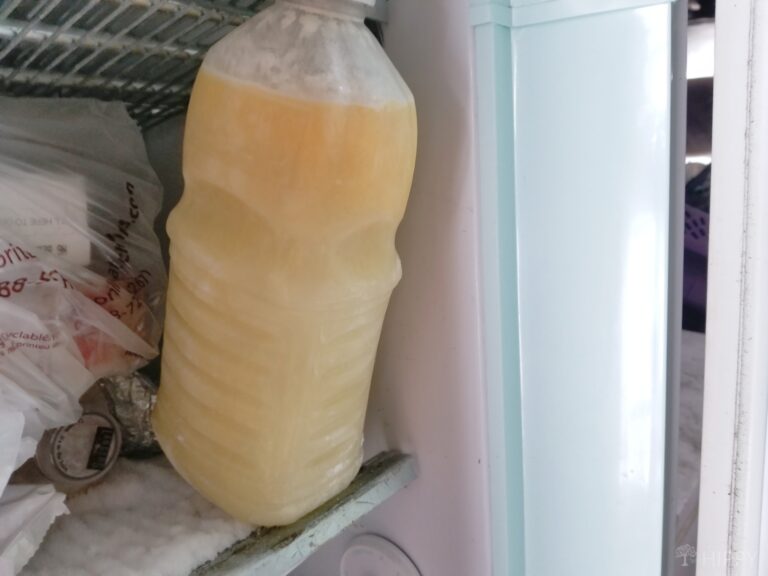
It’s winter on the homestead and we’ve had plenty of snow this year. The cow has dried up but years ago my grandmother taught us to freeze milk when we had an abundance.

However, I’m going to need my freezer space soon and must use up the milk that is taking up space or lose it.
My friend asked me if I’d ever “dehydrated” the milk. I had to reply that I’d never tried it, but, that got me to thinking…
I Decided to Try It
I have 2 excellent dehydrators and about 4 gallons of frozen milk taking up space in my freezer. What better way to test out the options? So, I set to work.
To begin with, I pulled out one gallon of the milk from the freezer and began to allow it to thaw in the refrigerator (I don’t have room for 4 gallons of milk in the refrigerator so will have to thaw it out one gallon at a time).
I figured it will take one to two days for the milk to thaw out in the refrigerator. I chose not to thaw it at room temperature because if it thaws too fast it could wind up spoiling and then I’d have to dehydrate sour milk. I prefer that it’s not sour when I dehydrate it.
Not a Common Storage Method
Of course, I know that powdered milk from the store isn’t as good and tasty as fresh milk, but I’m hopeful that by making it myself it will still be delicious enough for my family to enjoy.
I know that dehydrating milk isn’t nearly as common as freezing or canning fresh milk, but I’m hopeful that it will save some space in our freezer and pantry by doing it this way.
Here are the steps that I took to dehydrate our milk so that I would have “powdered milk” here on our homestead.
Preparing Your Milk For Dehydrating
Step One
Thaw your milk in the refrigerator. It’s important to not leave the milk sitting out on the counter as it could easily spoil.
It will typically take one to two days to thaw out in the refrigerator. Meanwhile, you can skip down to “Preparing Your Dehydrator for Dehydrating Milk”.
Step Two
I skimmed the cream off our our milk as we use the cream in cooking and coffee in the morning.
We also use the cream to make homemade butter so after the milk thawed I poured it into a large glass pitcher that we have and I allowed the milk to sit in the refrigerator another day in order to skim the cream off of the milk.
I set the cream aside in another container and put that in the refrigerator to make butter or use in our coffee.
Step Three
Scalding milk kills off any enzymes or bacteria that can spoil the milk. To scald milk, simply place milk into a saucepan and bring it just to a boil.
Don’t let it get to a hard boil. Just heat it up and stop the heat action as soon as the milk reaches a boiling point. The milk should reach an internal temperature of 180 degrees Fahrenheit (82 Celsius).
Use a candy thermometer to check the temperature. Make sure that your thermometer doesn’t touch the bottom of the pan at any time as it will throw off the actual temperature of the product.
If you accidentally turn your head and the milk exceeds 212 degrees Fahrenheit (100 Celsius), you’re going to have to start over with a fresh batch of milk. Milk that is heated to 212 F (100 C) or higher will curdle, and that is a huge mess.
Scalded milk should “coat” the pan. When you tilt the pan to the side and then put the pan back to the upright position, there should be a thin coating of milk on the inside of the pan where the scalded milk touched.
If there is not a thin coating of milk, continue heating the milk until it thinly coats the pan when you tilt the pan. After scalding the milk, I again placed it into the refrigerator to cool it before pouring it onto our dehydrator trays.
Tips On Scalding Milk
I can remember as a young child my mother “scalding” milk for a recipe. I was too young to really care, but, apparently when scalding milk for a recipe it will make the baked goods bake up fluffier.
It must have worked because my mother’s pancakes and biscuits were always nice and fluffy.
Although the purpose of scalding milk before dehydrating it is to kill off bacteria or enzymes that may spoil the milk, it’s the same process. I called my mother to verify that I had all of these steps correct before I began my project.
- Use a heavy pan for your scalding process.
- It should only take about 4 to 6 minutes to scald milk.
- Don’t allow the milk to boil when you scald.
- Stir your milk with a wooden spoon or a wooden spatula while you’re scalding it.
- Don’t allow your candy thermometer to touch the bottom of the pan.
- Stay with the milk through the entire process, don’t walk away from the milk.
- Use medium heat to scald milk.
- When the milk has been properly scalded remove it from the heat immediately.
- Allow your milk to cool at room temperature or place it in the refrigerator for a few minutes.
Dehydrating Milk In the Dehydrator
Step One
Clean and sanitize your dehydrator. All too often we dehydrate something and then just put the dehydrator away.
However, when you’re dehydrating milk you don’t want any off tastes that may have been left over from making jerky or any other dehydrated products.
Wipe your dehydrator out and make sure that you wash and sanitize the trays. I just used warm soapy water to clean the trays and rinsed them well. I then allowed them to air dry.
Step Two
If your dehydrator doesn’t come with silicone mats, you can make your own by simply purchasing some silicone baking sheets or a silicone cutting board.
Cut them to fit your dehydrator trays. You’ll need one of these for each tray that you plan to use in your dehydrating milk process.
You could also purchase fruit roll sheets for your dehydrator if you don’t wish to make them. Since we’re trying to save money I make as many things as possible on our homestead.
Step Three
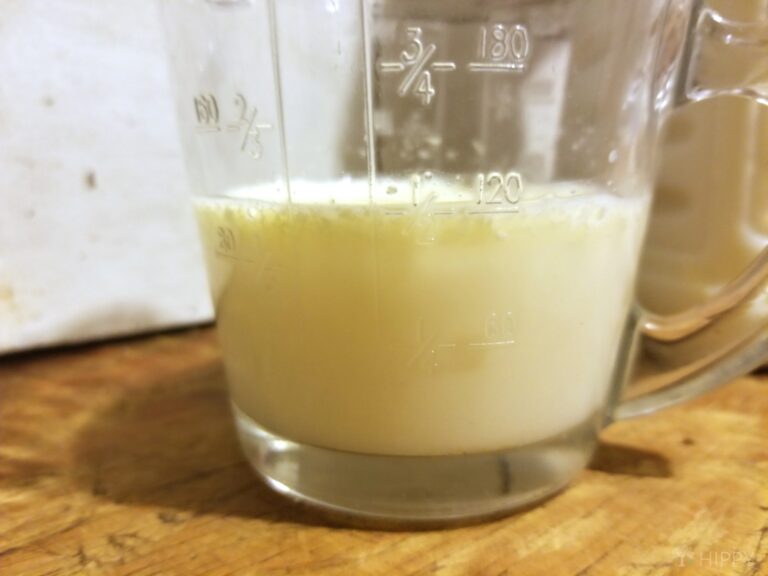
After preparing my dehydrator I placed my silicone mats on each of my dehydrator trays into my dehydrator. I loaded my trays into the dehydrator and then I poured 1 cup of milk into the center of the silicone mats on my dehydrator trays.
I deliberately placed the trays into the dehydrator prior to pouring the milk so that I wouldn’t spill any of the milk during the process of moving the trays. This way, all I had to do was slide my trays back into the dehydrator.
Step Four
I set my dehydrator temperature to 135 degrees Fahrenheit and turned it on. The directions stated to allow the milk to dehydrate for up to 12 hours or until the milk is dry and flaky.
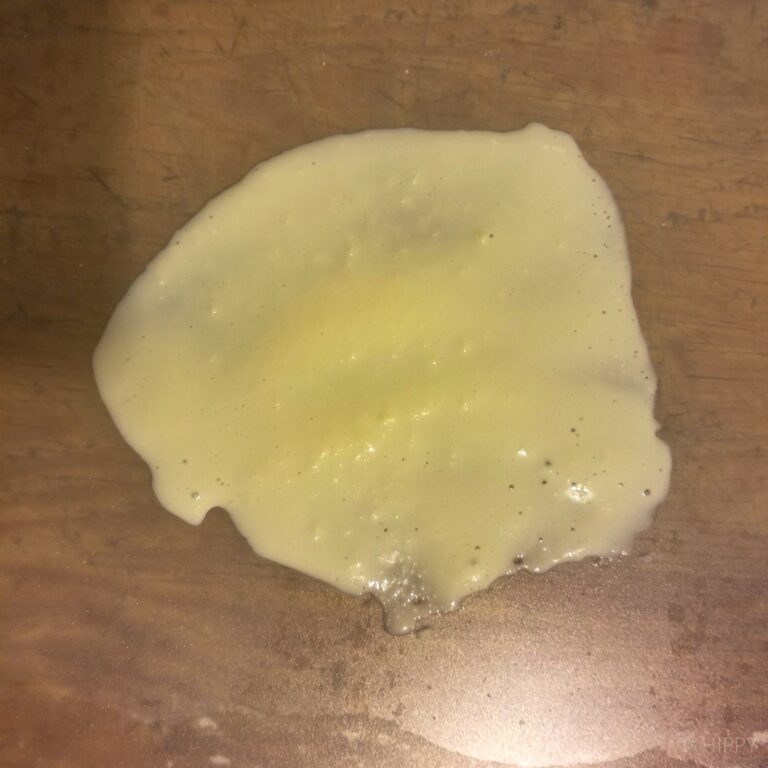
I checked on the progress of our milk after about 2 hours and it was pretty gooey but starting to dry out on the sides of the “puddle” of milk that I had poured into the dehydrator.
I continued to check the progress of the milk every few hours until it was a dry flaky “saucer”. I turned it over several times to ensure that it was completely dry throughout the entire “puddle”.
Dehydrating Milk In the Oven
You can also make your dehydrated milk in the oven if you don’t have a dehydrator. Here are the directions for the oven method.
I’ve not tried this myself, but my great-aunt told me how to do this when I was talking to her about it.
She said they used to use their oven (or the sun, which isn’t recommended at all for this type of dehydrating project as the milk could spoil too easily) all the time for dehydrating herbs and very thinly sliced vegetables and she had used the oven method for dehydrating milk a time or two.
Step One
Pour milk into the top pan of a double boiler. Make sure that the water in the bottom pan of the double boiler is boiling. You’ll also want to monitor the water in the bottom pan so that your double boiler doesn’t boil dry.
Step Two
Allow the milk to simmer until most of the water has evaporated. This will leave the milk with a thick and very creamy consistency.
Be patient as it may take several hours for the milk to become thick and creamy. Allow it to become as thick as possible to make using the oven as your dehydrator easier.
Step Three
Pour the milk into an oven-safe pan (my great aunt said that they used a 13X9 cake pan for this project).
Using a pan with sides makes it easier to dehydrate the milk in the oven and you won’t have to line the pan that way.
Just make sure that you can lift the dehydrated milk up out of the pan with your spatula when you are done. A nonstick pan would be the best option for this.
Also, you may wish to loosen the milk from the bottom of the pan as soon as it begins to solidify, that way you can turn it over frequently so that it dries evenly.
Step Four
Preheat the oven to 150 degrees Fahrenheit (65 Celsius).
Step Five
Place your cake pan into the oven and allow the door to remain slightly open so that the moisture can escape.
This step is very important. If the moisture can’t escape your milk isn’t going to dehydrate properly.
Step Six
Allow the milk to dry for several hours, checking it often to ensure that it’s not sticking to the pan. Flip it over periodically to dry it evenly. Again, use a non-stick type pan for easier removal from the pan.
Step Seven
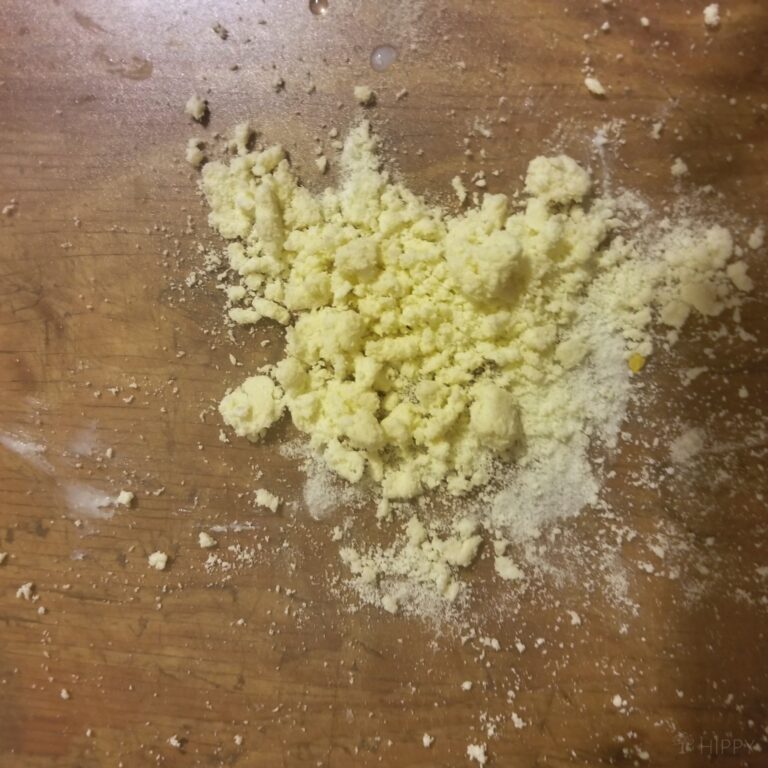
My great-aunt told me that they would then put the dried milk into their mortar and pestle for later.
When grandma bought a blender they would take it over to her house and use the blender to powder it. It was kept in a jar and used whenever milk would be used in a recipe or to drink.
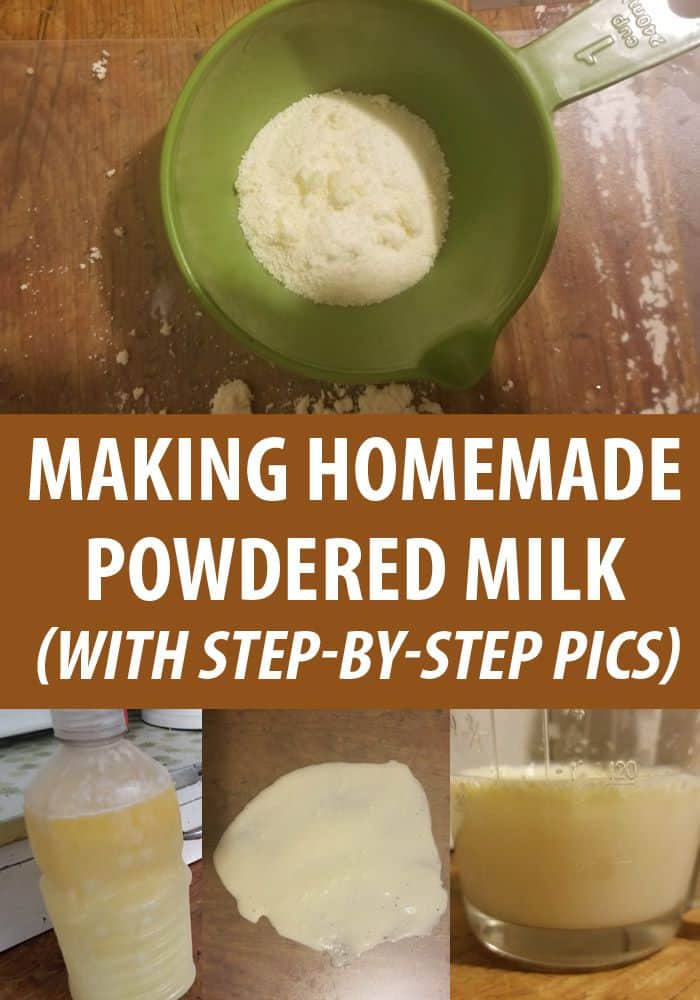
Here’s what the end result of powdered milk should look like:
Nutritional Value: Is Powdered Milk as Healthy as Actual Milk?
Well, first off; let’s look at the nutritional info. To make things simple, we’re going to use a measurement of 1 cup (244g).
| Qty. 1 Cup | Actual Milk (whole fat 3.3%) | Milk Powder |
| Calories | 148 | 635 |
| Carbs | 12g | 49g |
| Fat | 8g | 34g |
| Cholesterol | 24.4mg | 124.2mg |
| Sodium | 105mg | 475mg |
| Potassium | 322.1mg | 1702.4mg |
| Calcium | 276mg | 1200mg |
| Protein | 8.14g | 24g |
At first glance, looking at those numbers, it would seem that powdered milk is actually healthier than actual milk.
Make no mistake, it is healthy BUT it’s not as healthy as fresh milk. Fresh milk is higher in B vitamins, phosphorous, and selenium – all of which are needed for a healthy nervous system.
Where to Store your Milk Powder
So, you’ve dehydrated your milk into powder, now you need to put it somewhere safe where it won’t go bad. Where should it be stored?
Well, the best place to store it would be a cool, dry place, away from direct sunlight – if you have a dark cupboard or a pantry that’s free of moisture, then that’s the best place for your milk powder.
Shelf Life: How long does Milk Powder Last?
The best-by date on powdered milk is 18 months, but you can store it – unopened – for a lot longer. How much longer?
Well, according to the USDA, an unopened package of milk powder should still be usable anywhere from 2 – 10 years after the best-by date.
Of course, this will depend on the type of milk powder you’ve got. Non-fat milk powder lasts longer than full-fat milk because the fat is unstable meaning you have to use the full-fat milk powder sooner.
Tips And Tricks
- Pour only one cup of milk on each dehydrator tray. This will make sure that you’re not having a thick “blob” of dehydrated milk that isn’t dehydrating evenly. If using the oven method, and the pan allows, you can several “puddles” in the pan just make sure that none of them are touching.
- Start small. I started this project using only 3 dehydrator trays.
- Make sure that your dehydrator is on an even surface when you’re dehydrating milk. While this may sound obvious, it’s easy to have your dehydrator slightly uneven and not realize it. With a liquid product, it’s very important that your dehydrator is on an even surface.
- It’s far easier to pour the milk onto the silicone trays when the trays are already in the dehydrator, that way, there is no risk of spilling the milk as you’re trying to place the trays back into or onto the dehydrator.
- Dehydrated milk should be completely dry. If not, flip it over and keep dehydrating it until it’s flaky and you can crumble it into a powder. If it’s not completely dry it may begin to mold or spoil. Some dehydrators are lower powered so it may take longer in some dehydrators than others. Be patient and don’t rush.
- You can place your dehydrated milk into a blender or food processor to make it into a powder if you prefer. Or you can place it into a zippered plastic bag and crumble it up into a powder there.
- Store dehydrated milk in a glass jar. Make sure that the jar is clean and sanitized and that there is no moisture in the jar when you place the dehydrated milk into the jar. Secure the lid tightly to ensure that no moisture enters the jar.
- Make sure to date the jar of milk so that you’re using the oldest milk first. Always rotate your dehydrated products so that you’re using the freshest products possible.
Reconstituting Your Powdered Milk
As a kid, I hated powdered milk. In fact, if I had even an inkling that my mother was trying to give me powdered milk, I’d wait until my mother wasn’t looking and I’d pour it out.
I’m happy to say that dehydrating your own milk is far more delicious than the store-bought version.
Maybe it’s because it doesn’t have all of those preservatives in it. Whatever the reason, drinking powdered milk that I made in our dehydrator was far more delicious than store bought powdered milk.
The directions on the store-bought version of powdered milk are to mix 3 Tablespoons of powdered milk with 1 cup of cold water.
I kept to this conversion with my home dehydrated version of powdered milk and it’s almost perfect. I add just a pinch or two more of the dehydrated milk powder to my glass of cold water because I prefer a richer flavor and it’s perfect.
How To Use Dehydrated Milk
In addition to simply making up a glass of milk, there are other great ways that we use dehydrated milk in and around our homestead. Here are a few of our favorites.
Homemade Sweetened Condensed Milk
This recipe is equivalent to the same sized can of sweetened condensed milk that you would buy at your local grocery store (and oh so much more delicious).
- ½ water
- 1 cup dehydrated milk powdered
- 1 cup white sugar
- 1 Tablespoon of butter (don’t skimp and use margarine or this recipe won’t work)
Simmer your water over a double boiler and slowly stir in the other ingredients. Continue stirring the mixture over medium heat in your double boiler and allow it to thicken to your desired consistency.
Make sure you don’t stop stirring and keep in mind that it will burn your lips if you’re taste testing it and don’t cool it first. It takes approximately 15 to 20 minutes at our house to reach the right consistency.
Now that we’ve tried homemade sweetened condensed milk we don’t like the store bought version nearly as well. I now make this up in small batches every holiday season for baking and desserts.
Evaporated Milk
There are a lot of recipes out there that call for evaporated milk. It’s super simple to make this with your dehydrated milk.
Simply mix 1 and ½ cups of water into ½ cup plus 1 teaspoon of your dehydrated milk. Use this to replace evaporated milk in any recipe and you’ll get great results.
Whipped Cream
Pour ½ cup of powdered milk into a deep bowl and mix it with ½ cup of white sugar with a fork. Using a handheld mixer or a countertop mixer set to medium speed gradually add ½ cup of ice water into the powdered milk and the sugar.
Keep mixing until the milk starts to form soft peaks and gradually add 2 Tablespoons of lemon juice into the creamy mix continuing to blend until it’s the desired consistency.
Use your homemade powdered milk in place of regular milk in any of your recipes and see if your family notices a difference.
As long as my kids don’t walk in when I’m mixing up the milk they don’t notice it at all. Even my pickiest eaters haven’t noticed that they’re drinking powdered milk.
Health And Safety Concerns
- Always make sure that all of the milk is completely dehydrated and flaky to ensure that no mold will develop.
- Make sure that the storage container is completely dry as even a tiny bit of moisture can affect the overall quality and allow mold to begin to develop.
- Always use caution with a double boiler as it’s easy to burn yourself with the steam when checking the level of water when you lift the top pan out of the bottom pan.
This year, as our homestead has an abundance of milk, I think that I’ll try dehydrating fresh milk vs previously frozen milk and see how that works out. I’m anxious to try it on fresh milk and see if that has any effect on the taste.
We use our dehydrated milk in all of our baking recipes. I decided that if it’s for baked goods the dehydrated milk should work just fine. So far, our baked goods are still turning out delicious and tasty and no one is the wiser in my household.
I made up a full pitcher of milk from our dehydrated milk and stored it in a pitcher in the refrigerator. I didn’t tell anyone that it had been dehydrated. So far, no one has said a word so I think that it’s a hit.
Since we often store milk in a pitcher in the refrigerator I didn’t have to explain why it’s not in the usual gallon sized glass jar. I suppose I could have put it into a gallon-sized glass jar, however, my refrigerator was too full to accommodate the gallon sized glass jar.
Dehydrated milk was a great experiment with my dehydrator and I’m relieved to find that it opened up a lot of space in my freezer.
Frequently Asked Questions about Powdered Milk
Around 12 hours roughly – depending on the quantity of milk you’re trying to dehydrate.
The ratio is 4 cups of water to ½ a cup of milk powder.
If stored correctly, homemade milk powder can last for up to a year.
No, dried milk powder just needs to be stored in a cool, dry place away from direct sunlight.
It’s not advisable. Powdered milk is great but drinking it every day may lead to nutrient deficiencies which will cause some serious health problems.
Unfortunately, no, there isn’t a lactose-free option available when it comes to milk powder. There are low-lactose options but if you need a lactose-free option you’ll need to find something else.
No, dehydrating breast milk it’s not a good idea. You should only dehydrate pasteurized milk.
How long is the dehydrated milk good for once jarred?
Would using store bought milk change anything in this recipe?
I would only have access to store-bought milk. Can I use it in this recipe
Can I make this in large batches?
How much water do I need to reconstitute homemade powdered milk? Can I make this homemade powdered milk in bulk? What’s the shelf-life for homemade powdered milk?
Could you dehydrate almond milk this way as well