
Mice are a perennial problem around your home and homestead. All they do is break into your food, leave poop and pee everywhere, spread disease, and bother your animals. You can’t have that, but that doesn’t necessarily mean that you want to kill the poor little thing, either.

If you prefer to capture a mouse and release it elsewhere in the wild, hopefully far away from your home, you can do that with this crafty trap.
It’s surprisingly effective, very quick and easy to make, and works like a charm. Best of all, you need only simple tools and the most basic materials that I’m sure you’ve got close at hand right now.
Keep reading, and I’ll tell you what you need to know…
Needed Tools and Materials
My favorite thing about this trap design is how simple and elegant it is. Odds are good you have everything you need already in your home, junk drawer, and garage.
Plastic Bottle: you can make this using any common plastic bottle, especially a thin one that is a little bit crinkly. A larger half-liter bottle is ideal.
Thin Wooden Dowels or Skewers: a couple of small, 3/16” diameter wooden dowels or common bamboo skewers are needed to provide anchor points for the rubber bands that will actuate the trap when the trigger is tripped.
Rubber Bands: common rubber bands. That’s it. If you have a variety pack, grab them, because that will allow you to more easily dial in the required tension depending on the size of your bottle.
It’s possible to increase tension by rigging up the rubber bands in a slightly different way, but if they are way too short or too long the trap won’t work as well, or it could allow the mouse to get out.
Sturdy Wire: a short length of sturdy wire. A stout paperclip can work, or a small piece salvaged from some welded wire fencing.
String or Thin Ribbon: a short length of string, yarn, or thin ribbon is needed to connect the door of the trap and the trigger. Anything will work as long as you can’t easily pull it apart with your fingers and you can tie it.
Soldering Iron or Wood Burner: a regular soldering iron or wood burner with a pointed tip will allow you to make quick work of the cutting operations on the bottle, and also make uniformly sized, snug holes to hold the wooden dowels above, and also the wire that we will use as a trigger.
Sharp Knife (optional): if you don’t have a wood burner or soldering iron, or just don’t want to use one, any razor-sharp knife can do the trick. A brand-new box cutter blade, hobby knife, or window scraper razor blade will do just fine.
Hot Glue Gun: a hot glue gun will work perfectly to secure your wooden dowels once you insert them in the correct orientation. It’s critical that these parts be securely anchored to prevent escape, and glue is what you need to do it.
Super Glue (optional): if you don’t have a hot glue gun, or again just don’t want to use it, you can use a thick super glue formula for the same purpose. Note that hot glue does work better for this job since it will easily bond the wood to the plastic.
Pliers: any sturdy pliers that you have handy are all you’ll need to bend your wire into the correct shape and then straighten one end for use as the trigger.
Bait: last but not least, you’ll need some bait if you want to entice a mouse to enter the trap. Specifically for this type of trap, I recommend something solid like a gummy piece of candy, piece of cheese, solidified peanut butter balls, or something similar.
And that’s it. I told you it was simple, and you’re going to think it’s even simpler when we get to the steps!
Caution: Only Burn or Melt Plastic if You Have Adequate Ventilation
One quick note before we go on. Burning or melting plastic releases toxic smoke that can hurt you or cause long-term health problems.
Make sure you are performing the burning operations, if you’re using a hot tool, in a well-ventilated area, and wear a respirator if you have one.
Making Your Rubber Band Bottle Trap, Step by Step
The following steps and photographs will take you through crafting your own humane rubber band bottle trap step by step. I highly recommend you read through all of them and review the photos before you begin so you know what to expect.
Step 1: gather your tools and clear workspace. Every good job starts with gathering your tools and prepping your workspace. Make sure you’ve got all of the materials needed and that they’re the correct size or length.
Clear away everything from your workspace that might catch fire if exposed to your glue gun nozzle or soldering iron. Make sure you have a heat-proof mat or other surface to catch any drips of glue.

Now is also the time to make sure you’ve got good ventilation if you are using the soldering iron for cutting through the plastic.
Step 2: preheat tools. Put the correct tip on your soldering iron, whichever one you have that is pointed and conical, and load your glue gun with a fresh glue stick. Plug them in and get them preheating.
Again, make sure there’s nothing nearby that could catch fire, and don’t leave them unattended at this time.
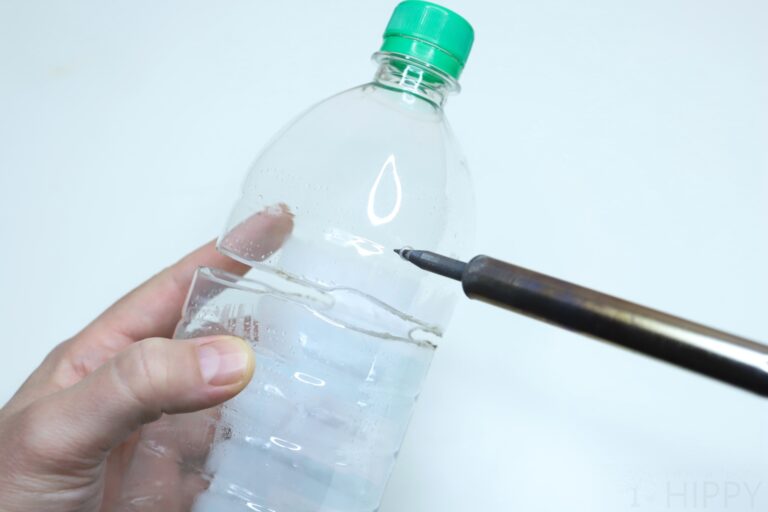
Step 3: cut most of the way around bottle. Moving down from the neck of the bottle, start to cut horizontally around the circumference about a quarter of the way from the top with the soldering iron.
Do not cut all the way through- go only about 75% to 80% around, leaving a short strip of plastic connecting the two parts. Use your knife if you need to.

Step 4: check for flexibility. Set your soldering iron aside and check for flexibility between the two parts. You don’t want it to be so fragile that it will risk tearing away, but the “door” of the bottle should now swing open and closed freely and smoothly.

If it does, move on. If it is too stiff, cut just a little more material away and check it again until it seems right.
Step 5: burn holes in neck of bottle. Grab your soldering iron again and on the top of the bottle, burn a hole biased on the opposite side where the remaining strip of material is.
Repeat the process on the opposite side of the top to make a matching hole. This hole should be the same size as your wooden dowels. Use your knife to make two tiny cuts in the shape of an X if you aren’t using a soldering iron.
Check this and the following pictures to get a better idea of how the holes should be placed in relation to the hinge of the bottle halves.
Step 6: burn holes in body of bottle. Repeat step 5 on the opposite part of the bottle, keeping them biased towards the side with the hinge. Once again, check the picture to verify that you have the holes in the correct orientation and position.
Step 7: insert dowels through holes. Now insert your wooden dowels through each set of holes starting on one side and exiting through the hole on the opposite side.
Your dowels only need to protrude about 1 ½” on either side. Trim them if they are too long as this will interfere with your positioning of the trap later.

If the holes are too snug, slightly enlarge them with the soldering iron. Ideally, you don’t want the dowels to be loose in the holes as this will weaken the integrity of the trap.
Step 8: glue dowels on outside of bottle. Once you have both dowels inserted, grab your glue gun and put a generous bead of glue around the insertion point of each dowel on both sides. Try to get a little bit of glue into the hole to better anchor the dowels. If you aren’t using hot glue, use your super glue.
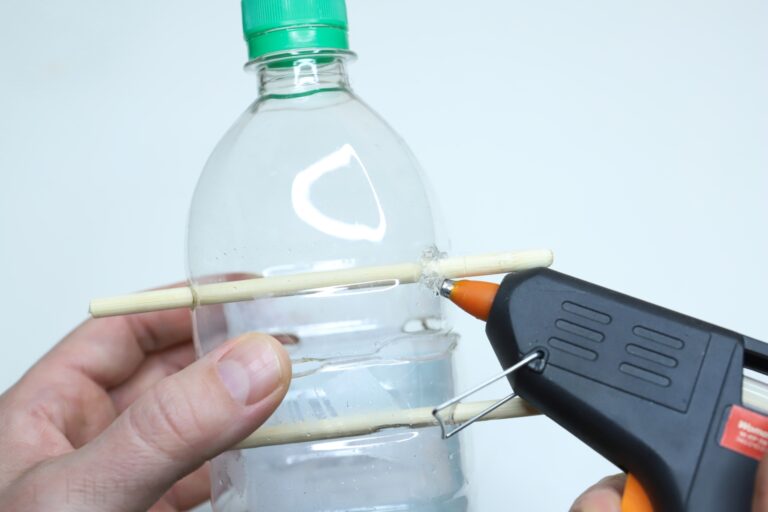
This step is critical to prevent escape because if the mouse can push either end of a dowel out, the tension on the trap will be lost and it can simply scamper out.
Step 9: attach rubber bands to dowels. On either side of the trap, loop one end of your rubber band over each dowel.

Step 10: adjust tension on rubber bands. The goal is to provide plenty of tension that will hold the trap shut, trapping the mouse. However, you must be able to open the lid all the way to arm the trap.
Play with different sizes of rubber bands until you strike the right balance, and remember you can shorten a rubber band a little bit by hitching it around one or both dowels on either side to increase tension. In all cases, the door of the bottle should snap shut when released after you draw it back.
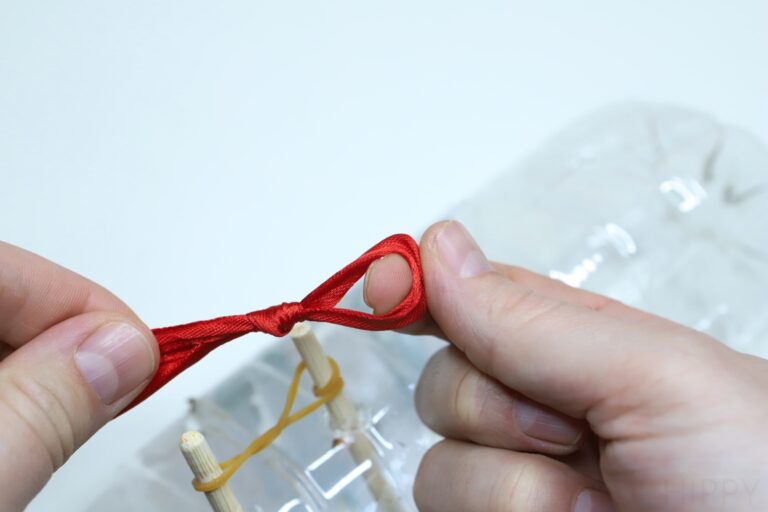
Step 11: tie string around neck of bottle. With the rubber bands correctly set, tie your string or ribbon around the neck of the bottle, just beneath the cap, lashing or knotting it so that it will not loosen or slip off.

Step 12: form loop in opposite end of string. Now, holding the top of the bottle put in the open position, run the string down to the very bottom of the bottle (the bottom being the end it usually sits on). At this point, create a loop in the string with an overhand knot, slipknot, bowline, or any other knot of your choice.
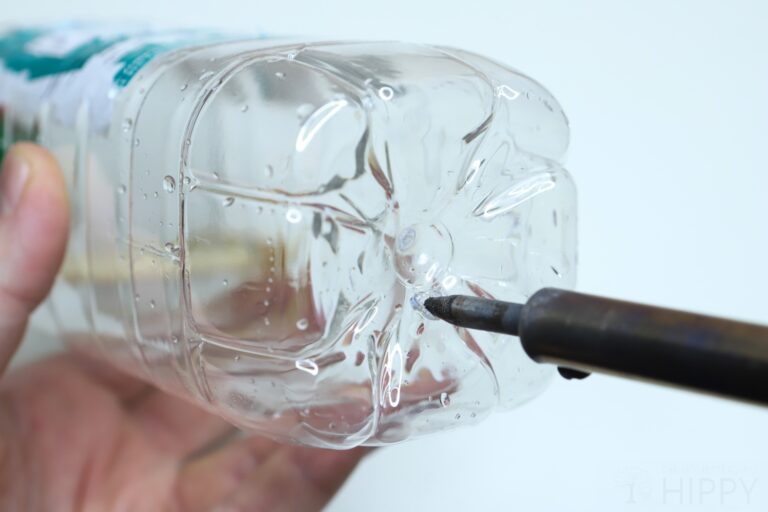
Step 13: burn hole in bottom of bottle. Grab your soldering iron again and burn a hole that is big enough to admit the wire in the bottom of the bottle.
Look closely at the picture: this hole should be biased slightly opposite the hinge side in the bottle. It should be low enough for the mouse to easily reach once it enters the trap.
Step 14: bend wire into P-shape with pliers. Take your pliers and bend the wire into a sort of P-shape as shown. This forms the trigger and bait holder of the trap. Note that the loop that forms the bell of the “P” is used to hold the bait. It should facilitate squishing or attaching the bait according to what type you are using.
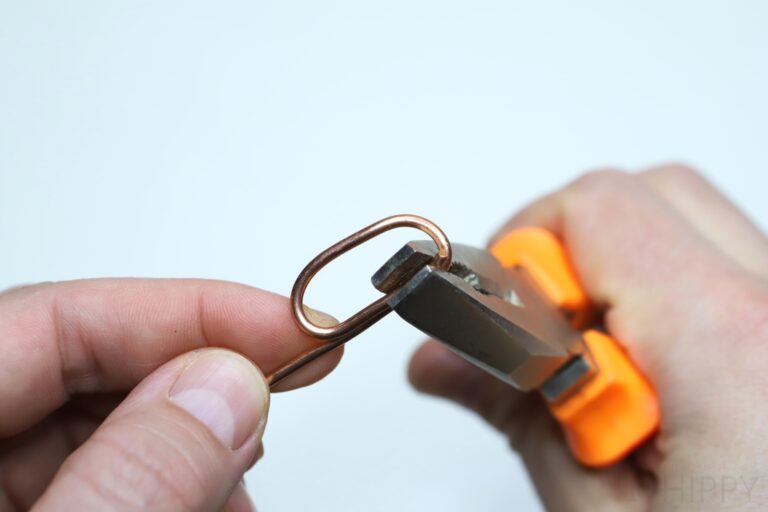
Step 15: straighten wire, check for fit in hole and attachment. Using the flat surfaces of your pliers, straighten the leg of the P as much as possible. It needs to be able to move smoothly into the hole you just burned and slip out with very little resistance once the mouse starts tugging on it.
P wire in hand.jpg
Step 16: load wire with bait, arm trap. Take your bait and attach it to the bell of the P. Do whatever you have to make sure it stays put, because if it falls off inside the trap it will likely fail.
Insert the trigger into the trap from within, leaving the bait side inside the bottle with the leg protruding from the hole in the bottom.
loading the P wire.jpg
With this in place, open the top of the trap, putting it under tension, and secure the loop in the string around the leg of the trigger that is protruding. Carefully release your grip on both parts and make sure the trap will stay armed. Check first picture of this article to see if you got everything set correctly.
Step 17: test it. Test the trap by reaching inside it with tweezers or needle nose pliers and gently pulling on the bait. The trigger should slip free with very little force. Once the leg slips through the hole and it releases the loop of the string the trap should snap shut instantly.
Perform a function check by ensuring that the rubber bands are holding the lid closed snugly. Ensure that the trigger can be pulled free with very little force; if it is too solid a mouse can eat the bait without triggering the trap. Make whatever adjustments you need to ensure it will stay put, trigger easily, and remain open when it is set.
Step 18: set trap and done! Replace your bait if you need to, arm the trap, and then place it gently wherever you know mice have been active. It won’t be long and you’ll have yourself a prisoner!
Once you’ve set your trap, check on it frequently. Once you have a mouse caught within, simply hold both parts of the trap closed, take the mouse far away from your house, and release it.
Tips and Tricks
Only make the pin as long as it needs to be. You can improve the effectiveness of your trap by shortening the leg of the P if you need to. It should be long enough to securely catch the loop on the end of the string, but also release very quickly once the mouse starts tugging on the bait.
Make sure the pin isn’t too snug. Probably the easiest mistake to make with this trap is not having the hole for the trigger the right size. It should be a perfect fit, gliding through it with almost no force, but still holding it securely enough that the trap will remain armed once you set the string.
Stick with solid bait for this trap. Solid baits work best for this trap. Something like a gumdrop, peanut butter ball, piece of cheese, or other bait. Peanut butter alone means a mouse can take little bites off and has less temptation to pull the bait down and toward itself.
Check your trap frequently. Check your trap regularly for success, especially during hours of peak activity. It isn’t out of the question that a mouse could chew through the dowels or the soft plastic of the bottle and escape, and if it stays in there too long it could die from exposure or dehydration.

Tim is a farm boy with vast experience on homesteads, and with survival and prepping. He lives a self-reliant lifestyle along with his aging mother in a quiet and very conservative little town in Ohio. He teaches folks about security, prepping and self-sufficiency not just through his witty writing, but also in person.
Find out more about Tim and the rest of the crew here.