
Mice are a big, big problem. Sure, they might be cute and charismatic, but that’s only when you’re looking at them on your phone or in the terrarium. When mice get into your house, or infest your outbuildings, you are going to have issues…

No matter how you might feel about them, the mice just have to go, but if you are a softy or you don’t want to put a mouse to death just because he’s doing mice things, you can catch him alive and release him elsewhere.
You don’t even need to go out of your way to get a specialized trap, either, because you can quickly and easily make your own live catch trap using common household items and junk.
Keep reading I’ll tell you about eight great live catch trap designs. I’ll show you how to make some really quick and easy ones just below.
Shoebox and Paper Trap
This ingenious, super simple trap is so elegant that it’s downright comical. It’s almost like something you would see in a cartoon!
But the performance is no joke, and that’s because mice are very easy to exploit when it comes to their love of food. A couple of minutes spent with the basic materials and a sharp knife, and a little bit of bait, and you’ll soon be catching mice.
What You’ll Need
You don’t need much at all to implement this trap, and the best part about it is that it’s easy to duplicate in just a few minutes’ time.
- Shoebox (or similar): you’ll need a shoebox or something similarly sized. It doesn’t have to have a removable lid, but it does have to have a solid upper surface with no other holes or openings that mice could potentially wriggle out of.
- Paper towel: any thin and pliable paper will work here, but it takes a little bit of testing and practice to get it right. It needs to be thin enough that it will completely buckle with the weight of a mouse once the mouse walks over it to get the bait. You can try pages torn from a magazine, printer paper, or even sturdy shop towels… but a piece of paper towel will work well.
- Ramp: you can use an old paint stirring stick, a paper towel tube, a scrap of wood, etc.
- Bait: any kind of food that will attract mice will work here. Raisins, seeds, soft candy, or ever-effective peanut butter.
- Knife: any sharp box cutter, hobby knife or pocketknife is all you need to cut a small hole in the box.
- Pen or Pencil: a pen or pencil can help you mark up the box prior to cutting.
Read through the following steps before you get started so you know what you are doing. It’s super simple!
Steps
Step 1: close box. Start at your work surface with the lid on your box closed and taped up if necessary.
Step 2: cut opening. In the middle of the box top, cut an opening that is about 4 x 4 inches, or 5 x 5 inches (12 x 12 centimeters) depending on the size of your box. Mark up the perimeter using your pen if necessary.

Step 3: Place paper over opening. Take your paper and place it flat over the opening in the box so that it extends several inches past the edge of the hole you just cut. Poke the middle of the paper a little bit to see if it will buckle easily under very little weight.
If it doesn’t, try a different kind of paper or crumple it up and flatten it repeatedly to soften it and take away some of the stiffness. Once you get it just right, leave the paper in place.
Step 4: place bait. Take your bait and place a tiny bit in the middle of the paper. It’s okay if it makes the paper sag a little bit, but it shouldn’t fall through into the box.
Adjust things until you get it just right, and use a different kind of paper or a smaller or larger portion of bait as needed.

Step 5: Place trap. Place the trap where you know mice have been active or traveling. Up against a wall is best since that is usually where they stick close to when they are moving around.
Step 6: place ramp. Take your paint stirring stick, scrap wood, or paper towel tube and lean it from the floor up to the top of the box so that mice have an easy way to get up there. You can also use a stack of books or anything else that is convenient if required.
Step 7: double check bait and wait. Make sure your bait is still in position and the paper is still in place correctly. Give your track one more function check to make sure that it will collapse when a mouse steps out onto the paper to get the bait.
Step 8: check trap regularly. Make sure you check on your trap multiple times a day. If you notice the paper has fallen inside, you’ve probably got a mouse in there! Look inside cautiously to see if you can spot the little critter; if left in there too long, he might chew his way out.
Step 9: reset trap when needed. This trap won’t catch more mice when the paper falls in. Reset it when needed by replacing the paper or using a fresh sheet of paper.
Unclimbable Shoebox Trap
Another worthwhile and creative box trap you can use to catch live mice, and one that’s much easier to see whether or not the mouse is actually inside is what I like to call the unclimbable shoebox trap.
What You’ll Need
- Shoebox: same as before, a common shoebox or a box of equivalent size. It can be open top this time.
- Ramp: Again, as with the previous track, this can be a stirring stick for paint, a paper towel tube, or branch.
- Cooking oil: Any kind is fine.
- Bait: Any kind of bait or attractant from mice works well, but I really like peanut butter for this trap.
- Small dish for saucer: Optional, but it can help prevent a big mess inside the box and it keeps the bait fresher longer.
Steps
Step 1: apply oil to box. Inside your box, take a rag or basting brush, or an old paintbrush and coat the interior walls all the way up to the edge on all sides. This is critical for preventing the mice from just climbing out because it makes it too slippery for them to get a grasp on it.

Step 2: position box. Position the box near where mice are known to frequent. If you’ve seen the moving around or looking for food in certain areas, this is where you should target.
Step 3: place ramp. On one end of the box, or both ends, lay your ramp down on the top edge so that mice can scurry up and hop inside.
Step 4: place bait on ramp. Place a seed, a raisin, or a few tiny dabs of peanut butter or candy, on the ramp to entice mice to climb up and explore. Don’t use too much, because that will allow them to stay out of the track and still get plenty of food, which will prevent you from catching them.

Step 5: Place bait inside trap. In the middle of the box, place your bait. Place it on the saucer or dish first if you are using it.
Step 6: Check trap regularly. To see if you have any mice inside. If the bait is gone from the inside, your box either is not tall enough or you didn’t make the sides slippery enough to keep the mice inside. Adjust or replace box as needed.

Step 7: Cover trap when releasing mice When you’ve caught a mouse or three, simply place a lid on the box or hold it closed with another sheet of cardboard. Take them far away from your home and turn them loose.
Slippery Bucket Trap
A similar trap to the previous one on our list, and really more of a variation, is the slippery bucket trap you can use a small bucket or a very large bowl in the same way, with a little bit of bait, a branch or small plank of wood and some cooking oil. Once the mice fall in, you’ll have them and can easily see when they are caught for later release.
This trap has a major advantage in that it’s capable of catching even large colonies of mice in a single night for subsequent depopulation! No resetting, no fuss and no muss.
What You’ll Need
- Bucket or large bowl: any common plastic bucket or large, deep bowl that has tall sides will work perfectly.
- Ramp: any sturdy, long object that mice can use as a ramp to reach the top edge of the bucket. Use a branch, a long paint stirrer, etc.
- Cooking oil: Any kind of cooking oil you have handy is suitable.
- Bait: any food that mice love is good enough, but once again I prefer peanut butter if I have a choice.
- Small dish or tray: this will hold the bait inside the bucket and make cleanup easier.
Steps
Step 1: coat interior of bowl or bucket with oil. Using a basting brush, rag, or old paintbrush, thoroughly wipe down the interior walls of the bucket or bowl with the cooking oil. Usually slick plastic like this is adequate for preventing mice from climbing, but this is cheap insurance. IMG_4672

Step 2: Place bucket. Put the bucket anywhere near an area where you know mice go to and fro or look for food. Depending on the size of your bucket or bowl, you might not be able to get it into a small space, so put it as close as you can or choose a smaller container.
Step 3: Place ramp. Lay whatever you are using for your ramp on the edge of the bucket. Take care that it cannot slip or fall down because that will prevent mice from accessing the trap entirely.
Step 4: Place bait on ramp. Place a few tiny morsels of peanut butter or other bait on the ramp to encourage mice to use it, climb up, and see what’s inside the bucket. IMG_4704

Step 5: Place bait inside bucket. Load your bait onto your tray or small saucer if you’re using it, and then set it inside the bucket right in the middle. Use a somewhat larger quantity than you would for normally catching mice, because increasing the aroma coming out of it will make it irresistible to mice who won’t be able to stop themselves from jumping inside to get it. IMG_4690

Step 6: check and re-bait trap. Check the trap periodically for mice. Clean the trap if necessary and add new, fresh bait to keep them coming. Re-bait the ramp accordingly
Spinning Can Trap
One of my favorite trap designs, and a truly clever one, is the spinning can or cylinder trap. A ramp leads up to it, again with a little bit of bait for encouragement, and when the mice leap out onto the cylinder to get a little bit more it will, of course, rotate to one side or the other and dump them into the bucket. It’s hilarious, non-lethal, and another great trap for catching loads of mice in very short order.
What You’ll Need
- Bucket: any larger plastic bucket can work, but a 5-gallon painter bucket works best.
- Metal rod: a thin, metal rod that is perfectly straight, preferably no larger than a quarter inch in diameter.
- Can/Tube: you can use a soup can, soda can, paper towel tube, or, best of all, the inner tube and caps from a roll of receipt paper or an old paint roller.
- Ramp: A long, sturdy piece of wood or other material to use as a ramp so the mice can reach the trap.
- Diagonal cutters: for trimming the metal rod if needed.
- Sharp nail or drill: for making holes in the bucket.
- Bait: you definitely want to use something sticky here, like peanut butter or some other kind of nut butter.
Steps
Step 1: measure rod. Measure out the length of the rod. It should be about an inch longer than the diameter of the bucket on either side.
Step 2: prepare can or tube. Do what you have to to punch a hole in either end of the can or tube if one isn’t already present. Use your nail or drill. Make sure you can thread the rod through it easily.
Step 3: drill holes in bucket. Near the top of the rim, drill a hole on either side of the bucket.
Step 4: install can. Thread the rod through on one side of the bucket, through the can, and then out the other side of the bucket. Make sure you position the can so that it is in the middle of the bucket.
Step 5: test can. Rotate the can to make sure it spins freely, and if you put a little bit of pressure on top it should immediately try to rotate to one side or the other. This is critical to ensure that the mouse will fall off immediately as soon as they set foot on it.
Step 6: position bucket. Place the bucket wherever you’ve seen mice moving or looking for food. This is a larger trap, so you won’t be able to get it in small, out of the way places.
Step 7: Place bait on can. Smear a generous dollop of peanut butter around the circumference of the can. This is to entice mice to leap from the rim of the bucket out to the can in order to feed.

Step 8: Place ramp, bait. Place your ramp securely so that it is anchored on the ground and also on the rim of the bucket. Be sure that it won’t slip and fall down. Place a few tiny tidbits of bait evenly spaced on the ramp to entice mice to climb to the top and see what’s up there.

Step 10: Check trap periodically. Once you’ve caught one or more mice, simply keep the bucket upright or pop a lid on it if you have one and take them far away from your home before turning them loose.
Step 11: Re-bait trap. The bait on the cylinder will dry out over time or be worn away. Apply fresh bait to it occasionally to keep it working.
“Plate” Trap
Another DIY mouse trap, another one that uses a bucket. Instead of using a rotating cylinder that is impossible to balance on, this one lures mice out over the edge, literally, using a teeter-totter principle. In going for the bait, they get dumped into the bucket and there they will stay until you come to set them free.

What You’ll Need
- Bucket: specifically a 5-gallon painter bucket.
- Rod: thin, straight metal rod or a wooden dowel, no larger than a quarter inch diameter.
- Tape: useful for securing the tilting platform to the rod.
- Plate: the platform of the trap. Can be made from a styrofoam plate, a sturdy piece of foam board, chipboard, or something similar. Make sure this material is very lightweight.
- Ramp: Any sturdy piece of scrap wood, cardboard, or anything else that mice can climb to get to the top.
- Diagonal cutters: for trimming your rod to length.
- Nail or Drill: for making holes in the bucket.
- Bait: peanut butter works best here, but you can use anything that will attract a mouse.
Steps
Step 1: test balance of platform. On top of your bucket, lay the rod across the rim. Now lay one edge of your platform on the rim of the bucket, moving the rod so it is beneath the balance point of the platform. Move your rod closer to the rim until the platform is precariously balanced and will tip towards the center of the bucket with very little weight applied.
Once you have this position correctly, Mark the spots on either side where the rod is on the rim.
Step 2: drill holes. Using the nail or your drill, punch holes in the rim directly beneath your marks. Thread the rod through and then trim off the excess on either side so only about an inch is sticking out.
Step 3: tape platform to rod. Position your platform (or plate) exactly as you had it earlier, and test to verify that the balance point is still correct. Carefully use some tape to secure it tightly to the rod. Make sure there is no slop or it can slide around because this will change the balance point.
Step 4: position bucket. Place your bucket where you know mice are moving around or likely to go.
Step 5: position ramp. Place the ramp so that it is securely on the ground and leaning just on the rim of the bucket where the platform contacts the edge. Lift the platform up and out of the way, place the ramp, and then lay the edge of the platform down so it is just overlapping.
Step 6: bait platform. Use a little bit of bait and stick it close to the edge of the platform that is hanging over the center of the bucket. Don’t use it so much that it will cause the platform to start tipping forward.
Step 7: test it. With the bait in place, use the tip of one finger and press on the edge of the platform that is over the middle of the bucket. It should freely and easily move downward, tipping the platform. If it doesn’t, or if there is much resistance, make adjustments until it does.

Step 8: wait. Leave the trap and then come check on it later, preferably after a period of peak activity.
Step 9: replace trap and replace bait if needed. Put the bucket back and add more bait to the plate as it is worn away or dried out. Repeat this process until all the mice are gone.
Rubber Band Bottle Trap
A ingenious and surprisingly intricate to track using nothing more than a plastic bottle, some wooden skewers, and a few rubber bands, this trap has the advantage of being highly secure and totally inescapable once it closes. It’s also a lot smaller compared to the larger bucket traps and that means you can place it in out-of-the-way nooks and crannies where mice often congregate.
When a mouse enters the trap to pull on a baited trigger at the far end, the rubber band-powered closure will slam shut and trap the mouse inside. Don’t worry, it won’t hurt him, and you’ll easily be able to see when he’s in there.
This trap looks intricate, and it is compared to others on our list, but it’s also surprisingly easy to build and a really fun project. Learn to make it here.
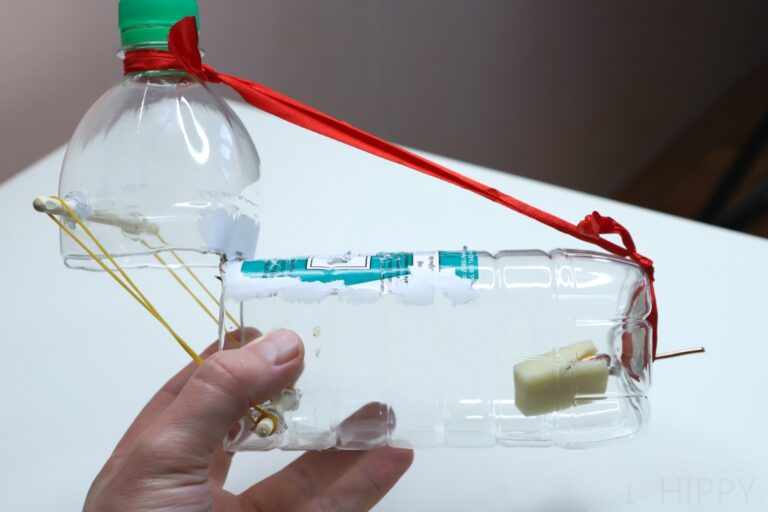
Tilting Bottle Trap
Another truly clever trap design, and one that uses a plastic bottle with very little modification – in case the previous one seemed a little too involved. It also uses components that you’re likely to throw away otherwise, meaning it’s great for recyclers.

This trap catches mice when they crawl inside the bottle to get the bait, tilting downward to block them inside with no hope of escape. The only tricky part is getting the balance just right on the wooden dowel so that the bottle will tilt down as soon as the mouse enters.
Spend a few extra minutes testing and tuning this one, and you can use it for a long time if you want to! Full instructions here.
Bucket Dropper Trap
Sometimes the simplest solution is the best. A cardboard tube, an open bucket, and a little bit of bait are all that’s required. Balance the tube precariously over the bucket, and when the mouse scurries inside to get a little snack it will tip over the edge, dropping him inside.
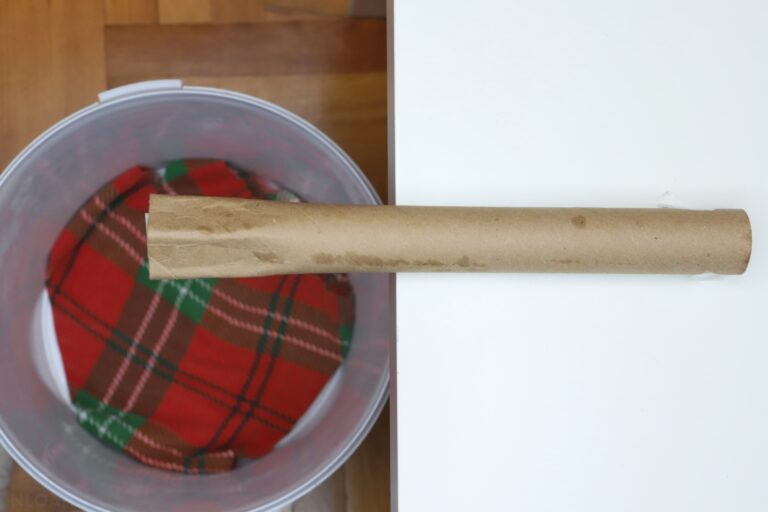
It’s much faster and more straightforward to put together compared to the other bucket traps on our list, but the obvious disadvantage is that it can only catch one mouse at a time- unless you want to set up multiple tubes! Here’s how to make it.

Tim is a farm boy with vast experience on homesteads, and with survival and prepping. He lives a self-reliant lifestyle along with his aging mother in a quiet and very conservative little town in Ohio. He teaches folks about security, prepping and self-sufficiency not just through his witty writing, but also in person.
Find out more about Tim and the rest of the crew here.
I tried the shoebox trap and it caught a mouse within minutes! However the mouse jumped out as soon as I picked the box up, I treid to scoop mouse back inside but mouse scampered free! Set it again and planned on using the wide wooden ramp to cover the hole. Mouse fell in almost immediately again, but mouse leaped out before I could get to the box!! Olympic leaping mouse lol!!
Trying the bucket and stick now, a TALL bucket!
Hi, I am in the UK.I managed to catch several mice with a bought live traps, now realize ‘unfortunately’ they may have been youngsters.
Have a very clever adult yet to catch, so I really appreciate all your ideas.
Thank you.