
Mice might be tiny and adorable, but they are big problems if they get inside your home. Mice will relentlessly break into food, contaminate every surface they touch, spread disease, and generally just cause problems.

However you feel about their place in nature, that’s exactly where they need to be: out in nature, not in your home!
But they don’t have to die just because they chose the wrong house. Using some scrap materials that you have in your kitchen and garage right this moment, you can quickly and easily craft a reusable, non-lethal mouse trap that is shockingly effective.
It’s a great way to reduce waste, and it even better way to get rid of these annoying mice they have invaded!
Keep reading, and I’ll show you how to build this trap…
Needed Tools and Materials
The best thing about this trap is just how simple it is to make, and because the materials are so common, and some of them are technically garbage, you can make multiple traps to quickly depopulate a swarm of mice that might be in your home. You need just a few materials and a couple of tools, nothing else.
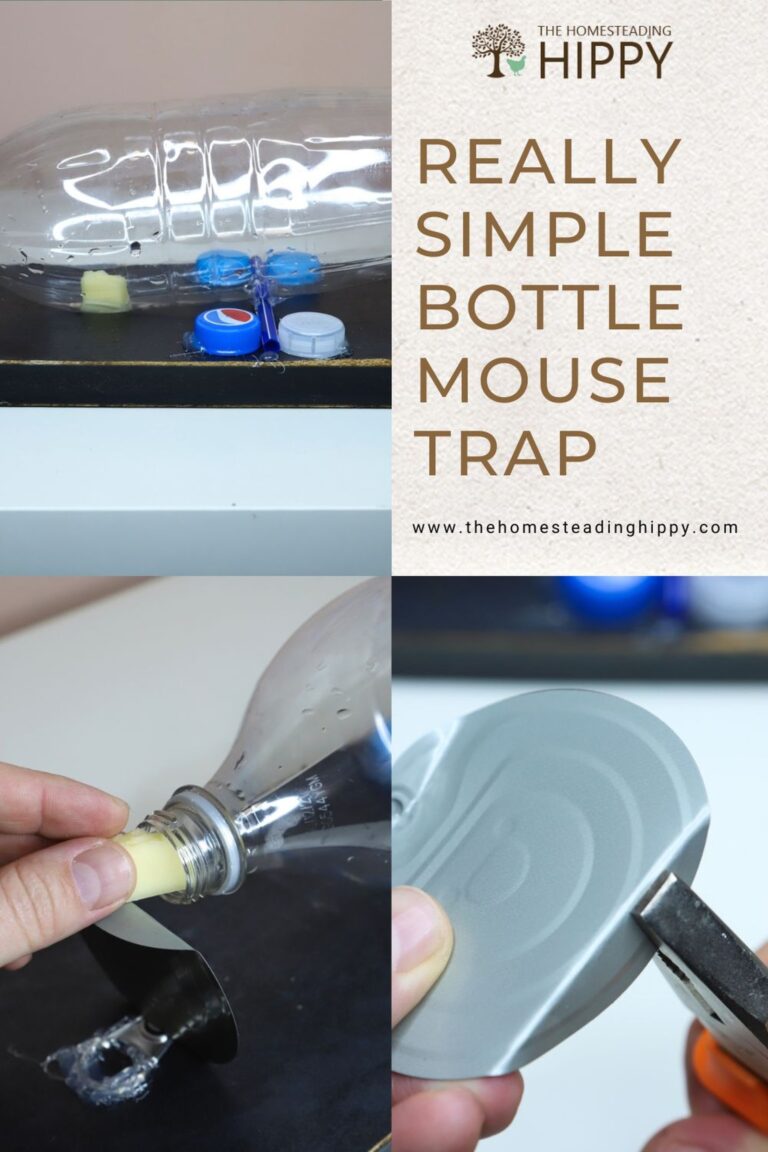
2-Liter Soda Bottle: you need a single large soda bottle for each trap. Make sure it’s not deformed, cracked, or damaged in any way, and give it a good rinse with some hot, soapy water. The less traction the mouse has on the inside, the better it’ll work.
Pen Barrel: you’ll need a single pen barrel for each trap you want to build. This is the outer tube or body of a common ballpoint pen. Remove the nib, the ink reservoir, and the end cap, clicker, or clip.
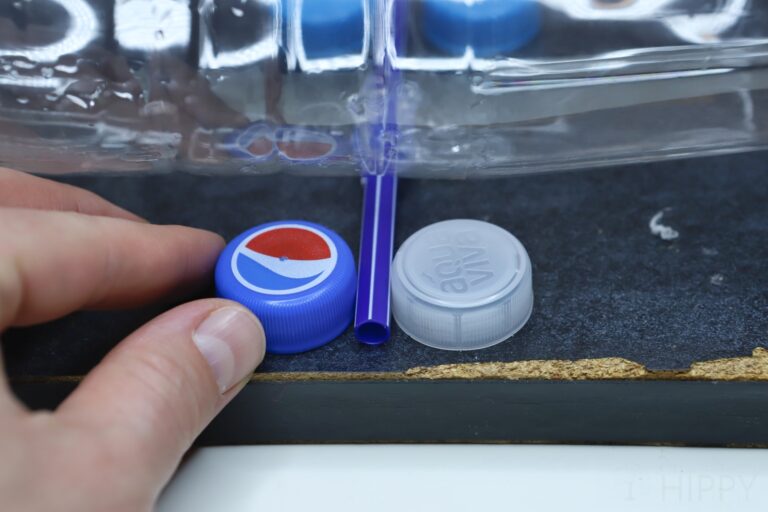
2-Liter Bottle Caps, x4: four 2-liter bottle caps are needed for each trap in order to stabilize the pen barrel which we will use as a sort of teeter-totter.
Soup Can Lid, with pull tab: each trap needs a single soup can lid, the kind with a pull tab. If you don’t have any with pull tabs, you can use a second, standard lid in conjunction with the first.
Plank of Wood: any scrap piece of wood you have of any kind will work for the trap as long as it’s thin enough for a mouse to easily climb up on and several inches longer and wider than the bottle itself. Plywood, hardwood, softwood, it doesn’t matter.
Hot Glue Gun: hot glue is used to secure several parts of the trap together for our build. You don’t need much glue, but make sure it works and you have enough to construct as many traps as you need.
Pliers: pliers, of any kind, come in very handy for safely and easily bending the metal of your soup can lid into position and disassembling an old pen to harvest the barrel.
TP: toilet paper makes a great wrapper for your bait, and facilitates easy cleanup of the trap and resetting so you can catch more mice. A few small swatches are all you need.
Bait: it’s tough to catch a mouse without the right bait. Great baits to use include peanut butter, soft gummy candies, seeds, and cheese.
And that’s really all you need to build this amazingly effective and humane mouse trap. We’ll get into the step by step in the very next section.
Building Your Simple Bottle Mouse Trap, Step by Step
This build is truly easy and straightforward, but there are a couple of steps that require a fair bit of precision in assembly to make sure the trap will function smoothly. I recommend you review all of the steps and look over all of the included photos so you have a better sense of what you’re doing before you start.
Step 1: clean and remove label from bottle. Take your bottle, remove the label, and then give the inside a good cleaning using some hot water, dish soap, and a lot of shaking.
This isn’t just for appearances, either. Sticky residue on the inside can give a mouse traction which might allow them to potentially escape the trap.
Clean the inside as best you can, give it a good rinse, and then move on.
Step 2: prep pen barrel. If needed, use your pliers to pull out the guts, clicker, and clip on your pen so only the round body remains.

Step 3: determine balance point of bottle.With the label removed from the bottle, look at it closely. Many brands have three embossed rings around the middle.
Going from top to bottom, the balance point of the bottle should be at the top edge of the third ring down. This is where we will glue the barrel of the pen to make our teeter-totter.
However, if your bottle has a different shape, you want to experiment by placing the pen on a flat surface, perpendicular to the length of the bottle and then experimenting so that you can find the balance point.
You want the bottle to rest on its bottom end, but tip forward, towards the neck, with the gentlest pressure.
Once you figure this out, Mark the location for the pen barrel with a marker or a shallow scratch and then move on.
Step 4: fill bottle with water, cap. Fill your bottle with room temperature water, then put the cap on it. This is necessary to prevent melting in the next step.
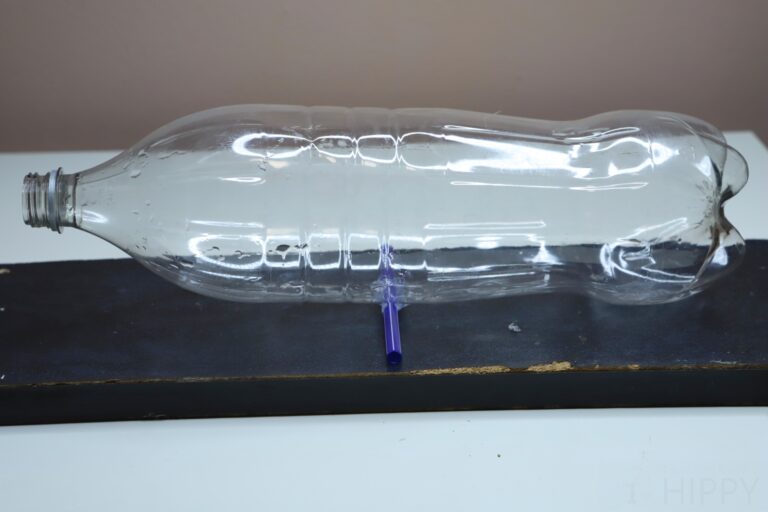
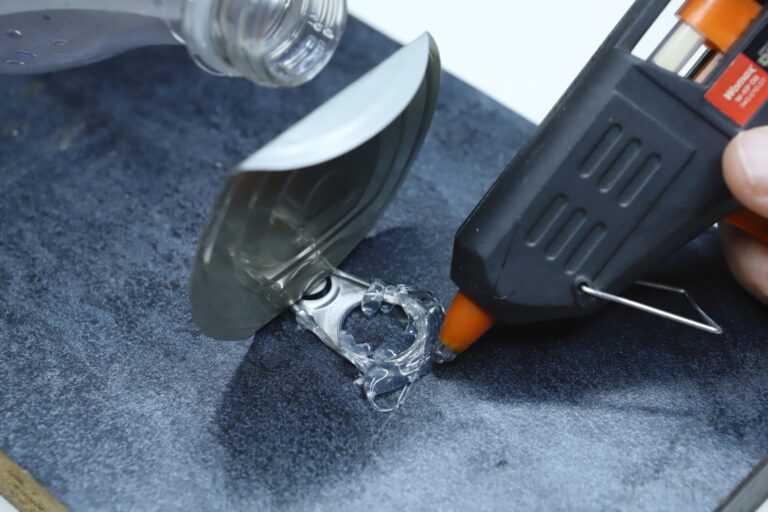
Step 5: glue pen barrel to bottle. Take the pen barrel and, using the hot glue gun, glue it perpendicular to the bottle at the balance point you determined in the previous step.
Be careful that you do not touch the nozzle directly to the plastic because it might singe and puncture it even with the water inside.

Make sure you press the pen barrel securely into the bead of glue to form a strong bond.
pen barrel glued to bottle.jpg
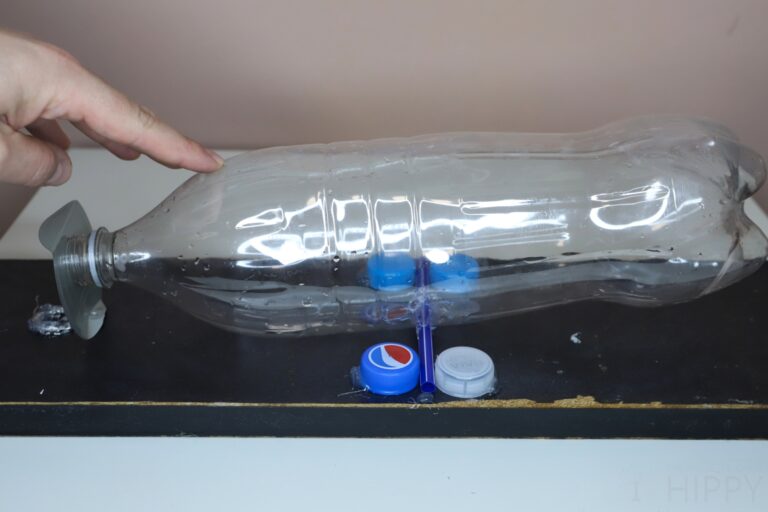
Step 6: position bottle on wood plank. Now take your bottle with the pen barrel down and position it so that the bottom of the bottle is roughly flush with one end of the board. Make sure you have at least 4 inches of open board ahead of the neck of the bottle.
Step 7: position bottle caps. Once you have the bottle properly positioned, grab the caps and position them very close to, but not touching, the pen barrel. You don’t want them to touch because the friction might prevent proper functioning.
Repeat this step on the opposite side of the bottle.
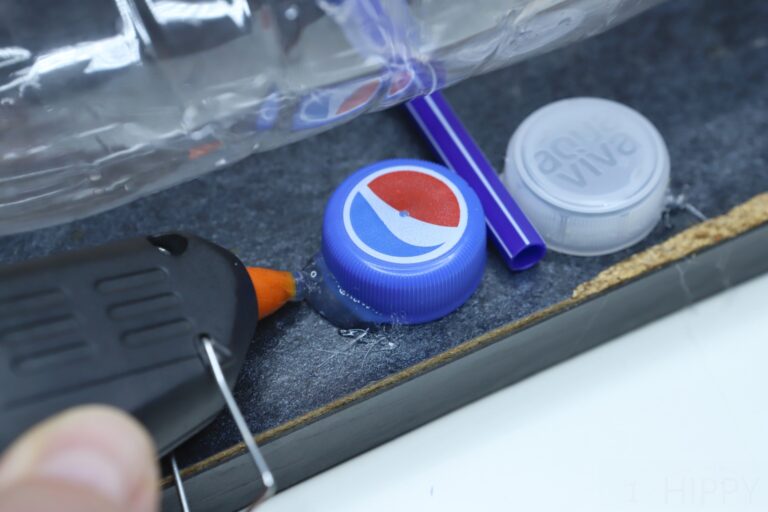
Step 8: glue caps to secure pen barrel in place. Once you have the spacing determined, double-check it one last time and then glue the caps down by running a bead of hot glue around the rim of each cap where you can reach it.
You should still easily be able to tilt the bottle and remove it from between the caps with no resistance. If you can feel resistance, you need to break the caps free, reposition, and re-glue them.
Once they are set, put a bead of glue at the end of the pen barrel on both sides, but not touching it! This is to prevent it from sliding side to side.
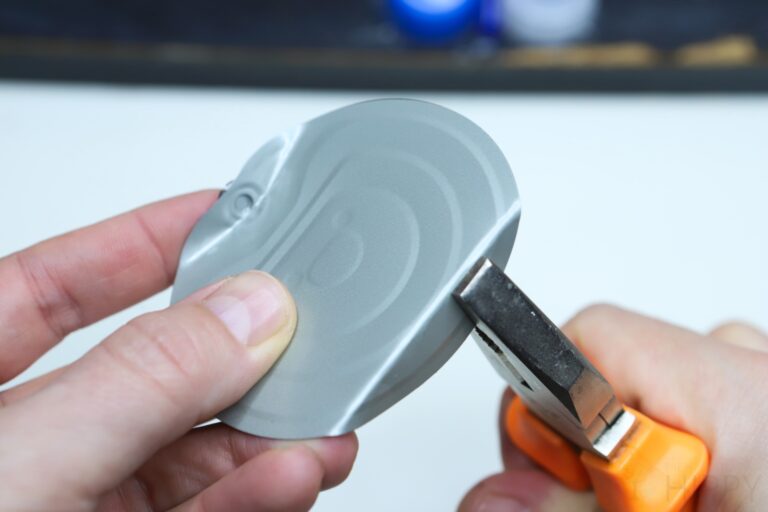
Step 9: bend one edge of can lid. Grab your pliers and your can lid. Working on the edge of the lid that is opposite the pull tab, bend the edge of the lid backwards toward the same side that the tab is on. Carefully bend the edge with the pull tab downward, toward the underside of the lid.
See the picture for details.
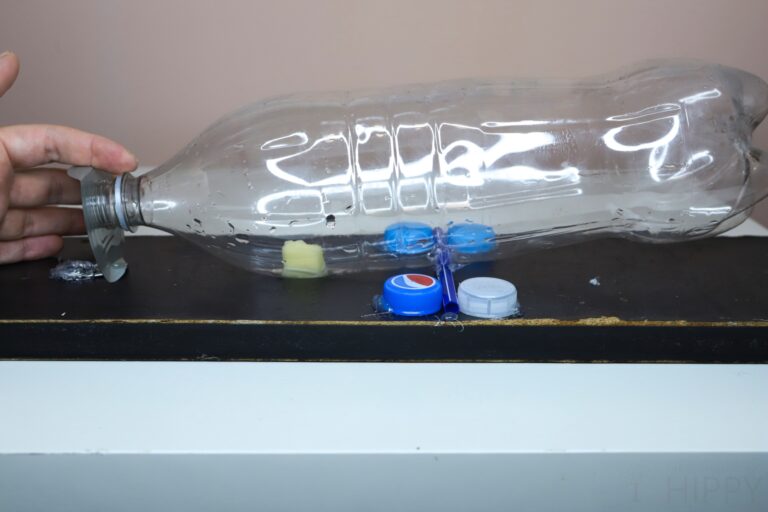
Step 10: position bottle, glue can lid to plank. Tilt the neck side of your bottle all the way down.
Now take the can lid, stand the pull tab straight up so that it is parallel with the length of the board and facing away from the bottle, then position the lid so that it’s flush against the opening in the neck of the bottle. Move the lid back ever so slightly to reduce the friction between it and the bottle.
Once you have the fit lined up correctly, use your hot glue gun and glue the pull tab down to the board to secure the lid.
Step 11: adjust lid for tight seal against bottle. Give the hot glue on the tab a short while to firm up. Then, test the bottle by moving it up and down. It should not rub against the lid and stop or drop slowly when you press down on the neck with a finger.
At the same time, there should not be but the tiniest gap between it and the lid. A rule of thumb is that you should only be able to slip a playing card between them.
Step 12: test trap. You can adjust the fitment here by carefully bending the lid forward or backward as needed, retesting as before.
Once you are sure there are no friction points between the mouth of the bottle and the lid or the pen barrel and the caps, press down on the neck with your finger to make sure it moves smoothly and then rebounds to its original position once you let go.
If everything functions correctly, you are ready to move on.
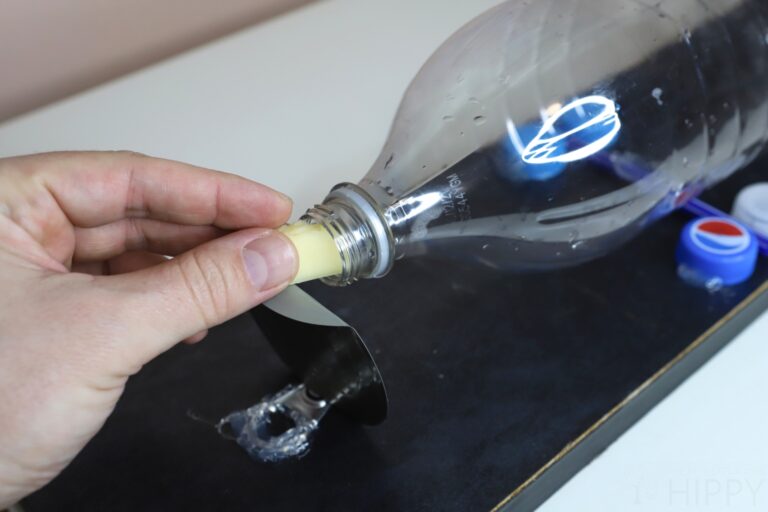
Step 13: load bait. Load your bait into the bottle by grabbing small bits that can easily pass through the neck and then wrapping them in a small swatch of toilet paper.
This part is essential because you don’t want to smear any bait on the neck of the lid which might allow a mouse to get a bite without committing to entering, and it also allows you to easily clean the trap simply by dumping out the contents and putting in fresh bait.
Load between 1 and 3 packets of bait to set the trap. Don’t worry, the super-sensitive noses of mice will easily be able to smell it and figure out where it is.
Step 14: position trap. Position the trap near areas of known mouse activity. As long as it is close to a route that they normally take when moving to and fro, or near other sources of food that they have accessed in the past, you’ll have them in no time.
Step 15: check trap regularly. Check your trap regularly to see if you’ve caught any mice. Also check to make sure the bait is still inside. If the bait is gone and there’s not a mouse trapped inside, you need to adjust your trap.
Step 16: done! And with that, your trap is completed and functional. Repeat these steps to quickly build on arsenal traps that you can place in high-traffic areas and get rid of lots of mice quickly.
Helpful Hints
Make sure the mouth of the bottle does not snag on the lid. It’s important to spend a few minutes making sure that the neck of the bottle will lower and raise smoothly without rubbing on the can lid. If it does, this can allow a mouse to enter, grab the food, and then leave.
Proper balance is essential. Likewise, spending the time to properly balance the bottle to get that correct teeter-totter action is absolutely critical for correct function.
The idea is that the mouse will enter the neck of the bottle and even their minimal weight will cause it to swing down trapping them inside. If it won’t do that, or if you have the weight biased towards the rear too much, you won’t catch any mice.
Use small, hard bait to make cleanup easy. As mentioned above, it’s smart to use the right bait with the TP to make cleanup and resetting of the trap easy.
If you don’t want to mess with that, consider using some of those sugar-frosted gummy candies or other hard bait like seeds that are attractive to mice but won’t really leave any residue behind for you to deal with
Carry the bottle upright when getting rid of the mouse. When you catch a mouse, it’s important to carry it correctly so he doesn’t get away and you don’t get bit. When the mouse is inside quickly let’s smoothly lift up the bottle or anything the neck upward as normal.
Put the cap on if you’re going to be taking the mouse outside immediately to release him don’t leave the cap on if you aren’t, though, because he will eventually suffocate in there.
Tim is a farm boy with vast experience on homesteads, and with survival and prepping. He lives a self-reliant lifestyle along with his aging mother in a quiet and very conservative little town in Ohio. He teaches folks about security, prepping and self-sufficiency not just through his witty writing, but also in person.
Find out more about Tim and the rest of the crew here.