
Using a three-bin system for composting makes it easy to manage, turn, aerate, and use. Learn more as we talk about how to get started with this system.
Everyone loves to say they compost but do they really know what they are doing? This 3 bin system works great for us and provides a bit of fresh, wonderful compost for our gardens each season.
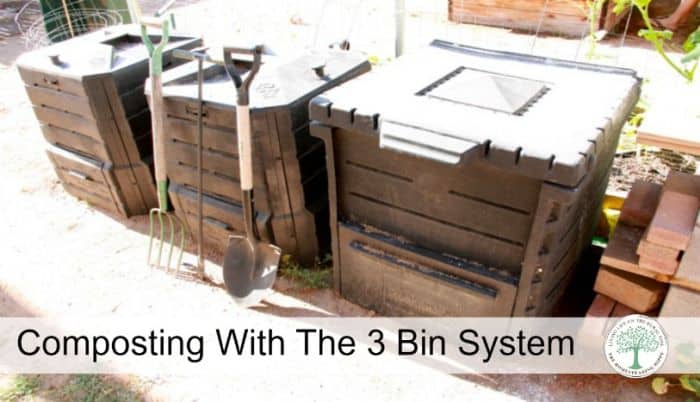
Table of Contents
Benefits of a 3 Bin Composting System
Now, I love composting, but one of the problems I’ve had in the past with the “traditional” style of composting is that the compost never truly breaks down all the way. Since we’re always adding new ingredients to the pile, it is always “cooking.”
As a result, you never actually know when the compost is ready to be used in your garden.
That might not be a huge problem if you’re adding mostly yard waste and kitchen scraps to the compost pile. These are things that, in most cases, are just fine to add fresh to your garden.
The problem arises when you are adding lots of ingredients to the compost that aren’t exactly safe to go on your garden “raw.” By that, I mean things like chicken manure and other animal manure.
These are great ingredients to add to a compost pile as they add tons of nitrogen, but when added raw to your garden (meaning they haven’t had the chance to break down for several months) they can overload your garden with nutrients and burn your plants.
Another benefit of this kind of compost bin system is that it will reduce the weight of the material you are putting inside.
If you don’t want to spend a lot of time turning heavy batches of compost every week, you may want to consider this kind of system. There’s less waste to deal with all at once.
Since you aren’t constantly adding new materials to every pile, you aren’t unnecessarily prolonging the decomposition process.
Siting Your Bins for Best Results
Before you start building your bins, you need to figure out where you’re going to put them. This is a surprisingly nuanced and important part of setting up a successful three-bin compost system.
Where you place the bins will have a major impact on your workflow, the health and productivity of the bins themselves, and also potentially your well-being: depending on where you live and what sort of condition your property is in, you might not want to be staring at your compost bins whenever you are out and about.
Accordingly, you’ll generally want to place your bins in an area where they are convenient to get to and work out of while still having ideal conditions for the composting process, and ideally the whole while they will be sort of out of sight and out of mind.
Again, depending on the arrangement of your garden, planters, and the rest of your property you might or might not be able to check off all of these boxes but you should try.
Check out all of the criteria below:
Some Shade
If at all possible, place your compost bins in an area that gets partial shade. This isn’t a deal breaker, but it can make your life easier and more convenient.
Your beans do need some sunlight, but too much direct sunlight, especially in hot, arid climates, can overheat your compost and slow or even stop productivity.
You might be able to situate your compost bins near the shade of a large tree, behind and out building or potentially even up against your house in order to get the needed shade.
Don’t worry about it too much, however, because you can always provide meaningful shade by covering your bins with lids, extra pallets, netting, or other hardware solutions.
On “High Ground”
Very important on your list of priorities is finding a place for your bins that is on the high ground, or more specifically a well-drained spot on your property.
Yes, compost bins do need moisture in order to function, but excess moisture is a problem as we will learn in a little while, and being flooded out or inundated by rising groundwater can be disastrous.
You can take care of this step through the simple process of elimination. Any place on your property, be it paved or open ground, that accumulates significant water during rains or is a path for flood water should be ruled out.
Keep in mind it is possible to improve the drainage around the spot where you place your bins, but this too may be a limiting factor if you can only do so much.
Out of Sight and Mind
Let’s face it: even if you have your bins set up in a nice, tidy, and reasonably attractive way they still aren’t very easy on the eyes.
Depending on the feelings of yourself and your family members, and potentially even your neighbors, it might be worth considering situating your bins in such a way that they are not an eyesore.
You should also keep in mind that there is the potential for some offensive odors emanating from your compost, and though this isn’t too bad unless your pile is badly out of balance, it is still a factor you might want to manage ahead of time through proper siting.
If possible, and if it will still allow you to check all of the other factors off of this list, consider placing your bins behind a shed or other convenient terrain factor to help shield them from view.
Another important but often overlooked part of placing your bins is how convenient they will be when the time comes to add material, manage the piles, or take out your compost for use in your garden or planters.
It isn’t the end of the world if you have to walk a little farther to interact with your bins, but the less convenient it is the less likely it is that you will stay on top of all the necessary maintenance.
The very best and most convenient place for your bins, assuming you can meet all the other criteria we’ve discussed, is somewhere near your planters or your garden.
Streamlining your workflow will make the entire process more efficient and also more enjoyable. Smart placement is part and parcel of this.
How to Build a 3-Bin Compost System
Now, you can easily run to the store and buy a 3-bin compost. This will save you some time and effort since everything will come hooked together and ready to go.
However, there’s really no reason to do that, since you can build one of these compost systems for very little (if any) money and you don’t need to be a carpenter to pull it off.
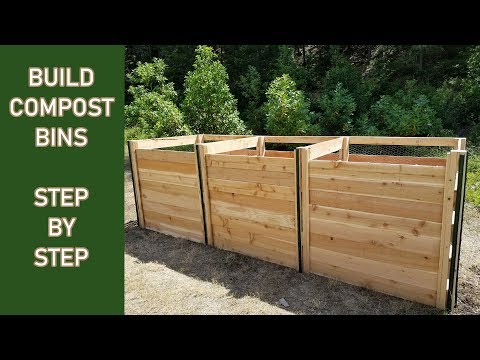
Here’s an easy way to build one. All you need is a rake, a shovel, and a hammer, along with seven untreated pallets and some nails.
Go ahead and level your compost area with the rake and shovel. Lay down a few sheets of cardboard to repel weeds (I’ll tell you more about this later in the article) and stand up two pallets to create a 90-degree, L-shaped angle. The thicker pieces should be parallel to the ground.
Then, nail your pallets together where the top and bottoms meet the slats. Attach a second side pallet to create a three-sided, open-faced box. Hammer in your nails until you have three attached, open-faced boxes.
You can choose to add a pallet to the front of each of your bins to serve as the front slats, or you can leave it open. You can also add a pallet “roof” if you’d like.
Just make sure there’s a way to keep animals and other pests out, and a way to allow moisture and oxygen in. If you want to permanently attach your lid take care that the screws you use for the hinges won’t blow through the thin wood of the pallets.
Don’t forget that you’ll also need to be able to get into your three bins to add ingredients, turn the compost, and move compost out on a regular basis.
How to Use a 3-Bin Compost System
As the title suggests, we use three bins to complete our full cycle of composting. The 3 bin compost system involves either buying or building three bins or boxes. They can be linked or merely positioned side by side.
This method is perfect for a gardener who can easily turn a compost pile with a pitchfork, as well as a garden whose plot produces tons of food and plant waste.
The first bin holds all of our “new” stuff. We collect kitchen scraps and toss them in fresh. We clean the chicken coops and throw all the waste in. We take down old and dead plants from the garden and add them to bin number one as well.
The theory behind composting in the first bin is similar to what you might do if you were composting in a more traditional sense. You’ll add your compost materials, layering green and brown ingredients whenever possible.
Once the pile starts decomposing, and it’s around 3x3x4’, that’s when the differences start to come about between this 3-bin method and a traditional method of composting.
Some examples of ingredients you might add to your first bin include:
- Plant trimmings
- Weds
- Eggshells
- Animal manures
- Coffee grounds
- Tea bags
- Kitchen scraps
- Paper
- Seaweed
- Straw
- Grass clippings
- Dried leaves
- Corn stalks
- Wood chips
- Coffee filters
- Pine needles
- Shredded branches
We are sure to turn the waste inside the bin frequently and keep it moist, but it is by far the yuckiest bin – filled with rotting food and all manner of bugs, who just love the stuff.
One thing it is NOT, however, is smelly. An overly fragrant compost pile is a bad sign. If everything is in balance and properly covered, your compost pile should not smell.
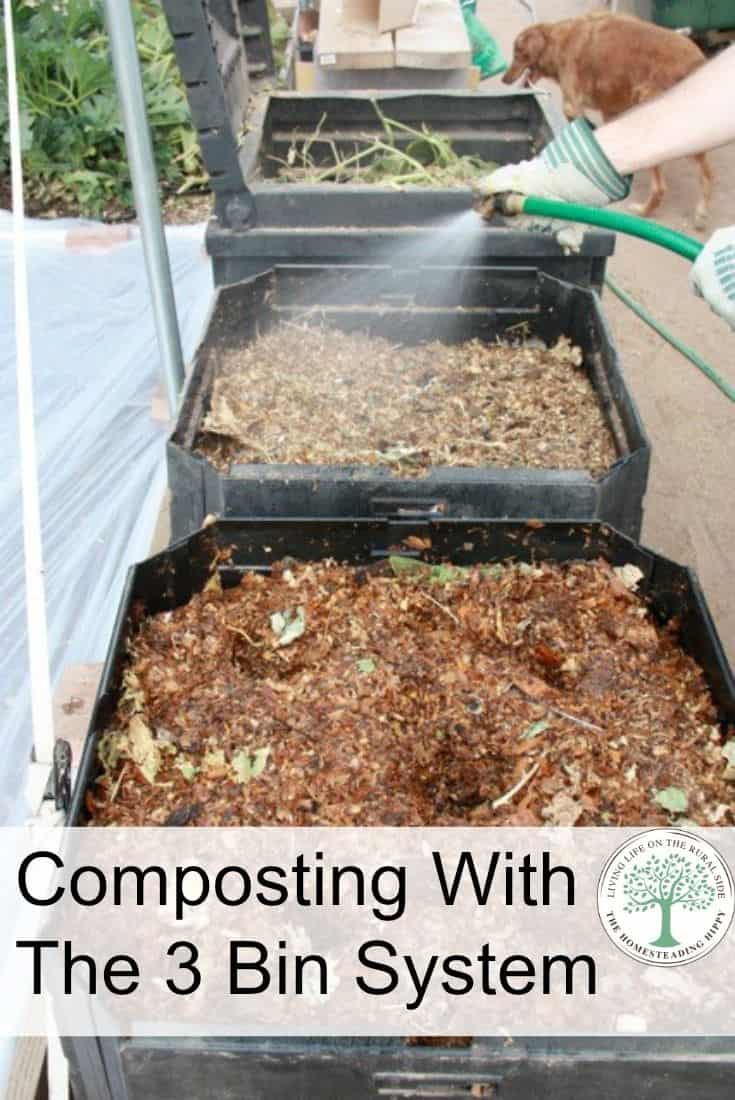
If you notice that the bin is getting dry, you might want to water it. It should be like a wrung-out sponge when you touch it.
If there’s more than a drop or two of water when you squeeze it in your hands, it’s too wet – add a layer of soil or dried leaves and turn it to get some of the extra moisture out.
In the first compost pile, the bin is building up fungal and bacterial activity. The temperature will increase naturally, and all you’ll need to do is turn the material regularly, and keep an eye on the moisture and heat of the bin.
It can take a few weeks for the pile to really get going, but usually, it won’t take more than a month.
This is when the fun begins. As the waste in bin number one reaches the top, we prepare to move it to bin number two.
In moving all of the contents of bin number one to bin number two, we are able to really mix up and aerate the decomposing matter. This is important for a proper and expedient composting system.
After the contents are moved, we are left with an empty bin number one. We will begin to fill bin one again with the “new waste” but we will never add new material to bin number two.
The only job bin number two has is to continue to compost and break down.
When All Three Composting Bins Are Full
As bin number one fills again, we move the contents of bin two to bin number three and so on and so forth.
By the time bin number one is full for the third time, bin number three should be fully composted and ready to use in the garden.
Remember: New material is only ever added to the first compost bin.
All of this will depend on how quickly you create the material that needs to be composted.
Some people will find that they need much larger bins or need to simply resort to large piles that are turned and shifted. These bins have always worked great for us, but we live on .15 acres in a large urban city, which may be very different from your situation.
You may also wonder how to know if bin number three is truly ready to be used. The easiest way to tell if your compost is done is by sight and feel.
Does it look like compost and is it cool to the touch? If you can still discern large chunks of food or specific plants, it needs more time.
The rule of thumb to live by for the third bin is that it should contain only unrecognizable materials. If you still see a chicken bone or a banana peel hanging out in there, it’s not ready to be used.
Also, if it is hot or warm to the touch, then it is still decomposing. Don’t use it if it isn’t finished. It can burn your plants, and they will die, which would be tragic. With patience and diligence, you will soon have a bin full of quality compost.
Keep an Eye on the Heat of Your Bins
When your compost bin starts working, it is going to start generating heat. Actually, it can generate a surprising amount of heat!
This is because the process of decomposition initialized and aided by the bacteria and other organisms living in and around your compost pile will generate heat as they work.
This further aids the process of decomposition, but it is possible for your compost pile to get too hot.
When this happens, bugs, worms, and microorganisms can start to leave or die off, slowing or halting decomposition and leaving you with a pile of sludge instead of rapidly progressing compost.
This is why it is so important to place your compost bin in an area where it gets partial shade because the sun contributes greatly to its overall temperature.
Some sun is good, for sure, but even if your compost pile is partially shaded you’ll have to stay on top of managing the temperature.
Do the following:
Check Temp with a Thermometer
A healthy compost pile that is properly managed will usually have a temperature between 131°F and 165° F. Don’t rely on the feel or the appearance of steam to determine the temperature; use a thermometer instead.
Specialized compost pile thermometers use a long probe that can take the temperature of the pile near its center, giving you an accurate reading and allowing you to make an informed decision.
Also, you don’t need to check the third bin when it is totally done composting: finished compost no longer generates heat and will only be warmed by the sun, so again if the pile feels cool to the touch and you cannot recognize anything in it then it is good to go.
Turn it Well
Always stay on top of turning and mixing your piles in all the bins. Aside from aerating it and promoting decomposition, this will help to manage heat by distributing it evenly.
You’ll want to turn it periodically even if you haven’t added anything recently, and you’ll also want to mix the first bin when you do add things.
Shade it if Necessary
We talked about the importance of shading your compost pile earlier in the article, particularly when it’s not in a shady spot.
If you live in a hot area or are just dealing with a prolonged period of blazing sun and no cloud cover, you can use a tarp, fine mesh netting, or a solid cover to keep the sun off of the contents and help keep heat under control.
Too much sun on an already hot compost pile can easily push it past the danger zone.
Add a Little Water
When your compost pile in any of the bins is a little too hot, consider adding a splash of water before mixing it. This will help to rapidly cool down the pile and also keep it moist.
As you probably expected, you will need to be careful if the pile is already wet because too much moisture will cause problems in a different way.
170 Degrees and Beyond May “Kill” Your Pile!
Even a piping hot compost pile in bin number one there’s nothing to worry about so long as it does not get too hot. How hot is too hot? Generally, when your compost pile hits 170°F and especially when it goes beyond that you’ve got problems.
When you notice the temperature on your thermometer approaching this zone, you need to act and follow all of the steps above in order to cool down the compost as quickly as possible without ruining it.
Lastly, don’t assume that just because you have intervened everything is good to go: make sure you recheck it and stay on top of it.
Other Considerations
There are a few other tips I can give you when it comes to using a 3-bin compost system.
For one, you need to be especially careful about weed seeds getting into your bin. You can’t really move your system once you’ve gotten started, and the compost sits directly on the ground.
Therefore, it can be easier for weed seeds to infiltrate and you can then transfer those seeds directly to your garden – something you really don’t want to do.
To avoid this, you might want to lay down a few sheets of cardboard before you set your 3-bin compost system in place.
This will help suffocate weeds and the cardboard will break down nicely, leaving you with rich, fertile soil beneath your bins (a plus if you decide that you ever want to plant where you once had your compost piles).
Another word of caution? Moisture. Moisture can be problematic.
If you live in a particularly wet area, or during abnormally wet periods of the year, you may find that your compost pile gets too wet. While a compost pile needs to be somewhat wet in order to get the microbial action really going, too much moisture can spell disaster for a compost pile.
Therefore, you’ll want to take one of two steps.
You can put a pallet over the top of the bins, which will let in some moisture but not too much. You can also leave the bin open on one side. This will let some moisture infiltrate but will still give you a spot where you can get your pitchfork into the bin to shovel out the compost and turn it on a regular basis.
The choice is yours! Whatever you do, though, just make sure you take the time to factor in how water might affect your compost pile.
More Composting Articles
- Reuse Eggshells instead of composting
- Moving the Compost Bin to the Chicken Area
- 5 Easy Steps to Composting
- Comparing Vermicomposting Methods

Heather’s homesteading journey started in 2006, with baby steps: first, she got a few raised beds, some chickens, and rabbits. Over the years, she amassed a wealth of homesteading knowledge, knowledge that you can find in the articles of this blog.
Learn more about Heather and the rest of the writers on this page.
This is completely brilliant!! We have one fresh and new compost bin that we continually add to, and one long and slow compost bin for our straw from the chicken run and yard clippings. I’m going to try adding another in between and see what happens. We have to keep all of our fresh stuff in a steel garbage can with holes cut into it, because we have a lot of issues with rats here in the city. Do you guys have problems with that as well? By the way- I just stumbled upon your site over on Passionfruit, you may be getting a request for advertising from me soon if I can come up with the extra cash! Very nice site! 🙂
hope to see you soon, Meredith! thanks for stopping by!
Great post! I wish I had this type of system. I have a long compost pile and I start at one end with fresh stuff and I slowly move it up as I turn it….but separate bins would be so much easier!
Thanks for linking up with Green Thumb Thursday. I hope you’ll stop back again this week!
Lisa
Hi,
How would you incorporate shredded newspaper into the system? We use it between the rows in our garden which has mostly gumbo muck/mud . It lets you walk in the rows after a rain but is not good for mulch really.
But we are getting to much lately.
Nice post too.
Mike and Sheila
into the bins, we would shred it up. We also lay some down between the garden beds and then cover with mulch to help create a walk way, control some weeds and such.
You don’t say, should there be drain holes, and what bin would you put worms in.
Do grass clippings go into the compost pile #1?
yes, that is where I would put them.
One extra bit of info for people who live in a dry climate like ours. A semi-arid bin should have little or no airflow, such as gaps between the slates, screens, etc. Our low-humidity environment — ranging from 3% to 44% RH — sucks all the moisture out of the pile in just a few hours. A composter won’t work properly if the materials dry out too much or too quickly. On the other hand, a semi-arid composter is designed to retain moisture, so you will need to turn over the material frequently so the bottom of the bin does not become soggy. It’s more work to compost here, but the outcome is as satisfying as in higher-humidity climates.
Those are GREAT tips! Thanks for sharing them, Glenn!
I thank you for explaining this system in a way a newby can understand AND make a success of it.
I like the 2-3 bin system and it seems that it would be the easiest to manage for newbies. I’m trying to start a compost in a highly humid environment. What do you suggest?
Also, to keep animals out – including mice/rats – but other wild animals, what materials do you suggest work the best?
Just built three 4x4x4-foot bins and our property is on the Island of Hawaii. Do we need to drill holes on the side of the bins for more airflow?
What do you do with your clippings and scraps while you wait to have enough to start a new pile?
Thank-you!! I just set up my 3 bin composter and this is exactly the information I was looking for. Just one question, do you layer a ratio of brown and green items in bin one? If so, what ratio, and do you wait a while before you begin turning it?
I appreciate this post so much!!