
Having a mouse in your house might not be a big deal at first, but it can quickly turn into a major problem. Mice are notorious pantry pests, and worst of all, they readily spread disease because they track their poop and urine everywhere.

It’s always in your best interest to get rid of a mouse as quickly as possible once you find evidence of their presence. But even so, annoying as they are, some of us prefer to catch and release rather than kill the cute little things.
If that sounds like something you’d rather do, keep reading and I’ll tell you how to make a highly effective, non-lethal mouse trap using little more than a common 5-gallon bucket.
Needed Tools and Materials
This is one of the simplest mouse traps to make yourself, and is very quick to put into action if you’ve got a rogue mouse and need a solution right away. The supplies you need are probably in your kitchen or garage at this very moment.

5-Gallon Bucket: the best bucket you can use for this trap is a 5-gallon hardware store bucket. Ideally, you’ll use one that is clean or at least doesn’t have any toxic residue in it.
It’s also possible to use smaller buckets, but what’s important is that the bucket is large enough to completely hold your cardboard tube so that the mouse can’t just run up it and then jump out of the bucket after they get caught.
Cardboard Tube: just a cardboard tube of the kind that you’ll get out of a roll of paper towels, shop towels, or wrapping paper.
It is possible to use a really small one from a roll of toilet paper, but it’s much more difficult to get the trap to work using one of those since it won’t have the length needed to serve as a counterweight. If you have a very long tube like from wrapping paper, you can cut it down.
Towel: any old towel, t-shirt, bundle of rags, or similar disposable cloth. You’ll use this to line the bottom of the bucket and give the little mouse some padding to cushion its fall. Without it, the mouse could be injured or die from the drop.
Scotch Tape: Scotch tape. Nothing more. You’ll need a tiny swatch of this stuff to steady the cardboard tube when you have it on the counter or other surfaces.
Note that you don’t want to use any tape that is too strong or too grippy; it’s actually ideal if it will break away very readily with just a little bit of pressure.
Bait: if you want to catch a mouse it always helps to have bait. You can use any kind of bait you want for this trap, but I’ll always recommend peanut butter or gummy candy for efficiency.
And that’s it. I told you this one was straightforward! We’ll get to the steps in the very next section.
Making a DIY Bucket Mouse Trap, Step by Step
The following steps will walk you through quickly and easily crafting this non-lethal bucket trap. As simple as it is, it’s a good idea to review all of the steps and photos so you know what to expect before you get started.
Step 1: trim and flatten cardboard tube. Your first step is to trim, if necessary, and partially flatten your cardboard tube. Gently flatten it so that one side will rest on the surface and prevent it from rolling around.
Because the tube will be placed on an elevated surface like a bench, your countertop, or anywhere else that mice are getting, you want to cut it down so that several inches of the tube will hang out over the edge and over the center of the bucket.
But, the opposite end of the tube is closer to the wall or backstop where the mouse will typically move around.
If you have a shorter tube that won’t reach the wall or backstop, don’t worry, because it will still work as long as it is about 9 inches long or so.
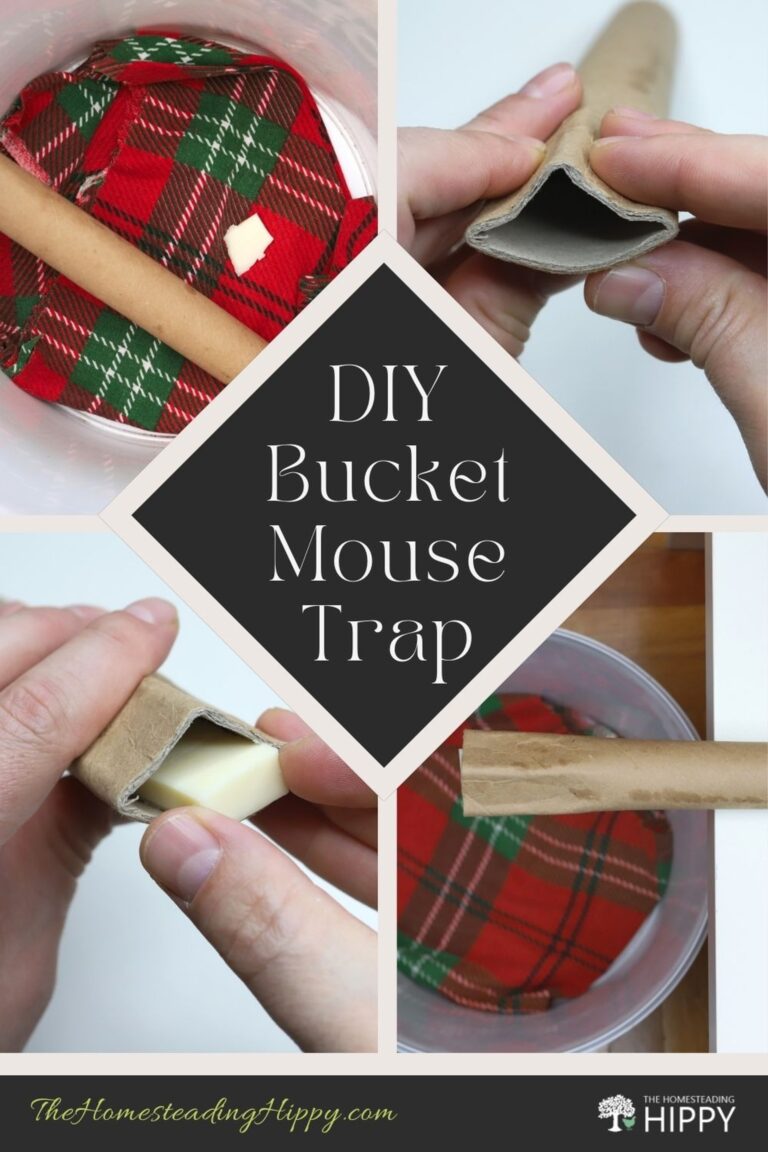
Step 2: crimp tube on one end. On one end of the tube, crimp it using your fingers and thumbs so it resembles a sort of sailboat or crescent moon shape. This will allow you to secure the bait, and it also forces the mouse to crawl through the tube in order to reach it.

See the picture for an illustration of the shape you’re going for. Note that you do not want to crimp the entire tube like this, just the one end for a length of about 4 inches.
Step 3: load bait in crimped end of tube. Place your bait, whatever it is, in the crimped end of the tube at the very end. Do not shove it farther into the tube, because this might allow the mouse to reach it without toppling into the bucket.

See the picture for an example of placement using cheese. You can do the same thing with peanut butter, you’ll just want to smear it just on the edge and barely inside the tube.
Step 4: position bucket, place towel in bottom. Place your bucket where you want it to be beneath your countertop, bench, or other raised surface. Just take care of it somewhere where it won’t be kicked or knocked around by kids, pets, or other members of the family.
At this time, place a thick layer of towels, rags, or other scrap cloth in the bottom to act as a cushion for the falling mouse.
Step 5: place tube on edge. Time to position your tube, loaded with the bait. The idea is to have the bait be directly over the center of the bucket, but also you want the tube to be very precariously balanced on the edge of the counter.
The idea is that, as the mouse crawls through the tube to reach the bait, even its meager weight will cause the tube to rock forward and fall into the bucket.

It might be helpful to mark the balance point with a pen to help you reset the trap quickly.
Step 6: secure tube with tape if needed. Depending on the length of the tube and other variables, it might be beneficial to anchor it however slightly using a tiny piece of tape.
On the far end of the tube, opposite the edge, use just the tiniest piece of tape adhered to the side of the tube and then just barely stuck to the surface.
This should be just enough security to keep the tube from blowing or rocking in a draft, and prevent it from moving when the mouse first enters it.
Step 7: test and check on trap regularly, reset if needed. Now it’s time to test your trap. With or without the tape, it should be balanced so that it will topple over with just a little bit of weight or force applied to the end that is over the bucket.
In all cases, if it will support the weight of a mouse without falling, it’s not going to work to catch them!
Once you’re happy with it, set the trap and leave it alone, but be sure to check on it periodically to make sure that vibration or draft hasn’t blown it over, and to make sure that you haven’t actually caught a mouse in the bucket! Just reset it and make adjustments in case of false alarms.
Step 8: done! And with that, your bucket trap is ready, set, and ready to catch mice.
As mentioned above make sure you check on the trap periodically, and if you’ve caught a mouse and want to release it back into the wild. Take it far, far away from your home and turn it loose in a stand of grass, thicket or some other place where it has shelter from predators and weather, and a supply of food, otherwise it will likely die.
Tips and Tricks
A long drop might kill a mouse. One thing to keep in mind is that a particularly long drop, and especially one onto an unpadded bucket bottom, will likely kill or injure a mouse. If you were setting the tube up on top of a particularly high surface such as a second-floor landing, consider putting a layer of foam in the bottom if you want to save the little thing’s life.
Balance is everything. This trap mechanism is entirely dependent upon perfect balance for correct function. Spend the time to get it right, and don’t get discouraged if you have a few false activations.
If it starts to tip too quickly as the mouse is advancing through the tube, they might be able to back out in time. If it doesn’t tip in time, they can snag the bait and get away again. Just work with a little bit, and you’ll have them soon enough.
Tim is a farm boy with vast experience on homesteads, and with survival and prepping. He lives a self-reliant lifestyle along with his aging mother in a quiet and very conservative little town in Ohio. He teaches folks about security, prepping and self-sufficiency not just through his witty writing, but also in person.
Find out more about Tim and the rest of the crew here.