
The Zeer pot, or pot-in-pot refrigerator, is a product of necessity – food preservation. This simple configuration of earthenware clay pots, insulation, and fabric allows for a cool space in even the hottest climates.
These systems have been used in hot, arid regions of the world like Africa and the Middle East for centuries. The pot allows a method of cool food storage that helps to extend the shelf life of produce up to 10 times as long compared to ambient temperatures.
Case studies have shown pots to be more than efficient in food storage and preservation. They require no electricity, are cheap to make, and are easy to maintain.
In short, they’re great for those who want to live off the grid and become more self-sufficient. But…
Table of Contents
Zeer Pots Are Not Better Than Fridges Overall
Zeer pots work best in certain climates and mostly for fruits and veggies. I’ve never seen a pot that has meat stored in it, and that’ because it’ll never get cool enough to prevent spoilage.
If you want to get close to refrigerator temperatures, outside temperature has to be fairly low as well (think 50 °F – 70 °F or 10 °C – 20 °C). Anything above that will see temps inside the zeer pot climb up as well…
So don’t get your hopes up and understand that zeer pots are simply an option for when the power is out, or if you want to live off-grid. They aren’t better than refrigerators. But they are cool, fun to make, and could help in a grid-down emergencies…
How it Works
A Zeer pot is an evaporative cooler, it uses a form of dormant evaporative cooling to wick warm temperatures up and out of the system. As heat rises from the contents of the pot, it condenses at the surface and is cooled by ambient airflow above.
In other words, it’s a bit like sweating. When our bodies heat up, we sweat. The moisture evaporates and cools us down.
Cooler air remains inside the pot as it passes down through the top. It is similar to a heat exchanger, a swamp cooler, or in the simplest form – a cold bandana.
In ideal conditions, it can hold temperatures 30 F to 40 F (-1 to 5 Celsius) below ambient temperatures and sometimes more.
Materials Needed
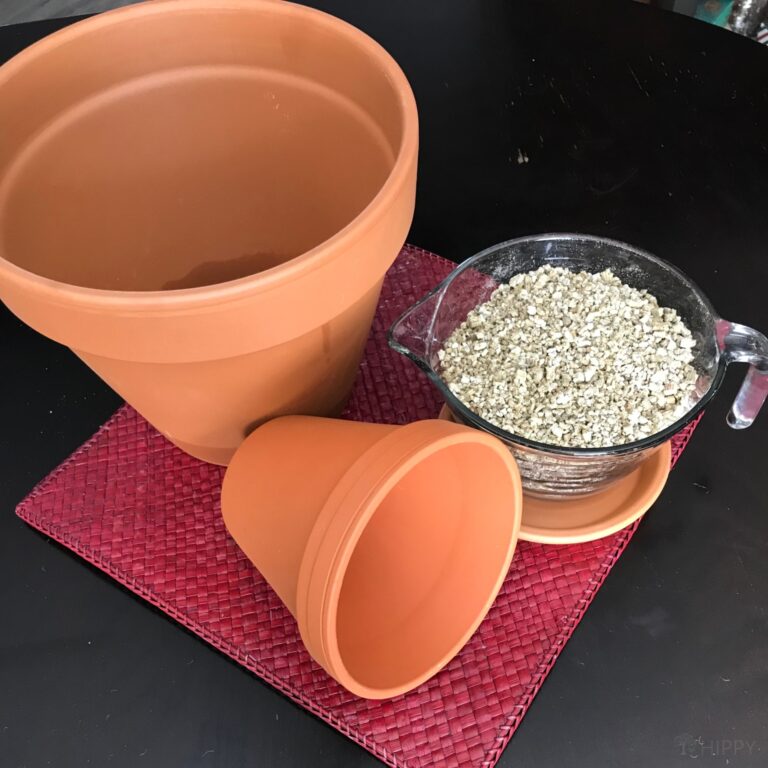
Assemble your supplies. For this build, you’ll need at least two clay pots large enough to store the foods you intend to chill.
If you don’t have one big enough for all of it, you can create multiple Zeer pots. You’ll also need an insulating material and a few tools, and some burlap.
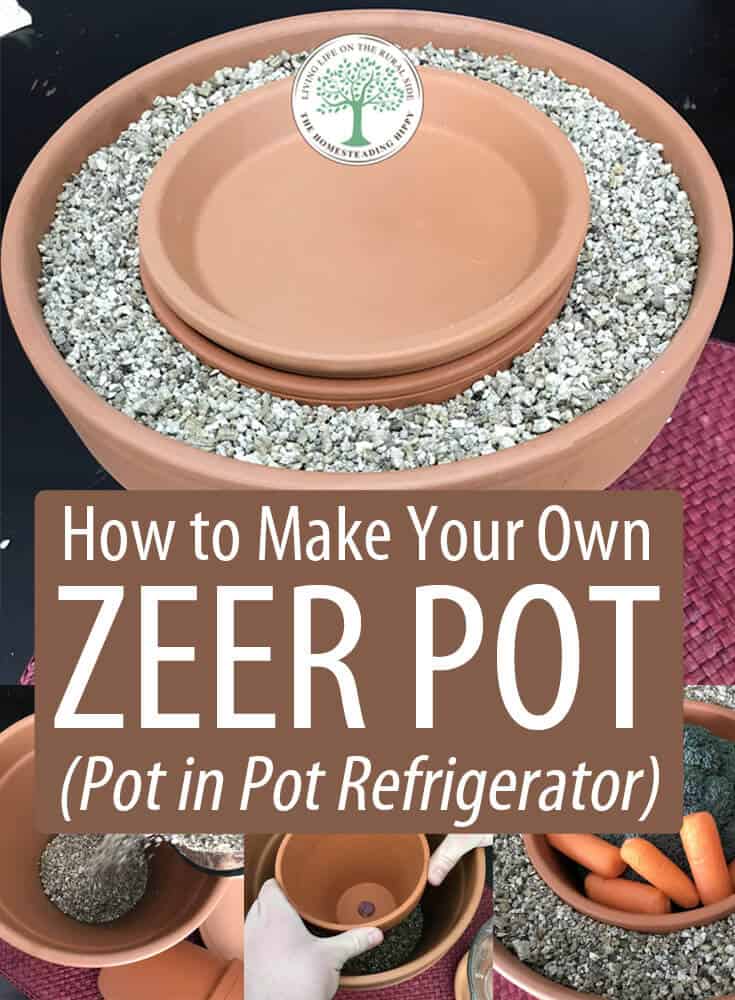
The system can be scaled up to any size you want as long as the inner pot has a diameter a few inches smaller than the outer pot. Here’s an example of the required materials for a 10-inch outside diameter system:
- Clay/terracotta pot (inner) – 8” diameter
- Clay/terracotta pot (outer) – 10” diameter
- Insulation/dirt
- Burlap or cotton
- Potting Tray – 12” diameter
- Cork, silicone, or other water-tight plug material (if needed)
- Cloth
- Water
Steps to Making a Zeer Pot
Step 1: Plug the Hole on the Larger Pot
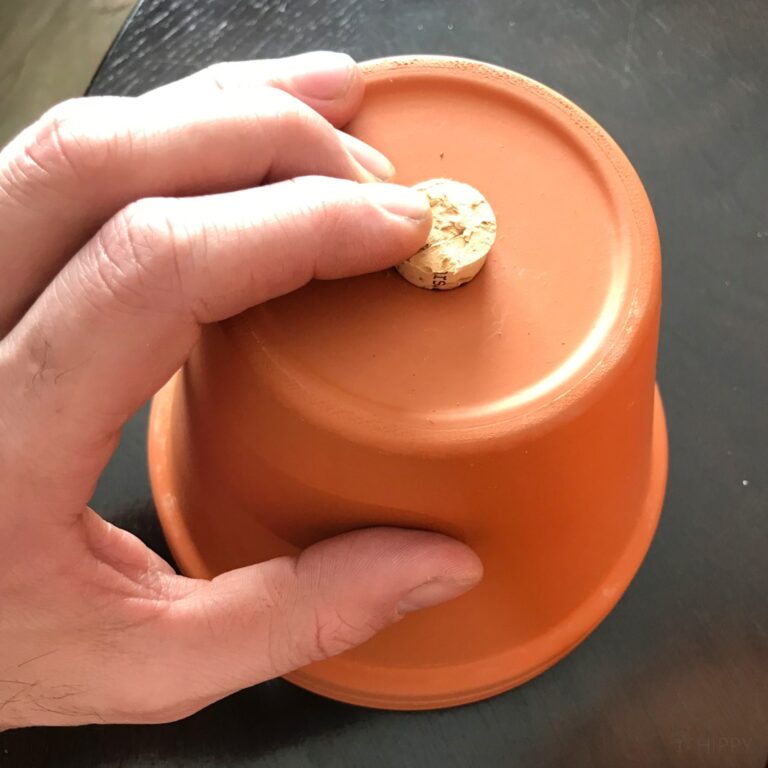
Set the larger pot on a stable, flat surface. This will be heavy once built, so if you don’t want to move it later, put it where you intend to use it.
An ideal location is somewhere that naturally experiences steady airflow, such as a corridor between two structures, a breezeway, or a balcony. Even a table near an open window with a cross-breeze can be an effective option.
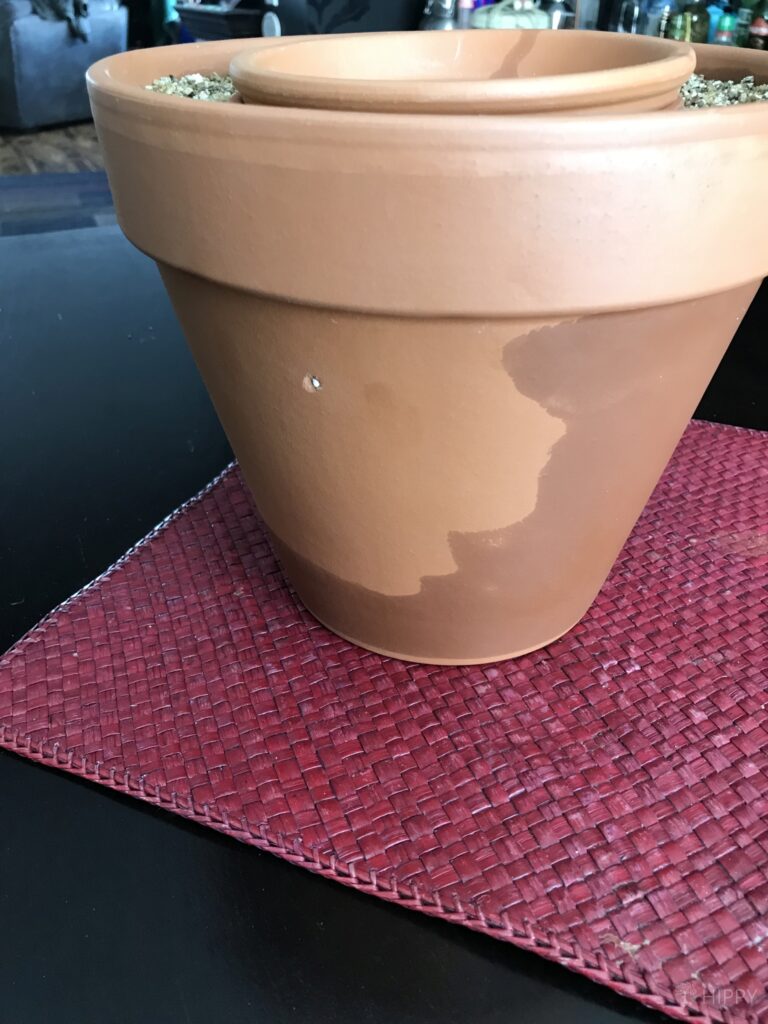
You may notice a hole in the bottom of the pots. If so, you’ll need to plug them with a cork, rubber stopper, duct tape, or other waterproof, leak-tight material.
Once your plugs are installed, you can cut the plug flush and seal them off with tape, glue, or a layer of wax. Solid-bottom pots are the most effective and eliminate the problem of accidental leaks.
Step 2: Add Dirt Into the Large Pot

Add about 1-2” layer of wet sand, dirt, vermiculite, or other insulating material to the bottom of the large pot. This acts as a thermal mass, spreading the moisture from the water along the pots.
The depth may vary depending on the size of pots you go with, but you’ll want to make sure the two pots are level and even at the top rim. This will allow you to have room for the next step.
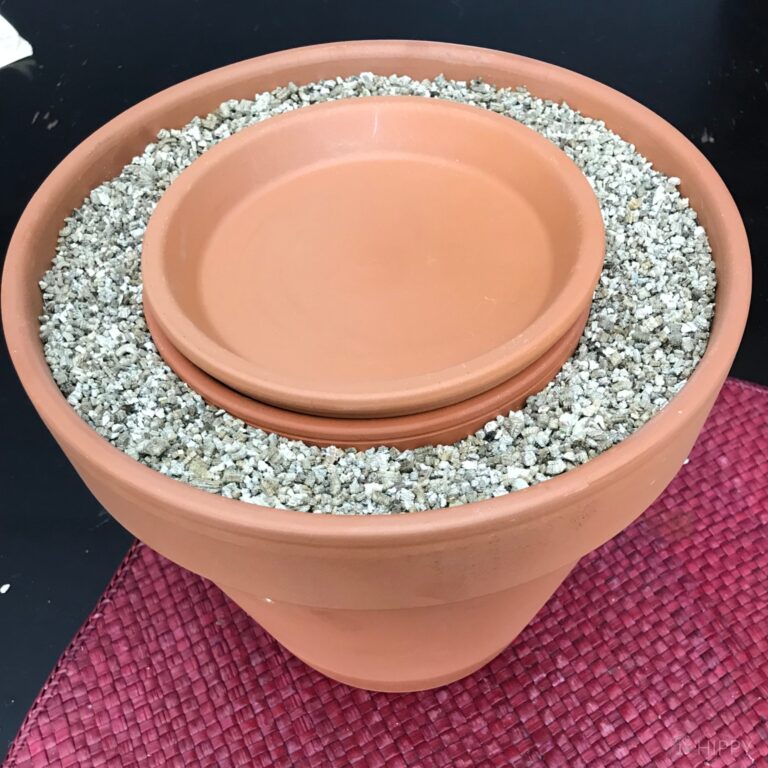
Step 3: Center the Second Pot Inside the First One
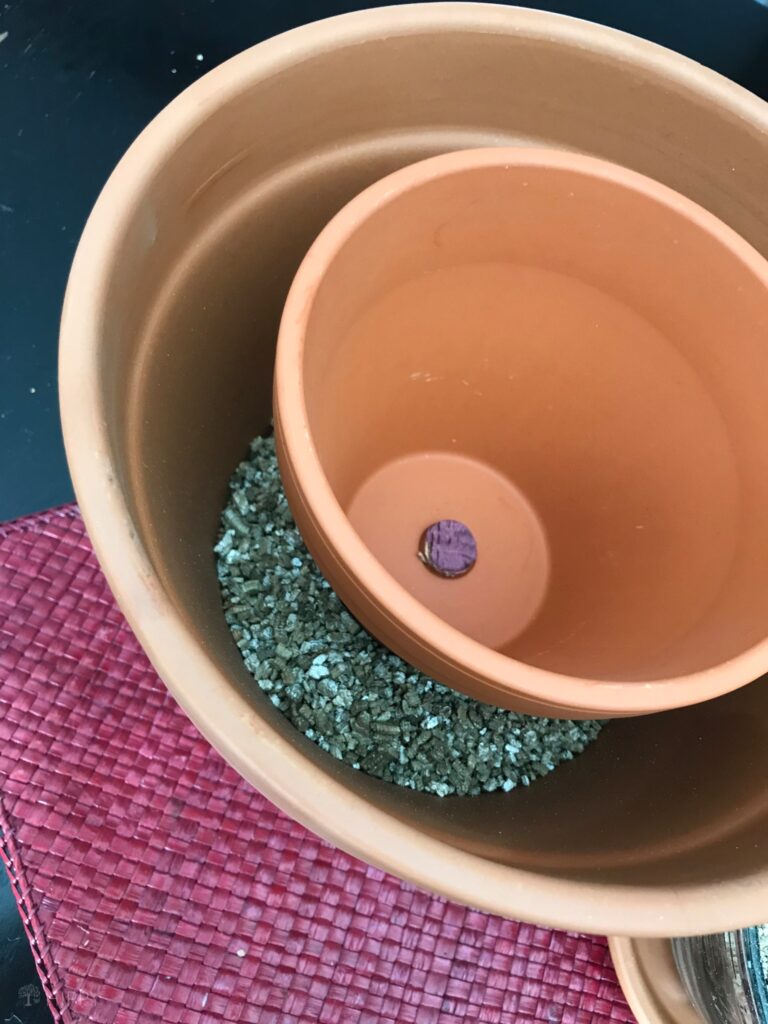
Center the small pot in the larger pot and check for level across the top. From the top you should see what looks like a bulls-eye: an inner ring and an outer ring with a cavity that separates the two.
Then, you can start to slowly add the insulation or dirt by pouring it into the cavity between the two pots. If you accidentally spill debris into the inner pot, simply remove it before the next step.
Note that if you have a hole in the bottom of the smaller pot, you can wrap the pot in plastic wrap to create a water-tight barrier, but the insulating and evaporative properties may be altered a bit.
If in step 6 you notice water leaking into the inner pot, you’ll need to restart from step 3 and re-seal the inner pot. The inner pot needs to remain dry but cool. Introducing water from the bottom could create an environment for mold growth.
Step 4: Adding the Rest of the Sand
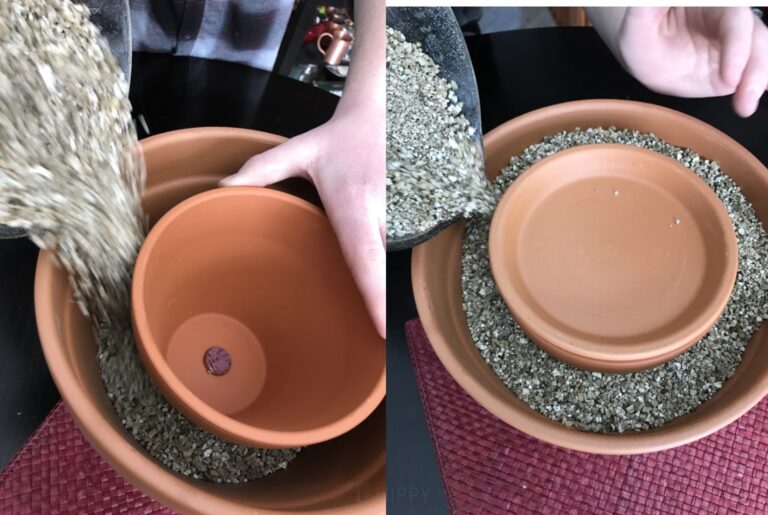
Fill the pot with insulation. If you intend to cool or preserve fruits or vegetables, make sure you wrap them so they don’t leak or mix together, or use multiple pot setups if you want to keep foods separate.
If you intend to use this pot for storing meats, you may want to keep a separate pot, or wrap meats with layers of cellophane to keep the pot from absorbing bacteria or pathogens from the meat.
This is an ideal pot for pre-packaged foods, foods with natural peels or dry foods.
Step 5: Add in the Water
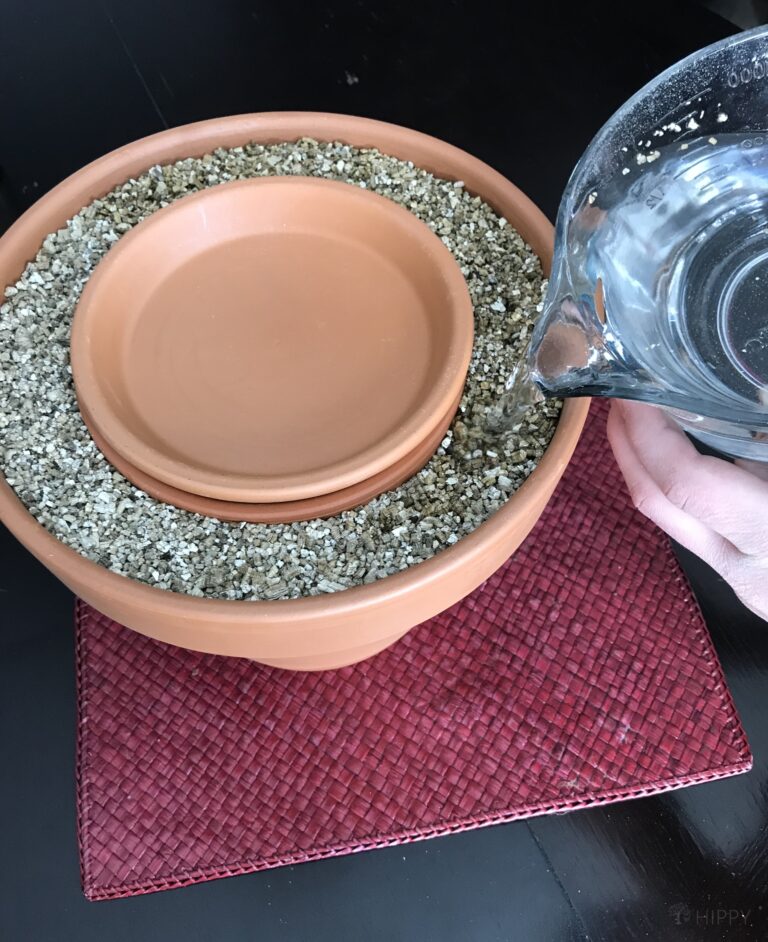
Fill the insulating layer with water. After you’ve filled, leveled, and topped off the gap with insulation, add water to the outer ring to saturate the insulation layer.
Colder water will help to cool faster but keep in mind that you’ll want to filter water if collected from rivers, streams, lakes, or ponds to prevent cross-contamination of the foods inside. You can fill the water to the brim – just keep it from getting inside the inner pot.
Check for leaks and patch them with adhesive, silicone, or other water-tight filler as needed. A potting tray beneath the system can help to collect leaks and protect substrates if kept indoors.
Step 6: Add Your Produce
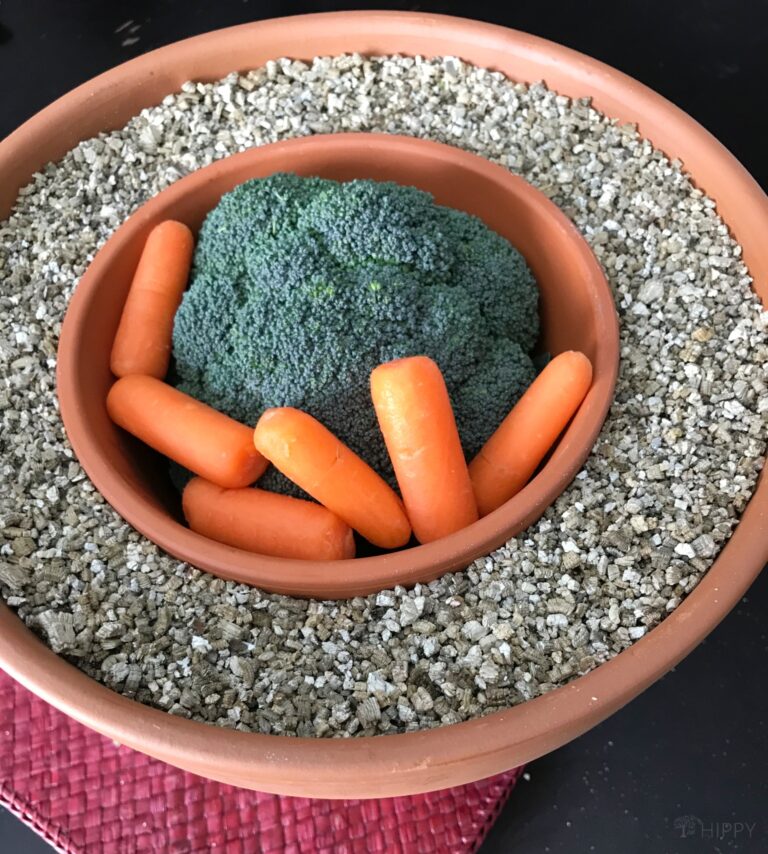
Add your food. If you’re creating this pot in reaction to a power outage or fridge failure, you can take the time to assemble and test the system before adding food from your fridge. As long as a fridge remains closed it will retain its cooling properties for several hours.
In the meantime, you can start the process and allow the pots to cool before adding food. If you’re considering this pot in your garden, you can add small portions at a time as they ripen until you’re ready to preserve them.
Plants like tomatoes and carrots can last up to three weeks, allowing time for a greater harvest and you can easily batch your canning or preservation tasks.
You can also scale these systems with larger pots to accommodate fruit trees, vines, and larger produce. Plus, the pots can remain outside instead of taking up space on your countertops, kitchens, or pantries.
Step 7: Cover the Zeer Pot
Add your cover. Collect your burlap, rags, cheesecloth, towel, cotton, or whatever woven cloth material you intend to use for the cover. The cloth must be large enough to cover the pot completely. Avoid man-made fabrics like polyesters or blends.
Now that your pot is filled with an insulating layer, water, and food, take one of your cloth sections and soak it in water. Then, remove most of the moisture by ringing it out, and gently place the fabric over the top of the Zeer pot.
If you are in an area that experiences high winds, use an elastic band, twine, or other cordage to lash the fabric to the pot.
You can add layers as needed by repeating this process, but keep in mind that you want to maintain some airflow up and out through the top. More layers will prevent bugs and wildlife from raiding your stash.
You’ll want to change out the rags as they dry out, and if you use layers, simply remove the top layer, soak it in cold water, and put it at the bottom of the stack. This type of rotation will help to prevent mold or mildew by constantly exposing layers to outside air.
Another option is to cover the inner pot with a clay lid and allow the evaporative cooling to occur from the outer insulating ring.
This will still keep your food cold and prevent water intrusion from overhead if stored outside. It will also allow a better form of protection against pests or wildlife.
Step 8: Add A Damp Cloth On Top
This is optional but will improve the evaporation process. Since you’ll have to refill the outer zeer pot with water, it’s easy to do an extra step and dampen a cloth which then goes at the top.
Step 9: Refill With Water When Necessary
Monitor and refill as needed. As the evaporation takes place, you’ll likely notice your rags drying out. Hotter temperatures will create faster evaporation, so take the time to inspect the water level in the insulating layer often.
One way to tell how much water is in the system is by inserting a piece of tubing into the insulating layer, or holding it in place as you pour the insulation.
This way, you can inspect the tube and see the water level. You can also check by touching the surface to feel for moisture and add as needed.
Cautions and Considerations
The Zeer pot is extremely useful for cooling, but it is not effective for freezing. If you intend to preserve frozen foods, the Zeer pot will allow for a slower thaw and buy time until you can consume the frozen food or access another freezer.
For the greatest level of efficiency, these pots need two main factors: airflow and moisture. If your airflow stops, the system won’t cool as well.
You also need to consider what types of food you’ll be putting into your zeer pot as well as the quantity of food. Both of these factors will affect the performance of the zeer pot.
Also, if your fabrics dry out, the evaporative effects won’t hold true. But an ideal mix of a good, steady breeze and regular moisture monitoring will keep these units cooling without electricity for as long as you maintain them with water and fabric rotation.
Relative humidity and outside temperature also have an effect on the amount and level of cooling. the lower the humidity, the more effective the evaporation process will be…
So, take careful consideration of pot location, shade sources, humidity levels, and ambient temperature.
The interior pot can reach a chilled temperature of 40 degrees Fahrenheit (5 Celsius) – if it’s constantly exposed to a good breeze. The average ambient temperature difference is typically around 1.5 – 3.5 degrees Celsius.
Ready To Do This?
The Zeer pot is an extremely effective and highly undervalued system that can provide adequate cooling and preservation on your homestead, balcony, or patio. Plus, the system can be scaled up or down depending on your needs or your harvest.
If using stackable pots, the systems can be set up when needed and stored away when not needed. It is a versatile, efficient, inexpensive, and highly effective alternative to the traditional refrigeration most of us are accustomed to.
So whether you’re looking for a backup to a power outage or a holding pattern for your fresh produce, the Zeer pot is a great way to go!
Root Cellar Variation
This variation is great for root vegetables and is quite easy to make. You make your zeer pot but instead of the interior pot being empty, you fill it halfway with damp sand. You bury whatever root veggies you want to keep cool in the sand
It Won’t Work Well in Some Conditions
Zeer pots work best in dry climates with very low levels of humidity. If you’re living in a very humid area, there’s a chance that your zeer pot may not work too well. This is because the high humidity may result in reduced evaporation.
Something else that you should keep in mind is that direct sunlight will overwhelm the evaporative effects.
Your pot should be exposed to a constant breeze so that the water is lifted equal to the heat you’re trying to disperse. If you don’t have a constant breeze going, you can simulate one with a fan.
If you’re not ready to make your own zeer pot now, be sure to PIN this for later on your Pinterest board!
D. Ryan Buford is a professionally trained writer and journalist from the Pacific Northwest region of the United States. He currently hosts “The Next Generation,” a live, weekly internet radio show on Prepper Broadcasting Network that focuses on parenting and preparedness. Learn more about our team here.
As an advocate of the preparedness and homesteading world, Ryan left behind a successful, fast-paced urban job for a more sustainable life among farm fields, wildlife and family. In addition to leading a self-sufficient life, he writes as a freelancer and maintains a blog and magazine at www.dryanbuford.com.
I ASSuME that terra cotta pots are used since they absorb moisture and will also provide cooling as the moisture in the pot walls evaporates? I read one article where they bury one end of the cover cloth in the sand/insulator so the water is wicked into the fabric.
If terra cotta is not needed for cooling, then I would ASSuME that I could use plastic post?
According to this article – https://getpocket.com/explore/item/the-coolest-way-to-keep-food-cold-without-refrigeration – unglazed ceramic is needed; I presume that’s why the terra cotta pots are used in this example – they are the easiest unglazed but fired pots to locate in the USA.
I live in an apartment with 2 small porches that get very hot (100+F). Will the Zee Pot work on those porches? Or will they do better during that time.in the apartment?