
I like to have lots of broth on hand.
Especially after canning chicken, I have lots to go around. You will always find some form of bone broth in my fridge, and on my pantry shelves. It’s so great to have it on hand for making risotto, soups, gravies, etc.
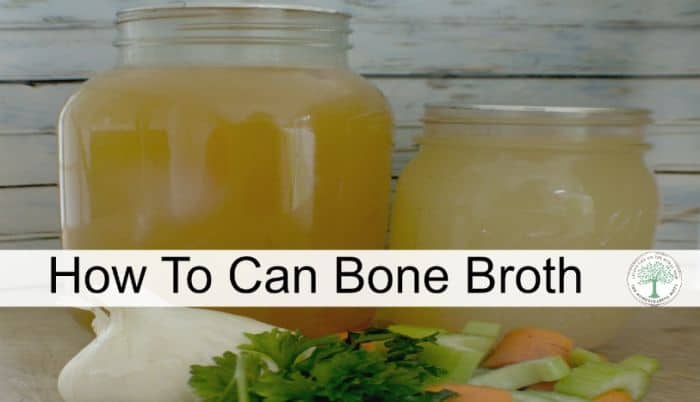
The daunting part for a lot of people is trying to figure out how to store it. Well, I like to can mine. And today, I am going to show you how to can broth for yourself!
Why You Should Can Bone Broth
There are plenty of reasons to consider canning bone broth. Here are some of my favorites.
First, bone broth is loaded with nutrients. It’s packed with protein and it’s also a great source of vitamins and collagen. When you make your own bone broth, you’ll be in charge of all the ingredients. Want organic bone broth? You got it – just use organic chicken. Free range? Same thing. You’re in charge!
You can also add all the flavors you might possibly want by adding in ingredients like fresh thyme, salt, mushrooms, or anything else that suits your fancy. You’ll be able to make a delicious, nutritious supply of broth that’s perfect for anything your family might want.
Homemade chicken broth simply has better flavor. You can use frsh, high-quality ingredients and adapt everything to your own tastes. It’s also a major benefit for people who want broth that has less sodium. A lot of store bought stocks contain chemicals and extra sodium that aren’t that good for you.
By canning your stock, you’ll free up valuable freezer space, too. That’s a must if you’re interested in preserving lots of food to get you through the winter!
Helpful Tips for Making Broth
New to making chicken broth? Here are some tips.
Consider Adding Vegetables
You don’t have to add veggies to your bone broth, but if you want to really increase the flavor of your bone broth, it’s a great idea. You can use anything you want, including onions, celery, carrots, mushrooms, and more.
You can even use less desirable bits and pieces to help you get the most out of them, such as onion skins or celery hearts. You’ll strain them out of the broth anyway, but they’ll still lend a great flavor to the mix.
Stockpile Chicken Bones and Carcasses
If you don’t have enough chicken to make a full batch of broth, consider hanging on to them until you have enough. When we butcher chickens for the year, I will often freeze the carcasses after we’ve cut off the breasts and thighs. Then, I make an enormous batch of chicken broth to can all at once. It saves a lot of time.
You can also save things like onion skins and carrot peelings to use in your broth, too.
Roast the Bones and Veggies First
To up the flavor profile of your chicken broth, you may want to roast the bones first. You can do the same thing for the veggies, too. Let them cook down until they are nice and brown, then simmer. Your broth will be way more flavorful!
The same goes for the simmering process. Too many people try to rush things when it comes to simmering. However, the longer you allow the stock to simmer, the more flavor you’ll be able to extract from all of your ingredients. When I make broth, I try to make it a multi-day process so that my broth has hours and hours to cook before I need to can it.
Equipment Needed
- Pressure Canner – Unlike some foods that can be canned in a water bath canner, bone broth absolutely needs to be canned in a pressure canner. Meat is low acid, so to be shelf-stable, a pressure canner is necessary.
- Canning Jars – Only use jars that are designed and approved for home canning. Don’t try to reuse old jelly jars or things like that – you need to make sure the irs will hold up to the stressors of the canner.
- Lids and Bands – You can reuse bands between canning sessions, but don’t reuse lids. You will need to buy brand-new ones each and every time you can.
- Jar Lifter – This isn’t a mandatory piece of equipment (you could also use a set of tongs). However, it can be helpful when it comes to moving the jars while they’re hot. You can use them both for water bath and pressure canning, so it’s a good investment to make.
- Funnel – A funnel can be helpful when it comes time to fill your jars. If you spill a ton of broth on the jars and forget to wipe it up (or miss some spots), they might not seal correctly. It will also help keep your countertops clean!
- Stockpot or Slow Cooker – This will be used to cook your broth. The higher capacity, the better – and why? So you can cook more broth!
Before Canning: Making the Bone Broth
Start by making your favorite broth recipe. This tutorial will be for chicken broth, but I’ll give you more information about making and canning other kinds of broth below.
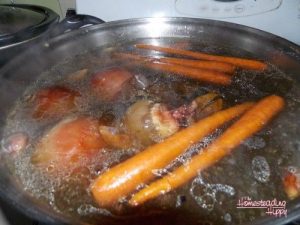
It’s a simple process. You can make the broth with a full chicken or you can use the remnants of a picked-over carcass, something you might do if you’re making broth out of last night’s dinner leftovers. Whatever the case may be, starting with a three- to four-pound chicken will generally be best.
Put the chicken in a large stockpot with the water and other ingredients. You can use a slow cooker if you’d rather leave the pot unattended while you do other things. Either way, bring the mixture to a boil. Allow it to boil for several minutes, then reduce heat and simmer for at least three hours. The chicken should be tender.
Method
- First, make the bone broth following the instructions above.
- Drain the broth. I use a large pot to do this. My colander won’t fit across the top of the pot, so I use a wooden spoon across the top to hold it in place. If you want bits of chicken in your stock, you don’t have to drain. However, I do recommend allowing it to cool so you can skim off the extra fat. Just heat the stock back up before canning it.
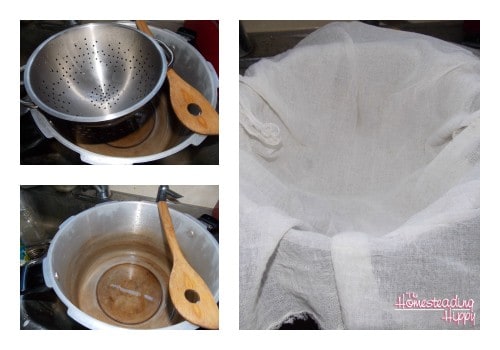
- Prepare the jars. As it is heating back up, I get the jars washed and into the canner pot to get nice and hot. I usually bring them to a boil, with water inside the jars boiling as well to help sanitize them and reduce “shocked jars”. I also make sure I have ready a towel to set the jars on while filling, a clean funnel, the lids simmering, and a clean damp cloth to wipe off the jars before getting the lids on.
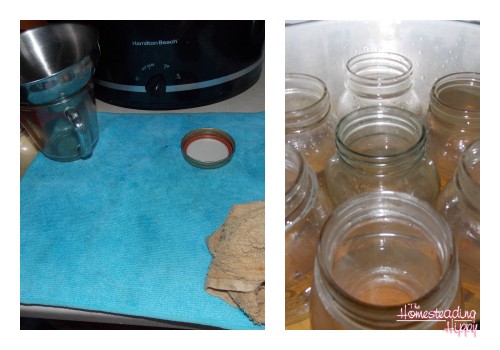
- Next, fill the jars. Ladle the hot stock into the hot jars, allowing for about one inch of headspace. Once the jars are all filled with the hot broth, wipe off the rim and place the lid and band on, finger tight. Avoid the urge to over-tighten.
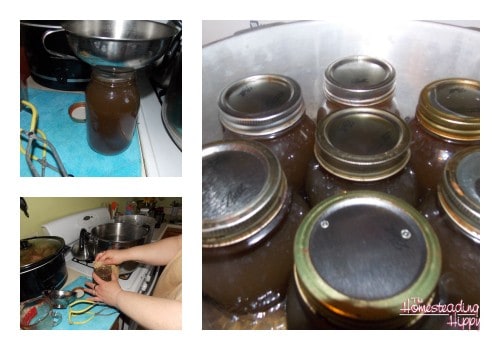
- Load the canner. Place the filled jar in the pressure canner and add the lid to the canner.
- Allow the canner to steam off, which means waiting for a heavy steam and allowing it to steam for about three minutes.
- After this time has passed, go ahead and add the weight. Then you can start timing. You will need the canner to get up to 10 lbs.
- Once it reaches this pressure, start your timer, and watch the canner vigilantly. If the pressure fluctuates below 10 lbs, you will need to restart your timer and add heat. If it goes about 10 lbs, you don’t have to restart the clock, but reduce the heat slightly so you don’t create too much pressure inside the canner (this can be dangerous).
- Process the jars. Process for 25 minutes (for quarts) or 20 minutes for pints at 10lbs. pressure.
- Let the jars cool and then store.
Allow the canner to cool completely on its own, remove the jars and let them cool for 24 hours in a non drafty place. Once the jars are cooled, check for seals.
Non sealed jars will “push” up and down when you press on them. Those jars should be placed in the fridge and used within a week.
Sealed jars should be washed off with hot soapy water to remove any oily residue and then stored for up to a year.

Heather’s homesteading journey started in 2006, with baby steps: first, she got a few raised beds, some chickens, and rabbits. Over the years, she amassed a wealth of homesteading knowledge, knowledge that you can find in the articles of this blog.
Learn more about Heather and the rest of the writers on this page.
I don’t have a pressure canner. How can I do this the old, old fashioned way? With big canning pot on the stovetop?
You can’t. It’s not safe. Low acid foods have to be pressure canned.
Thanks for the information. I can’t find my pressure canner manual so I searched online for the important numerical details I always forget (how much pressure, how long to process, how much headspace). I appreciate the help.
what about the Amish who water bath EVERYTHING including meat? remember who pays the government to set standards.
Do not attempt any way but pressure canning… The high temps of the pressure canner will kill botulism spores making it safe for storage. The water bath method will not kill the spores and you may get very sick or even die.
I made canned vegetable broth Do I need to refrigerate it. How long will it last?
if canned properly, using pressure canner, it does not need to be refrigerated. If you just made broth, and stored in the fridge, you’ll want to use it up within 3-4 days or freeze for later.
Skim the fat off. I have a fat seperator,it’s not very big but it works like a charm. Pour the broth in,wait a min for the fat to rise and then you squeeze the trigger in the handle. The broth pours out the bottom into your jars. Stop squeezing when the fat gets close to the bottom. Save the fat inot a bowl. Let the fat cool over nite in the fridge. Pull the fat out of the bowl. On the bottom is soon broth gel. Remove it and any soft fat. Your left with a hardfat. This is beef tallow. Great for many uses same as lard.
Can you use just a plain, non-pressure canner bath or no?
not for this. It’s not safe in my current knowledge to process meat (even in broth form) in a water bath.
There are people out there who do water bath canning for low acid foods. . . I am not recommending it, but I know they do it and have for years. If you search for “rebel” canning groups on Facebook you can look at their experiences. . . but it really is at your own risk. . . You’re better off buying a pressure canner. . . they aren’t really that expensive. . . I love to can meat. Frozen meat gets old faster than canned. . . and if the freezer goes out you can loose everything in it.
Great info! I Make bone broth from deer I take, & process myself. Also when I have a cooked whole chicken, take those bones and make broth. I use kitchen shears to cut chicken bones in half to allow marrow to cook out. For deer bones, there is a bit more energy and a heavy Cleaver used, to halve the long bones. :-O My broths are pressure canned in half pints and pints for varied size recipe needs.
I use my canned broth in deer stews and other recipes that call for commercially made broth. I have added chicken broth to rice and quinoa while cooking, replace some water, adds nutrients I hope. Using home made broths seems a good idea, since I know what all is and IS NOT in my broth !
I have developed a milk allergy. I am making broth for dairy free gravy. Can I use jelly jars and process them the same time at pints? Thanks
You failed to mention that if you are at a high altitude, you MUST increase the pressure weight and sometimes the time!!!! Most of us would know this but newbies might not!
do you know if pressure canning will destablize a good gelled bone broth? i’m looking into making some gelatin from scratch to can and add to soups later. any advise would be appreciated.
Must all the fat be removed? I like the fat in my broth.
Anne, no you shouldn’t leave the fat in. After you take the fat off, you can freeze it and add it back to the broth when you use it.
Anne Wilson, Fat in canned foods can go bad faster than if you take the fat off. As stated you can add fat back in when you go to heat the broth back up for consuming.
Wondering about using home canned broth? Does it have to boil to serve like green beans?
Betsy, it’s recommended to boil anything you home-can before use. If you’re using it in soup, stew, rice, etc., all that’s going to be boiled anyway.
Mark check out Salvation Army Thrift stores FAcebook market place for a used one.Many others have found really good deals.You will be thrilled to have one.I have 2 of them.,I have been canning 50+ years.God bless.,.Have fun and enjoy ?
Great help for those who are just beginning bone broth and using pressure cooker.Ty
What are the directions for canning pork broth? Does it have to be done differently than chicken or beef?