
Interest in microgreens has been on the rise in recent years as more people have become interested in consuming locally sourced and organic produce.
While most people are familiar with the more common microgreens like kale and arugula, there are many other types of microgreens that can be grown, including amaranth.
Amaranth microgreens are a great choice for those looking for a nutrient-rich food source that is easy to grow.
In this blog post, we will provide you with everything you need to know about growing amaranth microgreens.
Table of Contents
What Are Amaranth Microgreens?
Amaranth microgreens are a type of edible greens that are produced from the amaranth plant. The amaranth plant is a flowering plant that is native to South America, but it can now be found in many parts of the world.
The plant produces small, edible seeds that are rich in nutrients.
These seeds can be sprouted and grown into microgreens. Amaranth microgreens are often used as a garnish or as a salad ingredient.
They have a slightly nutty flavor and a crunchy texture. Microgreens are generally harvested when they are between 2-4 inches tall.

Are Amaranth Microgreens Good For You?
The amaranth plant is actually a grain-like crop that has been cultivated for centuries in South America. It was even a staple food of the Aztecs and Incas.
Amaranth microgreens are a rich source of vitamins A, C, and E, as well as potassium, magnesium, phosphorus, and iron. They also contain high levels of antioxidants and phytochemicals.
Some research suggests that amaranth microgreens may help to boost cognitive function, lower blood pressure, and reduce inflammation.
All of these potential health benefits make amaranth microgreens worth considering if you are looking for a nutrient-rich addition to your diet.
What Do Amaranth Microgreens Taste Like?
Amaranth microgreens have a slightly sweet taste with a hint of bitterness. They are often used in salads or as a garnish on soup or fish dishes.
When cooked, amaranth microgreens turn a deep green color and have a chewy texture. They are an excellent source of vitamins A and C, iron, and calcium.
Microgreens are young vegetable greens that are harvested when they are about two inches tall.
They are similar to sprouts, but they are usually grown in soil instead of water. Microgreens are becoming increasingly popular as a healthy and flavorful addition to meals.
Amaranth microgreens are one type of microgreen that is gaining popularity due to their nutritional value and unique flavor.
If you haven’t tried them yet, be sure to give amaranth microgreens a taste test the next time you’re looking for something new to add to your meal!
Types of Amaranth Microgreens to Grow
These delicate greens can be used to add flavor and color to salads, sandwiches, and soups.
There are many different varieties of amaranth microgreens, each with its own unique flavor and appearance. Some of the most popular varieties include:
- Green Amaranth: This variety has bright green leaves and a mild, slightly sweet flavor.
- Red Amaranth: This variety has deep red leaves and a slightly peppery flavor.
- Purple Amaranth: This variety has deep purple leaves and a mild, sweet flavor.

Growing Amaranth Microgreens: Step by Step
If you’re looking to add amaranth microgreens to your diet, here is a step-by-step guide to growing them at home.
Buy Seeds and Soak Them
First, you will need to purchase amaranth seeds from a trusted retailer. Once you have your seeds, it’s time to start germinating them. To do this, simply soak the seeds in water for 24 hours.
After 24 hours, drain the water and transfer the seeds to a damp paper towel. Place the paper towel inside a plastic bag and store it in a warm place until the seeds germinate (this usually takes around 5 days).
Fill a Growing Tray With Soil or Wood Shavings
Once the seeds have germinated, it’s time to plant them.
To get started, you will need a shallow container filled with moist potting mix, a spray bottle filled with water, and a packet of amaranth seeds.
Once you have gathered your supplies, simply sprinkle the seeds evenly over the surface of the potting mix and then mist them lightly with the spray bottle.
Be sure to keep the potting mix moist, but not soggy, until the seeds have germinated.
Wait for Seeds to Germinate
Cover the tray with a piece of cardboard or a cloth to keep the seeds in the dark and moist. Germination will occur in 7-10 days. After that, remove the cover and place the tray in a sunny spot.
Once the seedlings have emerged, you can begin to thin them out so that they are spaced about 2 inches apart.

Reasons Why Amaranth Microgreen Seeds Might Not Germinate
One of the most frustrating things for a gardener is to plant seeds, wait patiently for them to germinate, and then have nothing happen.
If you’ve tried growing amaranth microgreens and been frustrated by a lack of results, there are a few possible reasons why your seeds might not be germinating. One possibility is that the seeds are too old.
Amaranth seeds only have a shelf life of about 6 months, so if you’re using seeds that are older than that, it’s unlikely they will germinate.
Another possibility is that the seeds were not stored properly. Amaranth seeds need to be stored in a cool, dry place in order to remain viable.
If they were stored in a damp or humid environment, that could also prevent them from germinating.
Finally, it’s possible that the temperature was not ideal when you planted the seeds. Amaranth seeds require warm temperatures in order to germinate, so if it was too cold when you planted them, that could also explain why they haven’t sprouted yet.
If you’re troubleshooting why your amaranth microgreen seeds aren’t germinating, these are a few possible explanations to keep in mind.

Lighting for Microgreens
One of the keys to growing healthy microgreens is to provide them with the right amount of light. If they are not exposed to enough light, they will become spindly and weak.
However, if they are exposed to too much light, they will become stunted and yellow. The best way to provide microgreens with the ideal amount of light is to use a combination of artificial and natural light.
Artificial lights, such as LED grow lights, can be used to supplement the natural light available in your home or office.
By using a combination of artificial and natural light, you can ensure that your microgreens receive the optimal amount of light for healthy growth.

Should I Use a Heat Mat?
One of the most popular questions I get asked is whether or not to use a heat mat for amaranth microgreens.
The answer really depends on a few factors, such as the climate you live in and the time of year.
In general, amaranth microgreens do best in warm weather, so if you live in a place with cooler winters, a heat mat can help to provide the warmth they need.
Likewise, if you’re growing amaranth microgreens during the winter months, a heat mat can also be helpful in keeping them warm enough to germinate.
However, if you’re growing amaranth microgreens during the summer months or in a warm climate, you probably won’t need a heat mat.
So, ultimately, whether or not to use a heat mat for amaranth microgreens is up to you and will depend on your specific situation.
Harvesting Amaranth Microgreens
Amaranth microgreens are a type of leafy green that is typically harvested 10-14 days after planting.
The best time to harvest amaranth microgreens is when the leaves are fully developed and the plant is 2-3 inches tall.
To harvest, simply cut the greens at soil level with a sharp knife or scissors. Once harvested, amaranth microgreens can be used in salads, sandwiches, or stir-fries. They can also be juiced or blended into smoothies.
When storing amaranth microgreens, it is important to keep them dry and cool. They can be stored in the fridge for up to 5 days.

How to Store Amaranth Microgreens
Amaranth microgreens are a nutritious, delicately flavored addition to any meal.
Unlike other greens, amaranth microgreens do not need to be washed before storage. Simply trim the roots and remove any yellow or wilted leaves.
Place the greens in a container lined with a damp paper towel, and store in the refrigerator for up to four days.
When ready to use, simply snip off the desired amount and enjoy. Amaranth microgreens are an easy way to add flavor and nutrition to any dish.

Common Pests and Diseases of Amaranth Microgreens
Amaranth microgreens are also susceptible to several common pests and diseases.
Anthracnose
Anthracnose is a type of fungal disease that affects a wide range of plants, including amaranth. The fungus enters the plant through wounds or natural openings, and it can quickly spread throughout the plant.
Symptoms of anthracnose include yellow or brown leaf spots, wilting leaves, and premature death.
The disease is most damaging to young plants, which is why it is particularly problematic for amaranth microgreens. In addition to causing yield losses, anthracnose can also make the greens unmarketable.
To control the disease, it is important to practice good hygiene in the grow room and to promptly remove any infected plants. In addition, using a fungicide can help to prevent the fungus from spreading.
Pigweed Weevil
The pigweed weevil is a small, dark-colored beetle that feeds on the leaves of amaranth plants.
While the adults can cause some damage to the foliage, it is the larvae that are particularly destructive, as they can strip a plant of its leaves in just a few days.
In addition to causing aesthetic damage, the pigweed weevil can also weaken the plant, making it more susceptible to disease and stress.
The best way to control this pest is to regularly check amaranth plants for signs of damage and remove any affected leaves.
Additionally, keeping the area around the plants free from weed growth will help to reduce the number of weevils that are able to thrive. With proper care, it is possible to keep these pests under control and protect amaranth plants from serious harm.
Wet Rot
Amaranth microgreens are susceptible to a disease called wet rot, which can cause the leaves to turn yellow and collapse. The disease is caused by a fungus that enters the plant through wounds or cracks in the leaves.
Once the fungus has taken hold, it spreads rapidly, causing the leaves to wilt and eventually die.
Wet rot can be controlled by using fungicides, but the best way to prevent the disease is to water the plants carefully and avoid wounding the leaves.
Damping Off
One of the most common problems is damping-off, which is caused by a fungus that attacks young seedlings.
Damping-off can cause the seedlings to collapse and die. To prevent damping off, it is important to plant the seeds in well-draining soil and to keep the soil moist but not wet.
Aphids
Another common problem is aphids, which are small insects that suck the sap from plants.
Aphids can weaken the plant and make it more susceptible to other pests and diseases. To control aphids, use insecticidal soap or neem oil.
Powdery Mildew
Finally, powdery mildew is a type of fungal disease that can cause the leaves of amaranth microgreens to turn white or pale yellow.
Powdery mildew thrives in humid conditions, so it is important to water the plants early in the day so that the leaves have time to dry before nightfall. If powdery mildew does occur, treat it with a fung.
Amaranth Microgreen Recipes
Amaranth microgreens have a light, sweet flavor that pairs well with both savory and sweet dishes.
One of our favorite ways to enjoy amaranth is in a simple salad.
To make this Amaranth Microgreen Salad, start by mixing together 2 cups of amaranth microgreens, 1 cup of diced cucumber, and 1/2 cup of diced red onion.
In a separate bowl, whisk together 1/4 cup of olive oil, 1 tablespoon of white vinegar, 1 teaspoon of honey, and 1/4 teaspoon of salt. Pour the dressing over the salad and toss to combine.
This salad is best enjoyed immediately, but leftovers can be stored in the fridge for up to two days.
If you’re looking for a more substantial dish, amaranth microgreens also make a great addition to quinoa bowls.
We like to mix them into our Southwestern Quinoa Bowls along with black beans, corn, avocado, and a creamy cilantro lime dressing.
This dish is hearty enough to serve as the main course, but can also be enjoyed as a side dish or light lunch. Leftovers will keep in the fridge for up to four days.
How Long Does it Take to Grow Amaranth Microgreens?
Amaranth microgreens are one of the most popular types of microgreens and for good reason. They’re easy to grow and only take about 7-14 days to mature.
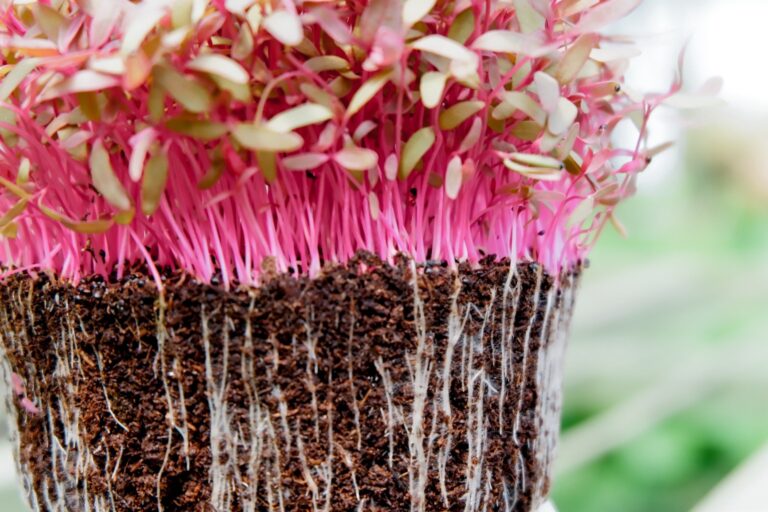
They have a mild flavor that can be used in salads, soups, smoothies, and more. In addition, amaranth microgreens are beautiful to look at, with their vibrant green leaves and red stems.
Whether you’re a beginner or a seasoned gardener, amaranth microgreens are a great option for your next crop.
Final Thoughts
If you’re looking for a fun and easy way to add nutrient-rich microgreens to your diet, amaranth is a great option.
These little plants are packed with vitamins, minerals, and antioxidants, making them an ideal addition to any meal.
And growing them is simple – all you need is a sunny spot in your garden or windowsill.
So why not give amaranth microgreens a try? Once you learn these tips, you’ll be able to grow healthy and delicious microgreens right at home.

Rebekah is a full-time homesteader. On her 22 acres, she raises chickens, sheep, and bees, not to mention she grows a wide variety of veggies. She has a huge greenhouse and does lots of DIY projects with her husband in her ever-growing homesteading endeavor. Learn more about Rebekah here.